Create a Home Assistant Automation to Control a Bathroom Fan When Humidity is High and Auto-Shutoff Timer
Automating a bathroom fan based on humidity levels is a common task you may want to do with your smart home devices. On the surface it seems like this may be a simple task, but what if you also want the fan to run for a predetermined amount of time to exhaust air out of the bathroom by pressing the switch? This adds more complexity to the automation since you want the fan to turn on under two different circumstances, and you do not want them to interfere with each other.
I spent some time wrestling with this automation for it to work well under both circumstances. When I first tried, I created two separate automations since that made sense to me. However, I found that combining the two scenarios into a single automation was the best way to control each set of actions in a way that will not interfere with each other. As I explain below, the key to making this all work is utilizing trigger IDs.
In this guide, I will demonstrate the automation using the web interface for automations rather than using YAML files since I think the web interface may be easier for new or less technical users. I will post the YAML generated by the web interface at the end in case you prefer to use the YAML as a starting point for your automation.
Disclaimer: There are a number of ways to create automations in Home Assistant. Some are much more elegant than others. This example is one way I found that works well enough for my needs and is not overly complex. I am providing the example to help give you some ideas on how you may want to implement your own automations. Automations are very personal in nature since they are designed to meet your specific household needs.
For the purposes of this guide, I am going to assume you have a humidity sensor and a smart switch wired to your bathroom fan.
Create Automation
To create a new automation, click on “Settings > Automations & Scenes > Create Automation”. Then choose “Create new automation” to start a new empty automation.
When creating automations, you need to define what will trigger (or start) the automation. For this automation, there will be two triggers: one based on humidity and the other based on the fan switch being turned on.
Humidity and Fan Switch Triggers
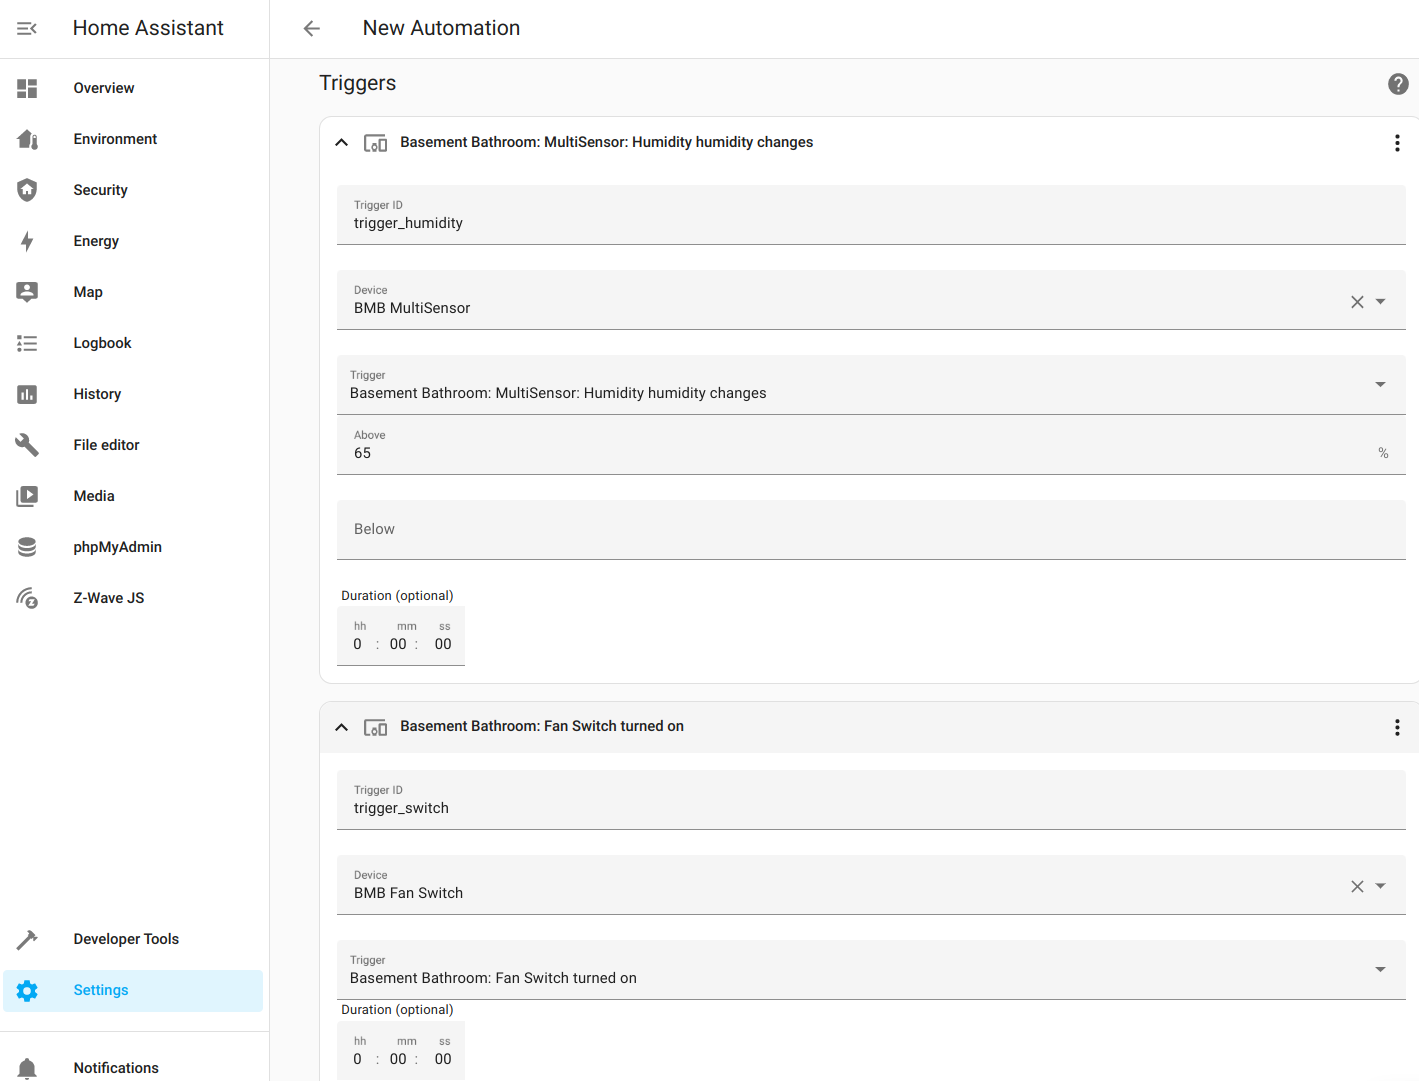
First up is the humidity trigger. Click on “Add Trigger” to create a new trigger. Choose “Device” and then select your humidity sensor from the “Device” dropdown box. You can make use of autocomplete to find your device name quicker. For the “Trigger” option, select something similar to “humidity changes”. The name of that trigger may vary based on your device.
For this example, I am going to use 65 as the “Above” percent value. You may want to use a lower humidity percentage depending on how soon or how often you want the fan to turn on. It may be helpful to watch your humidity values on the Home Assistant app while you turn on the shower to see when you would like the fan to kick on.
You may leave the “Duration” at zero so it will be triggered immediately.
This step is important: click on the 3 dots in the upper right hand corner of the trigger dialog box. Choose “Edit ID” so that you can enter a name for the trigger ID. This will be used later in the automation to define different actions based on what was triggered. For the “Trigger ID”, enter a value such as trigger_humidity.
Next is the fan switch trigger. Click on “Add Trigger” again to add a second trigger. Once again, choose “Device” and select your bathroom fan switch from the “Device” dropdown box. Then for the “Trigger” option, select similar to “switch turned on”. Click the 3 dots for the menu option of “Edit ID” and then enter something like trigger_switch for the “Trigger ID”.
Humidity/Fan Switch Action
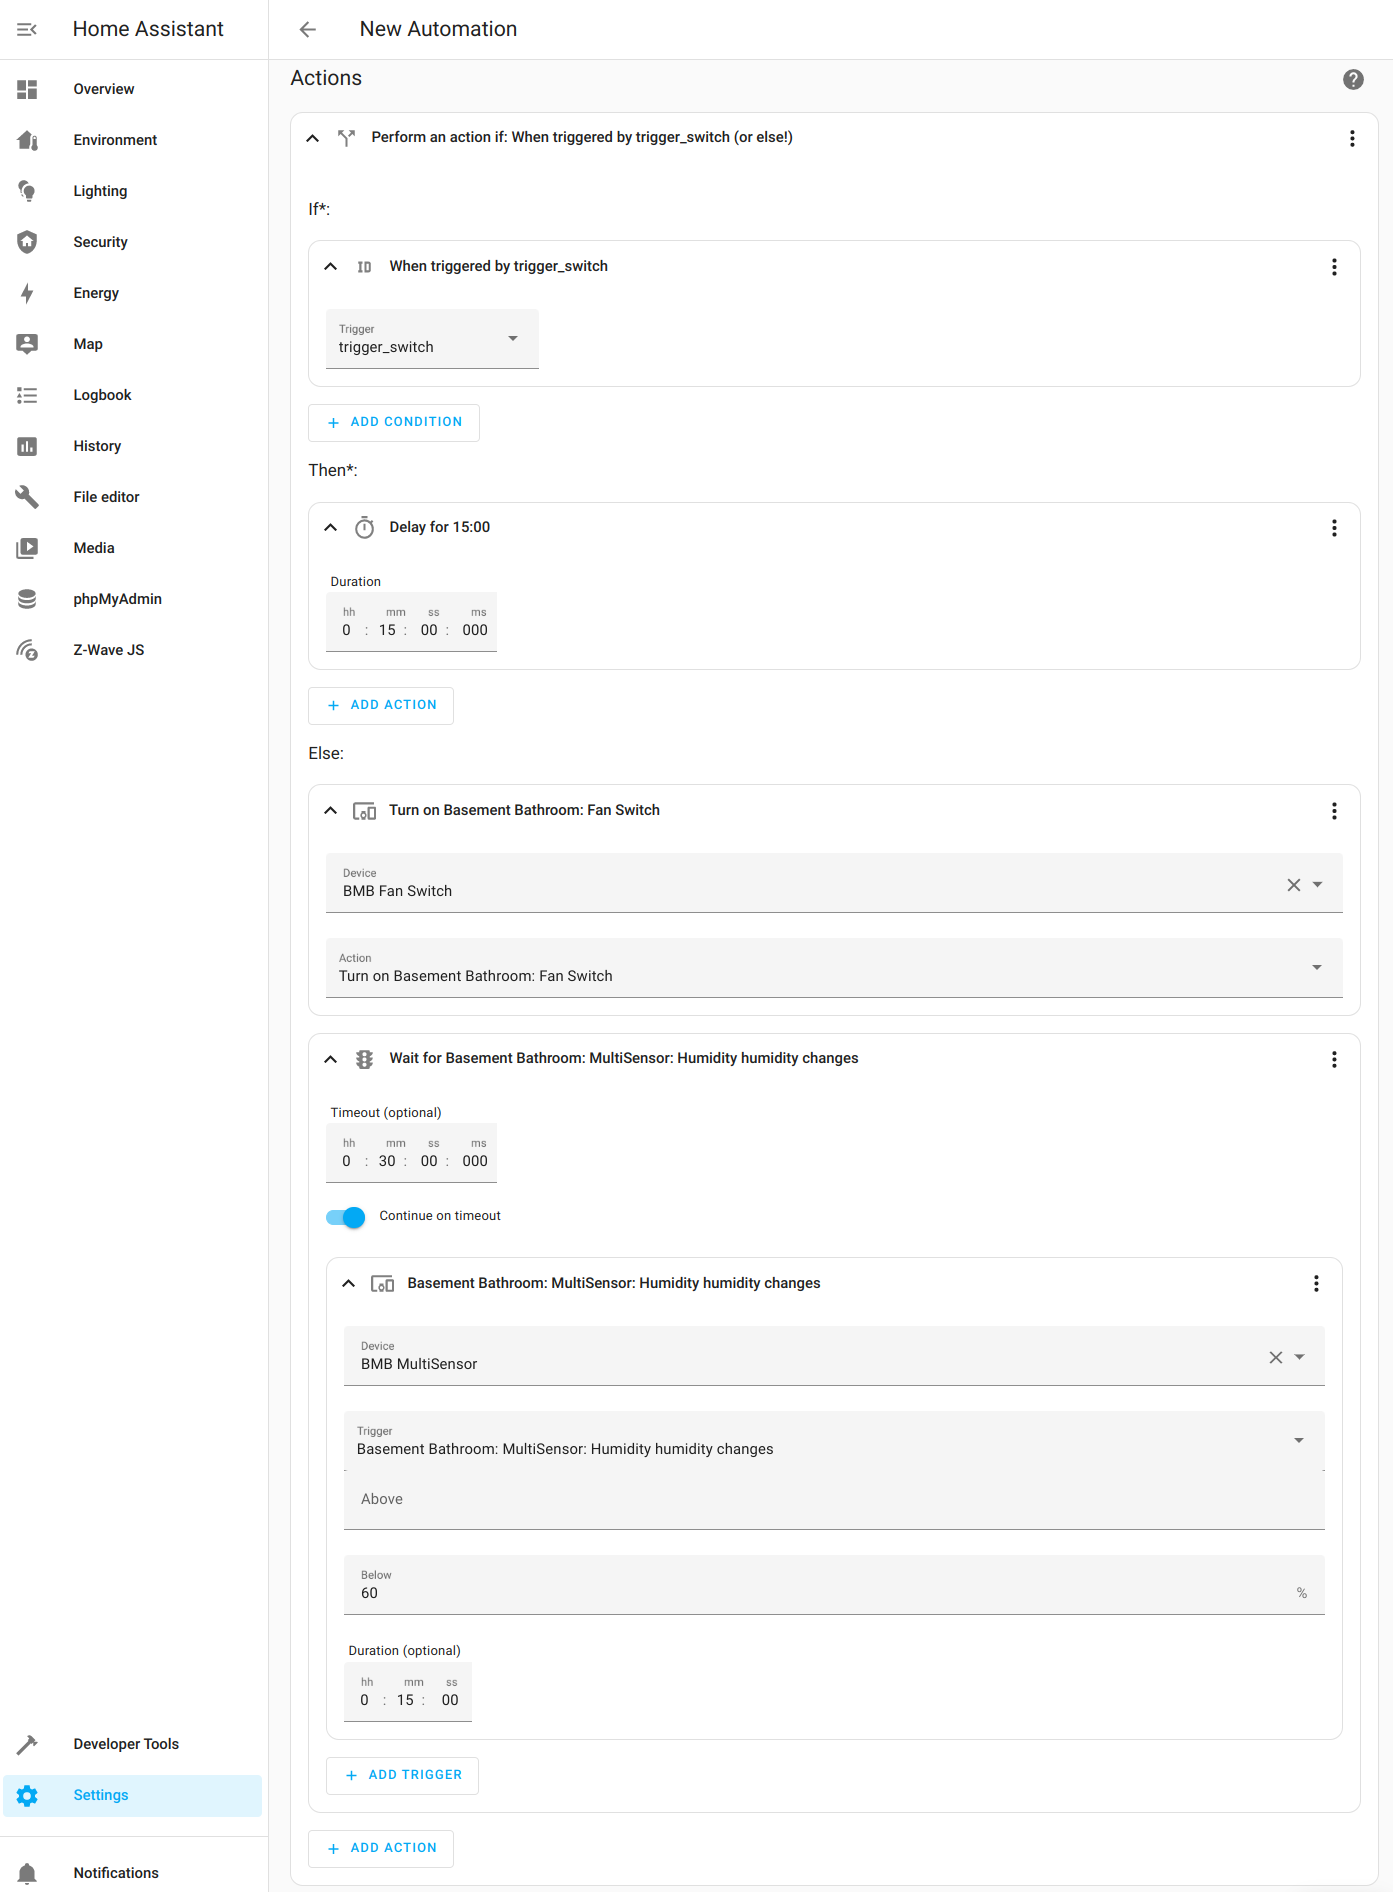
The main logic for this automation will occur in the “Actions” section where you set up all of the actions you wish to perform when the automation is triggered by the two scenarios defined above. Click on “Add Action” and choose “If-then” from the dropdown box.
Click on “Add Condition” and choose “Triggered by”. You can then select trigger_switch which is the trigger ID defined earlier. For the “Add Action” in the “Then” section, select “Wait for time to pass (delay)”. Enter 15 for the minutes (or your desired amount of time). This first condition occurs when you turn on the humidity switch manually. It essentially acts as a 15 minute timer for the fan.
Click on “Add else” in order to handle the second scenario with humidity. You do not have to pick the trigger ID since “else” is being used and we only have two triggers in this scenario. If the trigger ID does not match trigger_switch then it will execute the actions in the “else” section.
There are a couple of actions that will need to be added in this section. First, the fan switch needs to be turned on (since it was not manually turned on like the other scenario in this automation). Next, wait for the humidity to change below the configured level for a specified duration so the fan can then be turned off.
It is important to set a duration on the “wait” step because the humidity may quickly drop below the threshold once the fan is turned on and then the humidity will rise quickly again once the fan is turned off. The automation will trigger multiple times causing your bath fan to keep turning on and off in a short period of time, which is not ideal. I recommend setting the duration to something like 15 minutes to cover the maximum amount of time one may be taking a shower or bath. The automation will go beyond 15 minutes if the humidity is still high enough because of the duration for the “wait” action. If the humidity jumps above the threshold while waiting, the 15 minute duration resets which prolongs the amount of time the fan runs.
Click “Add Action” in the “Else” section, and choose “Device” and select the bathroom fan switch. For the “Action”, select “Turn on fan switch”.
Next, click “Add Action” again at the bottom of the “Else” section to add a second action. Choose “Wait for a trigger”. For the “Timeout”, enter 30 for the minutes so that you can have the fan shut off after a while if for some reason the humidity level according to the sensor is still not below the threshold. This timeout prevents the fan for running forever (in case the batteries in the sensor dies or the connection is lost to the sensor, etc.). You may set the timeout higher if you like. Click on “Add Trigger” and select “Device” so you can choose your humidity sensor. For the “Trigger”, select “Humidity changes” and enter 60 in the “Below” box (or your desired value).
Final Action
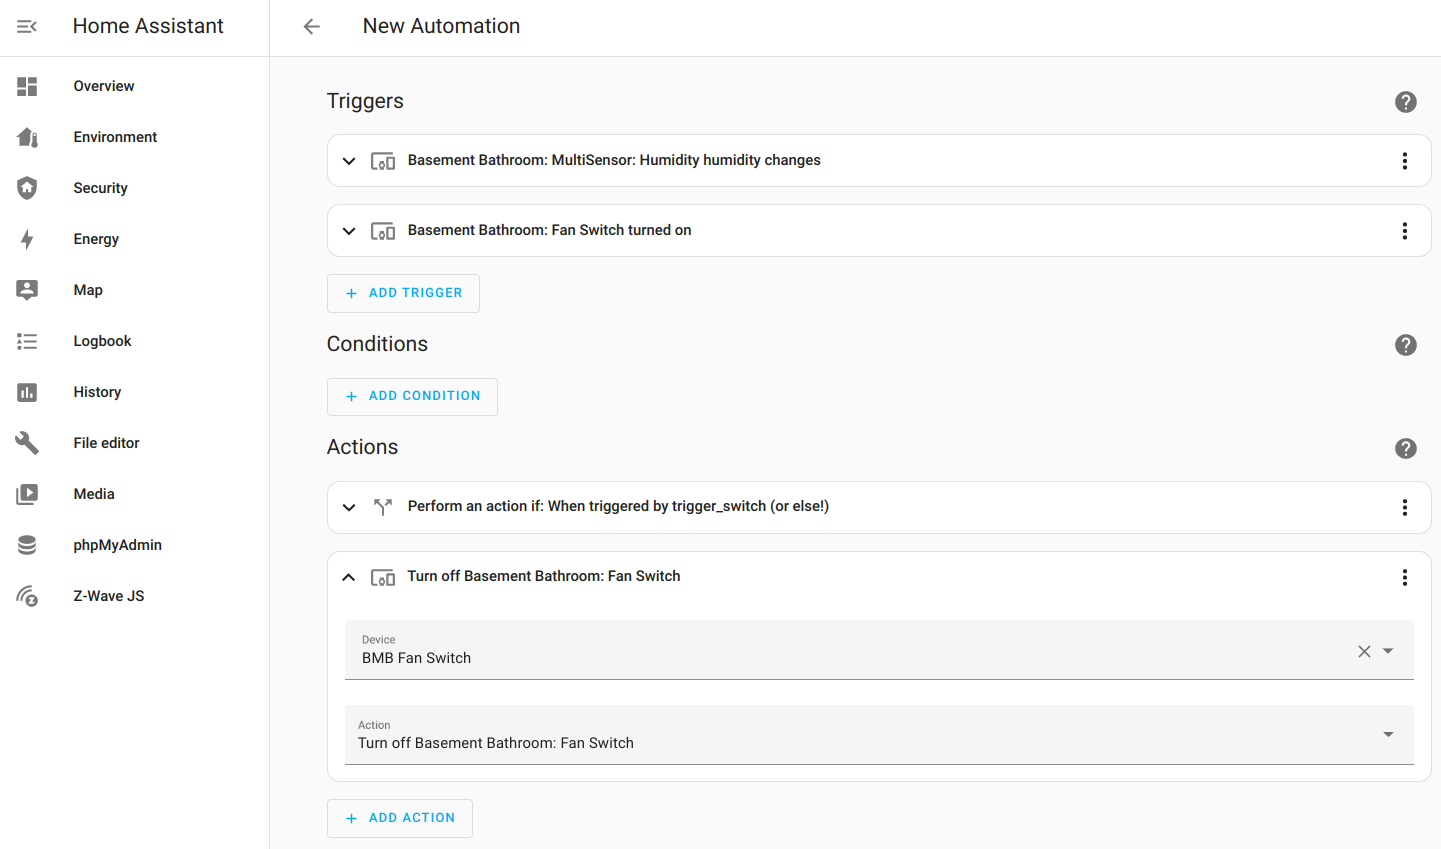
After finishing the first action which handled the actions of both triggers, the final action is to simply turn off the fan switch. Regardless of the initial trigger that turns the fan on, the end result for both scenarios is to automatically turn off the fan switch.
Click on “Add Action” at the bottom of the page (make sure you are not adding actions to the first main action – it can get confusing with all of the levels of logic but you may collapse the different levels so you can focus on the one you are currently working on as seen in the screenshot below). Simply select “Device” and select the fan switch so you can choose the “Turn off switch” action.
Save the Automation
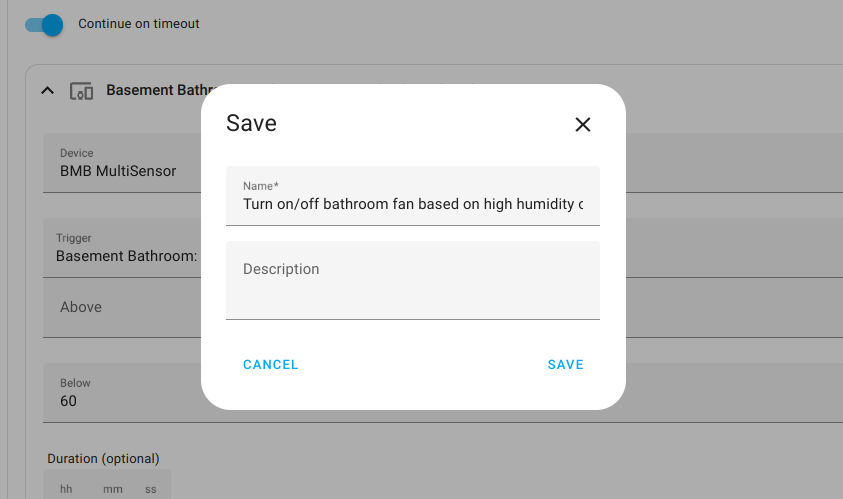
When you are finished, click the “Save” button at the bottom of the page. Enter a descriptive “Name” and an optional “Description” and click “Save”. Your automation should now be saved and enabled!
Set Default Auto Shutoff on Device Parameters (Optional)
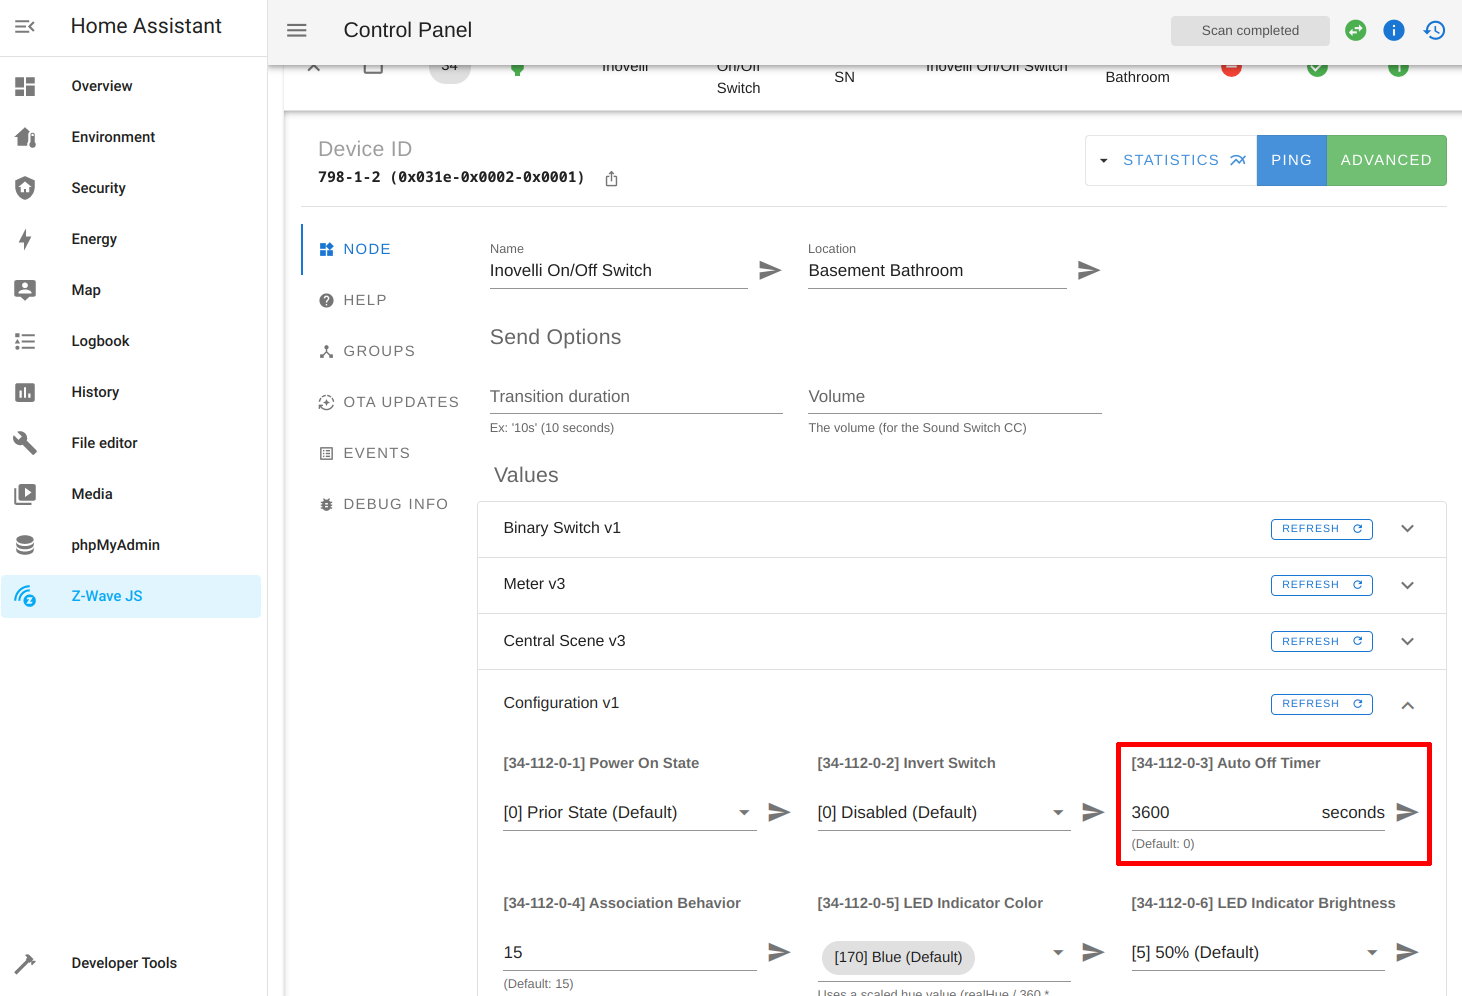
One step that I recommend that you should do depending on the type of smart switch you are using for your fan switch is to set a value for the auto shutoff timer in the device configuration. I am using a Z-Wave smart switch, and I am able to set various parameters directly on the switch to control specific behavior that does not require the use of a smart hub or automation software like Home Assistant.
If for some reason your smart home automation hub or software such as Home Assistant is down or is not functioning properly for whatever reason, your automations will not run. If an automation has already started executing when the hub goes down, whatever actions you wanted to complete during the execution of the automation will not be completed.
While that is not a big deal for the humidity level scenario (other than having a steamy bathroom) since the fan will not automatically turn on, the importance grows when you turn on the fan switch and expect it to shut off after 15 minutes, for example. If your hub is down, your fan will run continuously and waste energy. You may not realize it for many hours later or perhaps a day later if it is a bathroom you do not use very often.
One way to mitigate this issue is to set the auto shutoff timer value on your smart switch. You could set it for a time that is longer than your typical automation runs but short enough that you are not wasting a lot of energy. One suggestion would to set it to 1 or 2 hours. Since it is a fallback mechanism, it will not be often that your fan will have to run that long, but it is nice to have reassurance that the switch will shut off eventually on its own in a reasonable amount of time to minimize energy waste.
For my Z-Wave switch, you can see below where I have set the “Auto Off Timer” to 3600 seconds which is 1 hour.
Test Automation
Home Assistant allows you to run an automation by clicking on the menu to the right of each automation on the “Automations” dashboard. It essentially bypasses the triggers/conditions to fire off the automation. This may be useful for some automations to determine if the actions are working properly. However, you cannot test each individual trigger in this way since they are being bypassed.
Testing automations can be interesting because often times you actually need to physically trigger each scenario by simulating the conditions necessary for the automation to execute. For the auto fan shutoff scenario, testing the automation is as simple as turning on the switch and waiting 15 minutes to see if the fan turns off.
To test the humidity scenario, you could close your bathroom door and turn on your shower to build up humidity. If your bathroom is small, humidity may increase much quicker than you might think so testing if the fan will turn on automatically should only take a couple of minutes or less. Then you can watch the humidity levels to see if the automation will shut off the fan when the humidity drops below the configured value.
Since the two scenarios are combined into one automation and the mode is set to single by default, it is not possible for the two scenarios to interfere with each other. For instance, if the fan is turned on due to humidity and you later try to turn on the fan switch by pressing it to the “on” position (even though the fan is already on), the fan will not shut off after 15 minutes from the moment you pressed the switch since the automation is already in progress. A new automation process cannot be started until the first one finishes. That means if it is turned on by the humidity levels, it will turn off based on humidity which means it can run longer than 15 minutes if necessary. You may, of course, turn the switch off manually at any time if you want.
The opposite is also true – if you turn on the fan switch then it will run for 15 minutes regardless of the humidity levels. I think this behavior is ok because if I am taking a shower, it will turn on automatically and run as long as it needs to in order to drop the humidity to the desired levels. If I am manually turning on the fan, I am likely not taking a shower and just want to exhaust air out of the room to have fresh air, if you know what I mean.
YAML Code
Below is the YAML code which is created when using the web interface. If you are using this as a template to create your own automation, you would of course need to change the device and entity IDs to match your smart home devices:
alias: >-
  Turn on/off bathroom fan based on high humidity or after 15 minutes when the
  switch is turned on
description: ""
trigger:
  - type: humidity
    platform: device
    device_id: 6c4a7z711fc8dcb13cc9a4c49e463611
    entity_id: sensor.multisensor_6_humidity
    domain: sensor
    above: 65
    id: trigger_humidity
  - platform: device
    type: turned_on
    device_id: 0c82506b5e8ba0cf0b18c7a97e234a72
    entity_id: switch.inovelli_on_off_switch_3
    domain: switch
    id: trigger_switch
condition: []
action:
  - if:
      - condition: trigger
        id: trigger_switch
    then:
      - delay:
          hours: 0
          minutes: 15
          seconds: 0
          milliseconds: 0
    else:
      - type: turn_on
        device_id: 0c82506b5e8ba0cf0b18c7a97e234a72
        entity_id: switch.inovelli_on_off_switch_3
        domain: switch
      - wait_for_trigger:
          - type: humidity
            platform: device
            device_id: 6c4a7z711fc8dcb13cc9a4c49e463611
            entity_id: sensor.multisensor_6_humidity
            domain: sensor
            below: 60
            for:
              hours: 0
              minutes: 15
              seconds: 0
        timeout:
          hours: 0
          minutes: 30
          seconds: 0
          milliseconds: 0
  - type: turn_off
    device_id: 0c82506b5e8ba0cf0b18c7a97e234a72
    entity_id: switch.inovelli_on_off_switch_3
    domain: switch
mode: single
Related Posts

Use MariaDB instead of SQLite Database in Home Assistant
By default, Home Assistant uses a SQLite database to store all its historical data. However, you can use other databases such as MariaDB which perform better for larger datasets even though MariaDB is is heavier on hardware resources than SQLite.
Read more
How to Set Up Nginx Proxy Manager in Home Assistant
If you wish to have secure connections to Home Assistant, a reverse proxy may be used. The proxy can reside on the same system (as demonstrated in this guide) or on another system as I have demonstrated in a previous guide.
Read more
How to Put Home Assistant behind Existing Nginx Proxy Manager
A reverse proxy allows you to conveniently have a single entry point by which you may host multiple apps/services on one or more systems.
Read more