
Set up Z-Wave in Home Assistant
Once you have a fresh Home Assistant installation up and running, you will likely want to dive into configuring your smart home devices. Z-Wave is one technology you may consider using in your smart home especially if you want to have local control of your devices. Z-Wave has the advantage of not interfering with 2.4 GHz wireless since it works in the 900 MHz range (similar to the handheld portable landline phones – some of us grew up with those type of phones).
Before you can do any automation or control any smart devices, you must do some initial configuration before the fun can begin. Fortunately, the Z-Wave integration in Home Assistant has been greatly improved over the years. There are two different Z-Wave add-ons you may install. I will discuss the differences of each one so you can decide which add-on works best for you.
Purchase a Z-Wave Controller
Before continuing this guide, you will need to have purchased a Z-Wave controller that will act as the centralized Z-Wave hub for your Z-Wave network. Since Home Assistant is a DIY smart home solution, you do not need to purchase a hub such as Hubitat (affiliate link) . All you need is a dedicated low power system such as the Raspberry Pi, the official Home Assistant hub, or some other computer system. You may even run Home Assistant in a virtual machine on a server on your network. I personally run Home Assistant on my Proxmox server where I host all of my other apps and services on my network.
Once you have a system to run Home Assistant, to use Z-Wave you will need to purchase a Z-Wave controller. USB Z-Wave controllers are often the most convenient plug and play solution, but if you use a Raspberry Pi, you also have the option to use a Raspberry Pi hat such as the Z-Wave.Me RaZberry2 (affiliate link) .
I personally have used both the Aeotec Gen5+ (affiliate link) and the Zooz 700 Series (affiliate link) USB Z-Wave controllers. I decided to get the Zooz to take advantage of the 700 series features (better range, lower power consumption, etc), and the Aeotec 700 series controller was not available to purchase at the time. Not only that, I wanted to have an extra Z-Wave controller that I could use for the sole purpose of writing guides such as this without interfering with my main Home Assistant setup.
(Optional) Pass through the USB Device to your Virtual Machine in Proxmox
If you are using a virtual machine in Proxmox for Home Assistant like I am, you will have the extra step of passing through the USB device before you can use it with the Home Assistant virtual machine. This process will vary among different hypervisors/virtual machine managers if you are not using Proxmox.
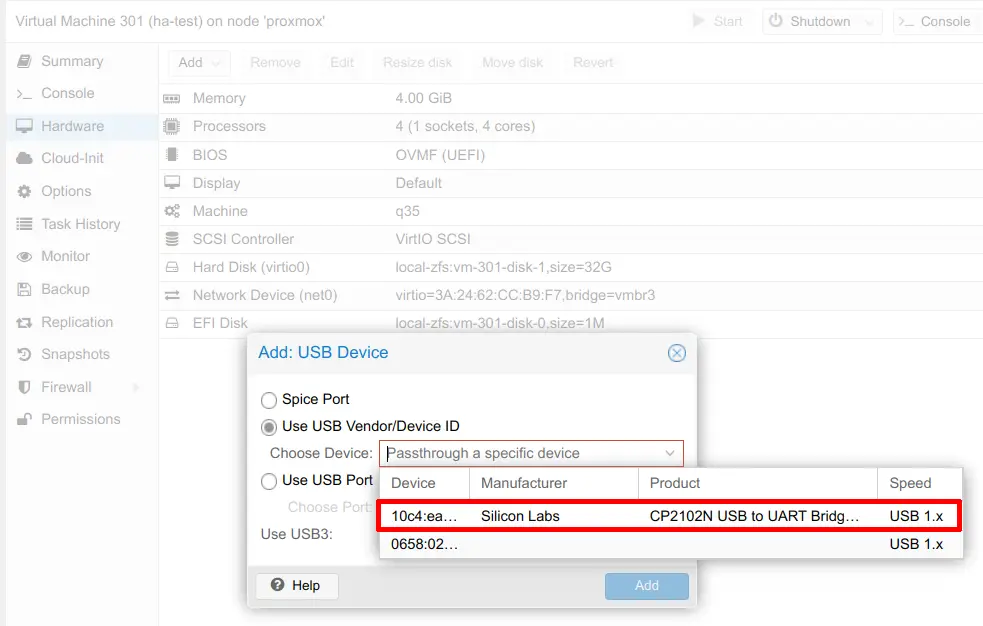
Choose a Z-Wave Add-on to Install
There are two Z-Wave add-ons for Home Assistant: Z-Wave JS and Z-Wave JS to MQTT. The Z-Wave JS is an officially supported add-on while Z-Wave JS to MQTT is a community add-on. At a high level, Z-Wave JS provides the standard options for Z-Wave support while Z-Wave JS to MQTT exposes more options and includes a feature rich control panel. More advanced users may prefer the Z-Wave JS to MQTT add-on.
The Home Assistant Operating System version of Home Assistant has a built-in add-on store, which makes installing add-ons very simple. I will assume you are using the OS version for this guide. If you are not using the OS version, you will have to set up the Docker container for each add-on manually.
Add-on #1: Z-Wave JS
Z-Wave JS is available in the “Official add-ons” section of the add-on store. If you choose this add-on, please continue the steps below. Otherwise, skip to the Add-on #2: Z-Wave JS to MQTT section below.
Install Z-Wave JS
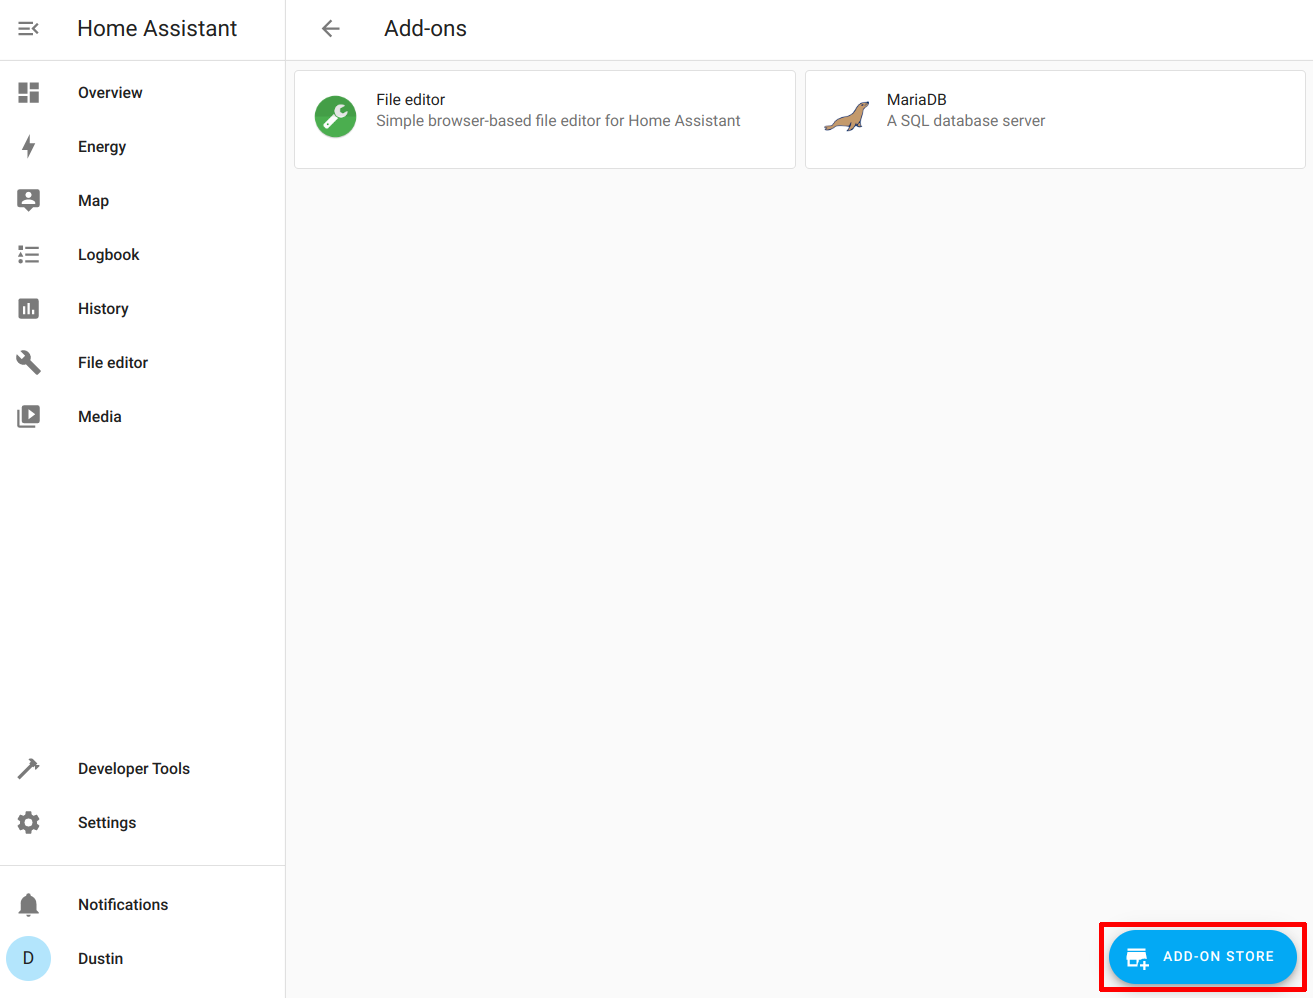
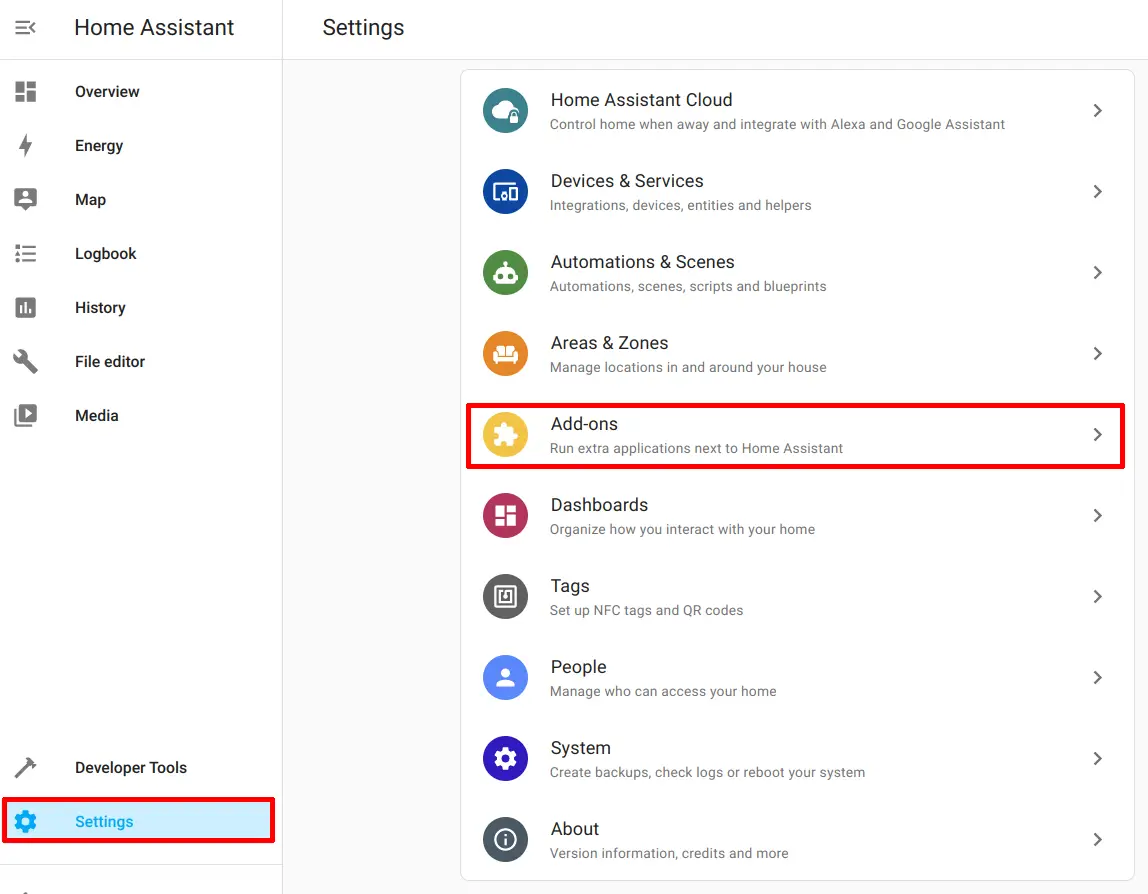
To install the Z-Wave JS add-on, go to the “Settings > Add-ons” page.

Click on the “Add-on Store” button.
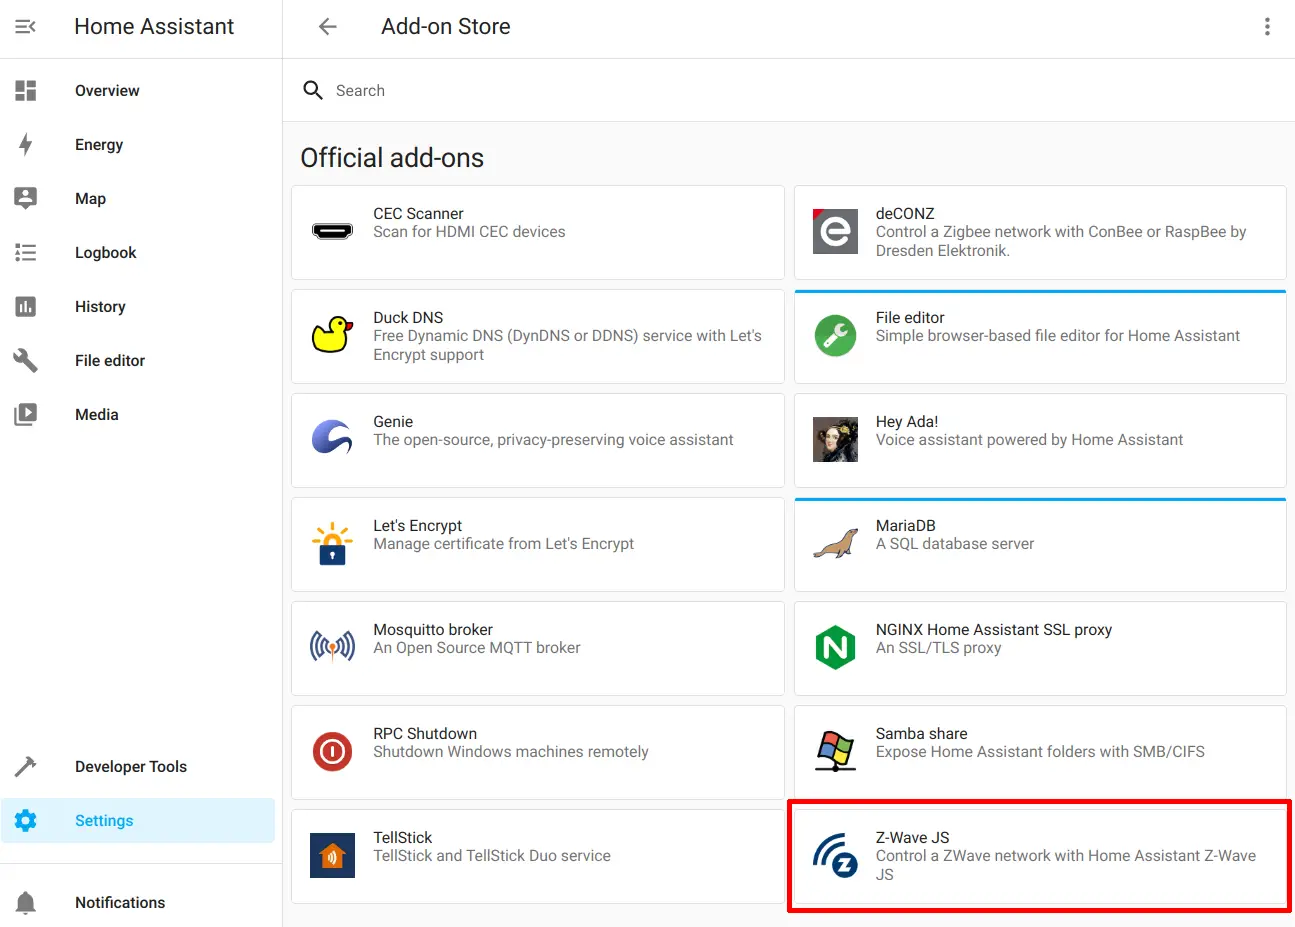
Find the Z-Wave JS add-on and click on it.
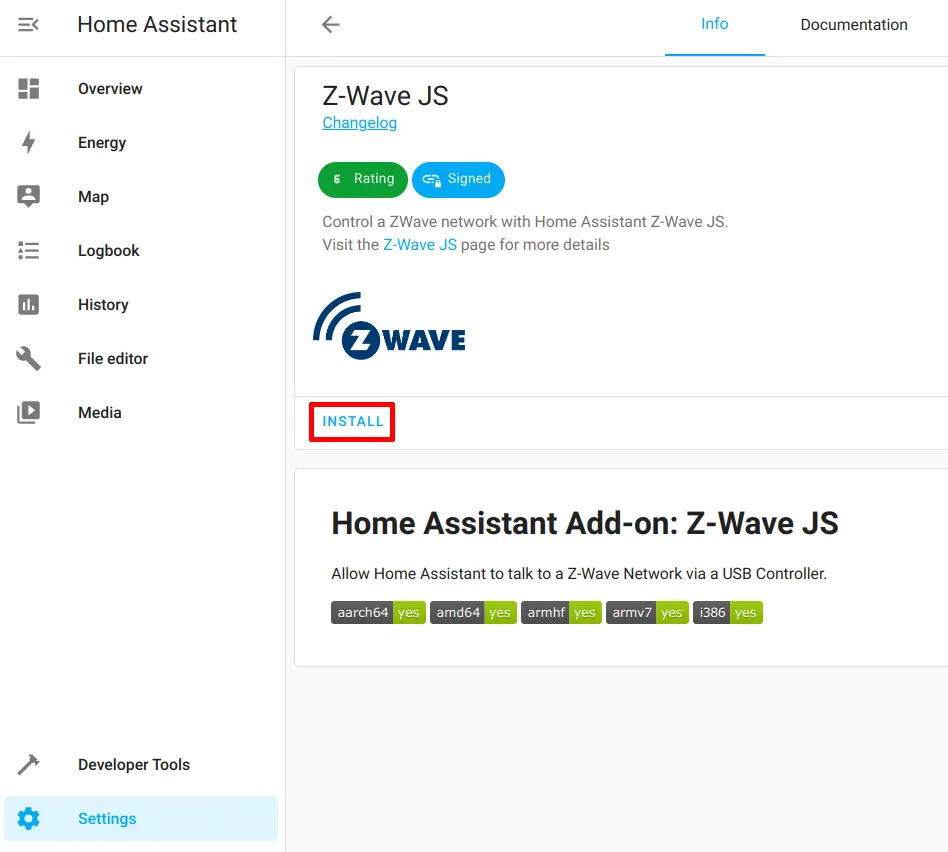
Simply click the “Install” button.
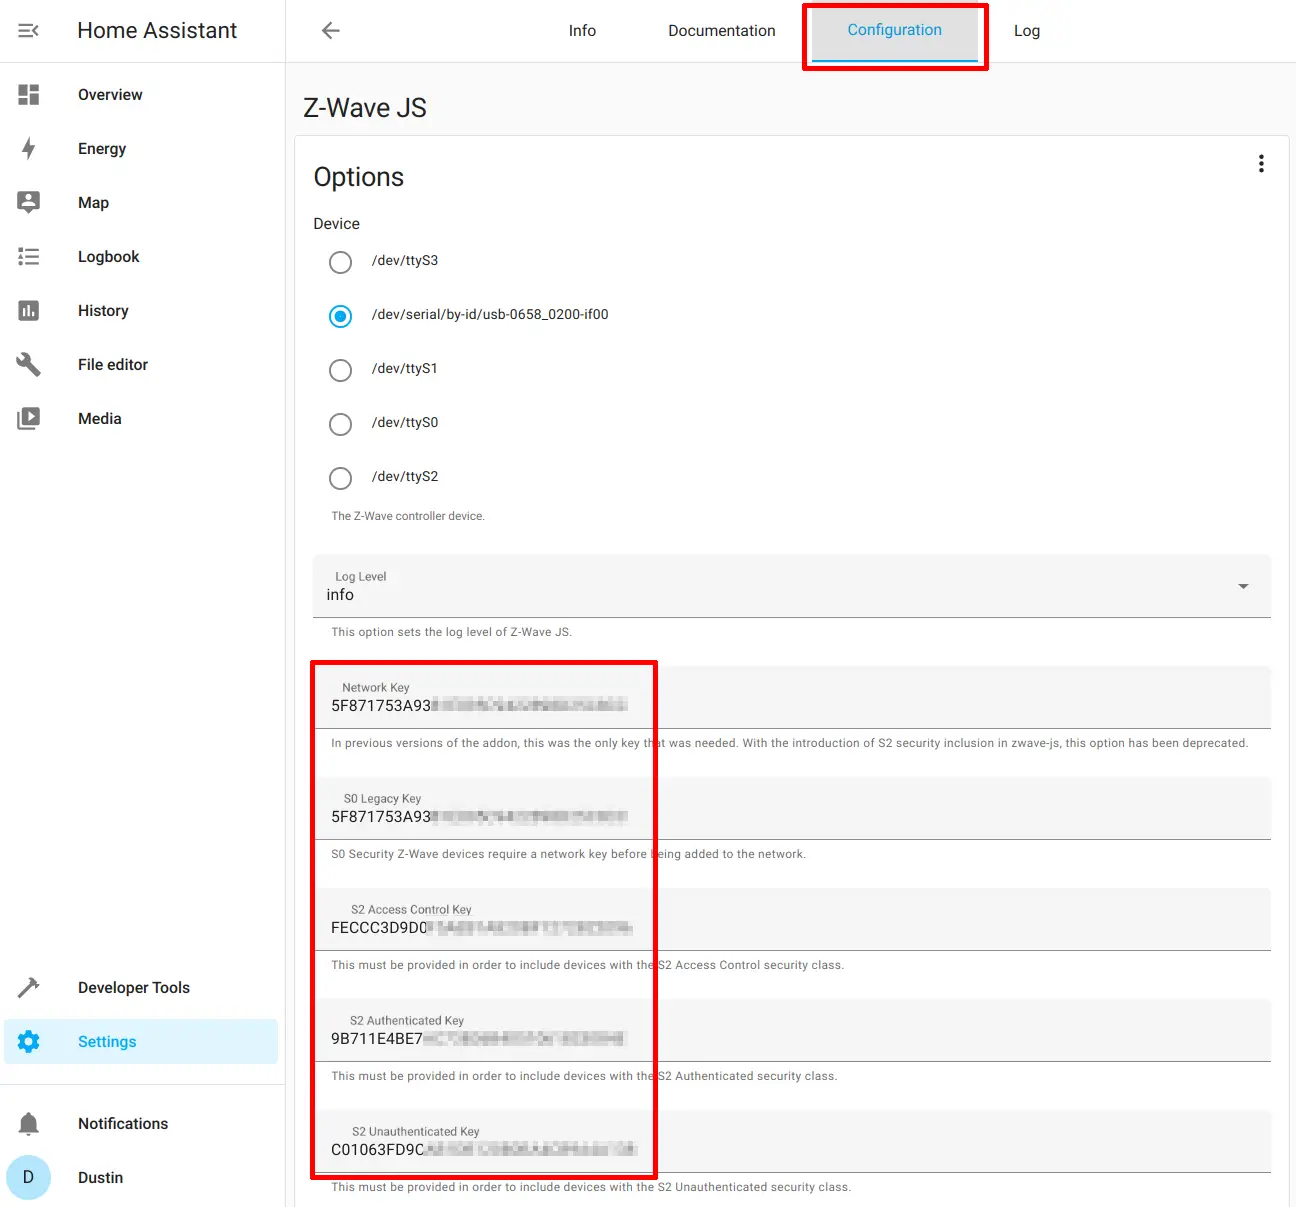
After the add-on is installed, go to the “Configuration” tab which will be displayed above the current Z-Wave JS add-on page. You will need to select the USB device for your Z-Wave controller. Fortunately, you do not need to type or copy/paste the device as it will be displayed automatically. Leave all of the authentication keys blank since they will be generated automatically when you start the Z-Wave add-on. Click the “Save” button.

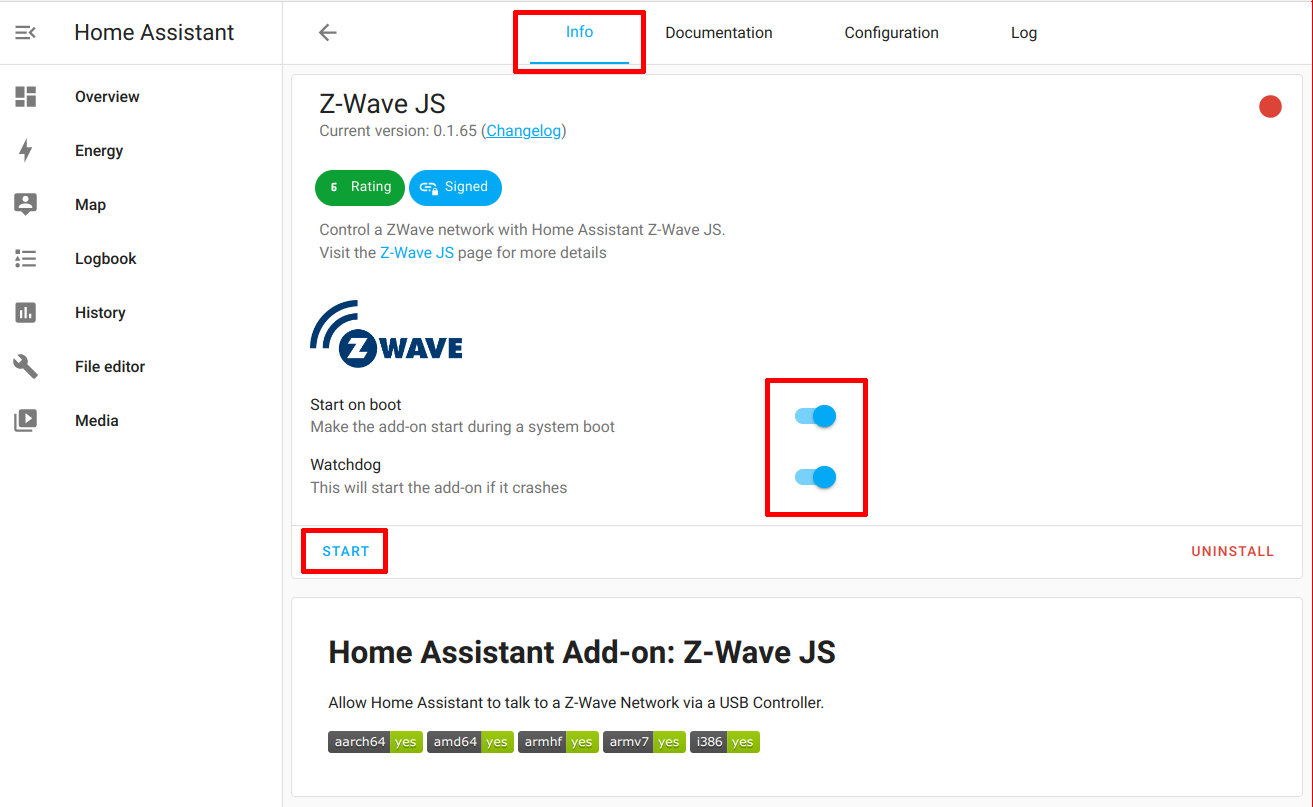
Go back to the “Info” tab. You will want to make sure the add-on starts on boot and enabling the watchdog is also a good idea so the add-on can be restarted automatically if it crashes. Click the “Start” button to load the add-on.
To verify that the security keys are automatically generated, go to the “Configuration” tab. You should be able to see the generated keys. It is possible you may need to refresh the page in order for it show all the values.
Configure the Z-Wave JS Integration
Even though you installed and configured the Z-Wave add-on, you will need to configure the Z-Wave integration. This step is not immediately intuitive if you are new to Home Assistant. I assumed installing the add-on would be enough. However, the integration is necessary so that you can add/remove devices from your Z-Wave network, and once the devices are added, they will automatically be included on the default “Overview” dashboard page.
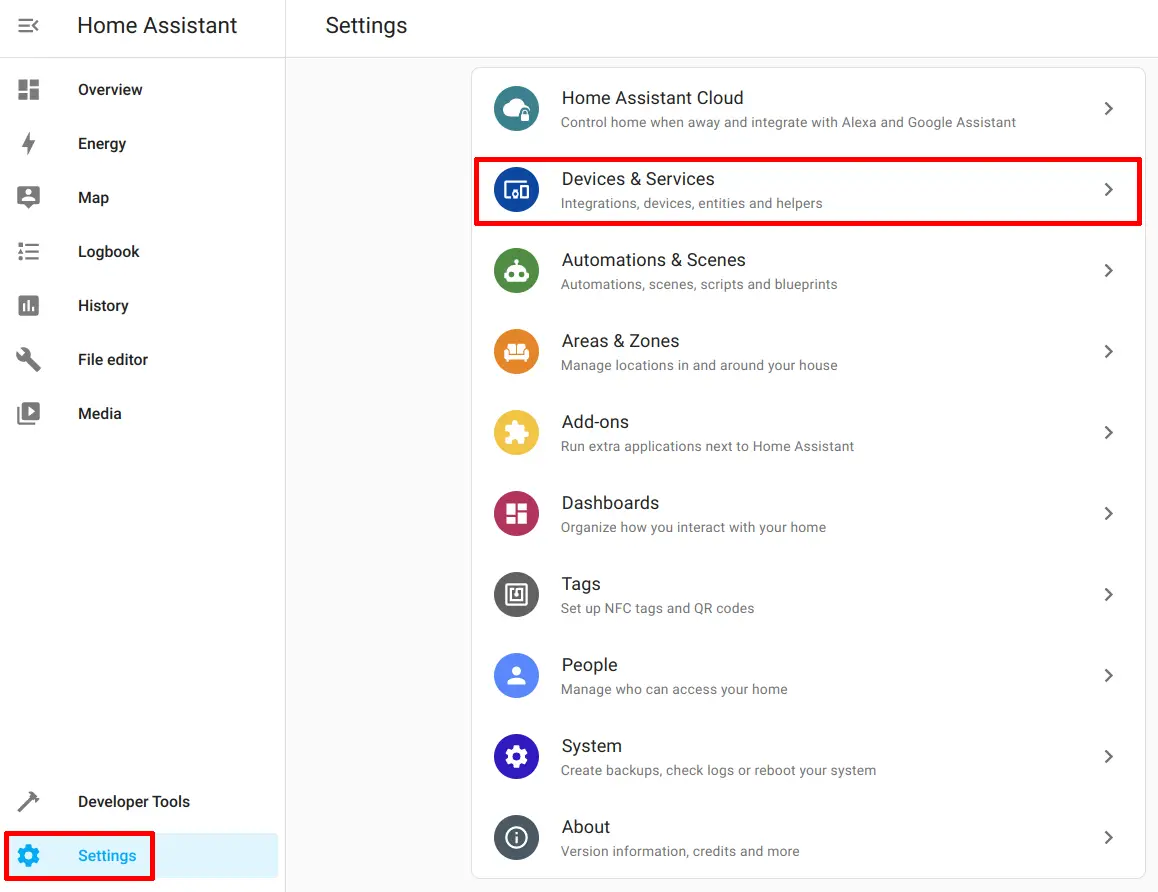
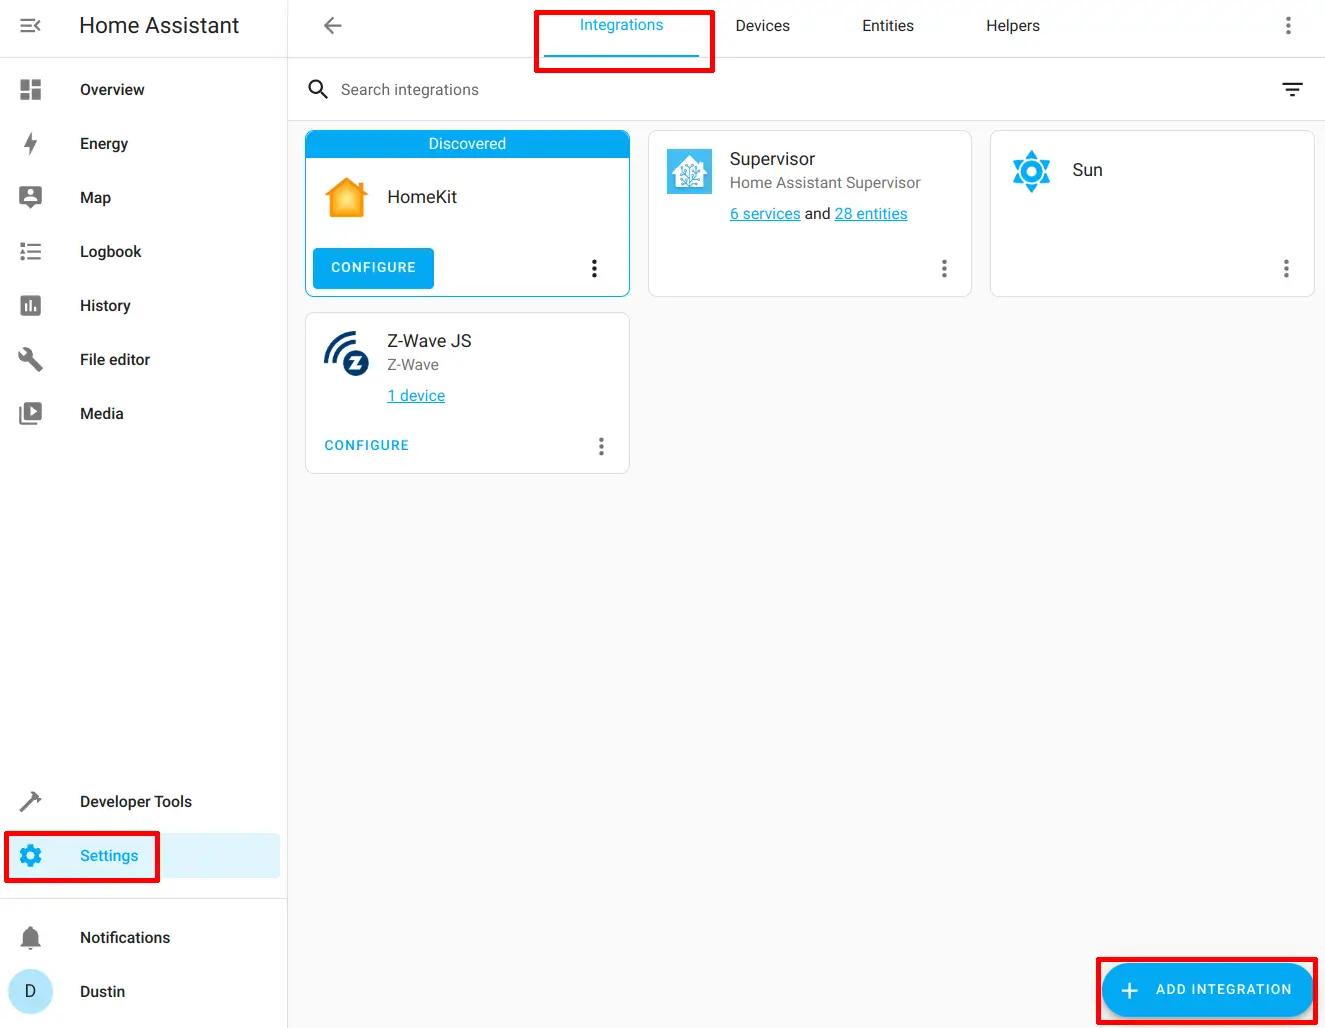
Go to the “Integrations” tab on the “Settings > Devices & Services” page to configure the Z-Wave integration.
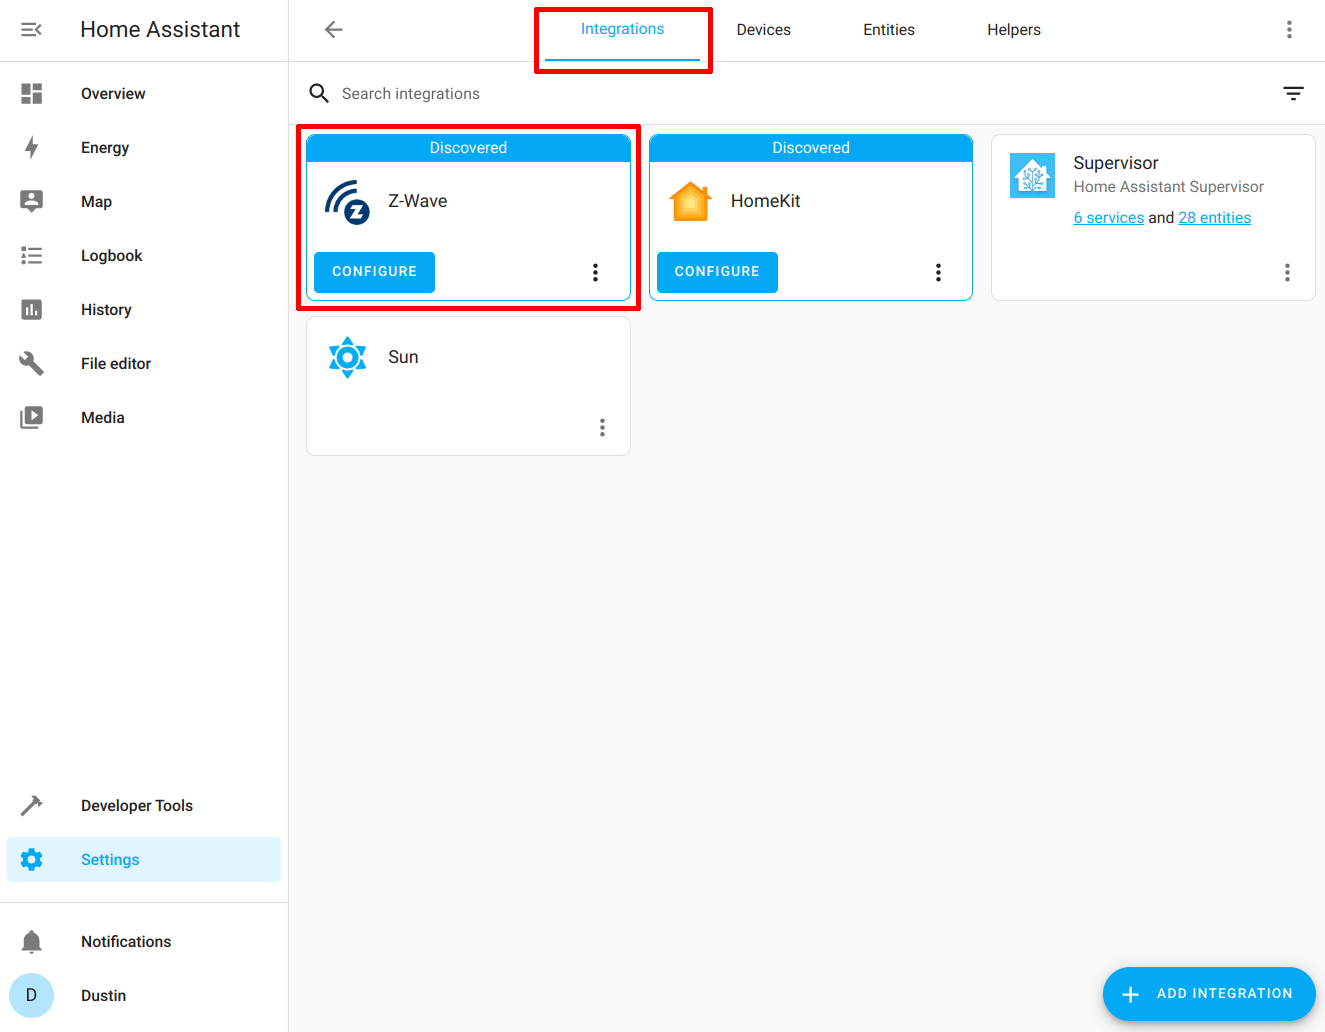
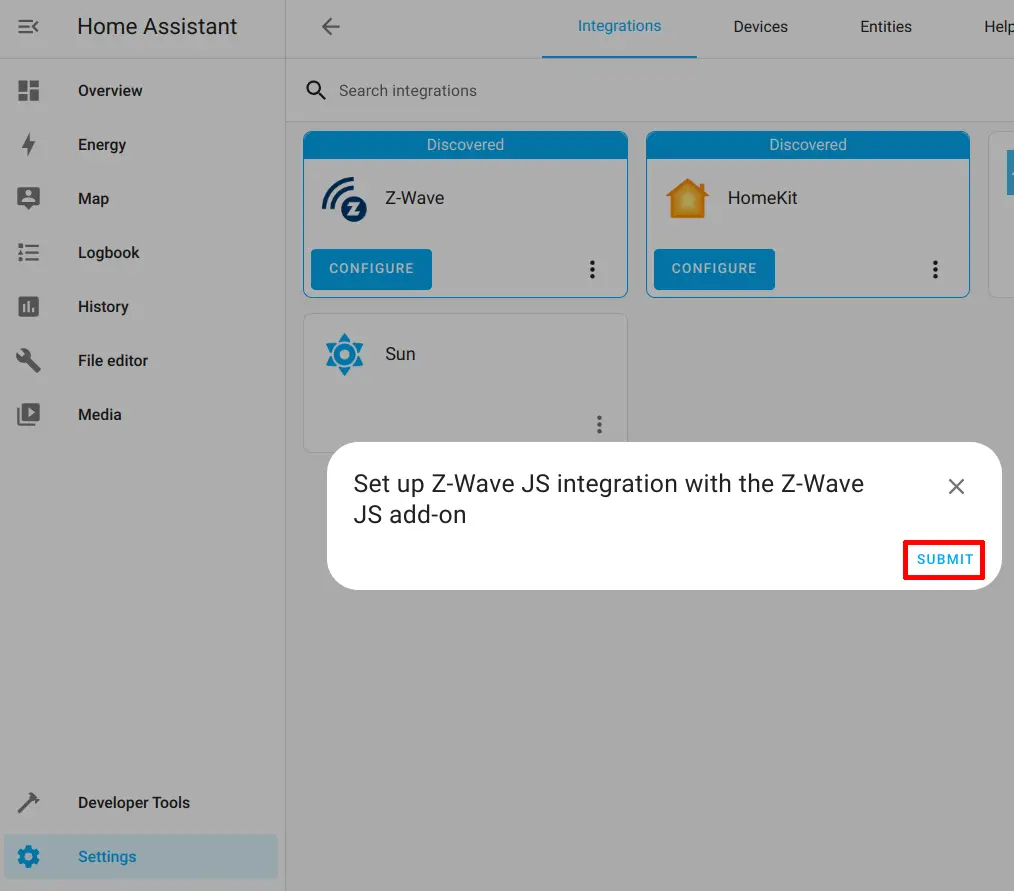
In the “Integrations” tab, there should be an auto-discovered “Z-wave” integration displayed. If you do not see the auto-discovered integration, you may need to reboot Home Assistant (or you may manually install the integration by clicking on the “Add Integration” button and search for “Z-Wave”). Click on the “Configure” button to set up the integration.
After clicking “Configure” or after searching for the Z-Wave integration after clicking “Add Integration”, click “Submit” to get started with the configuration.
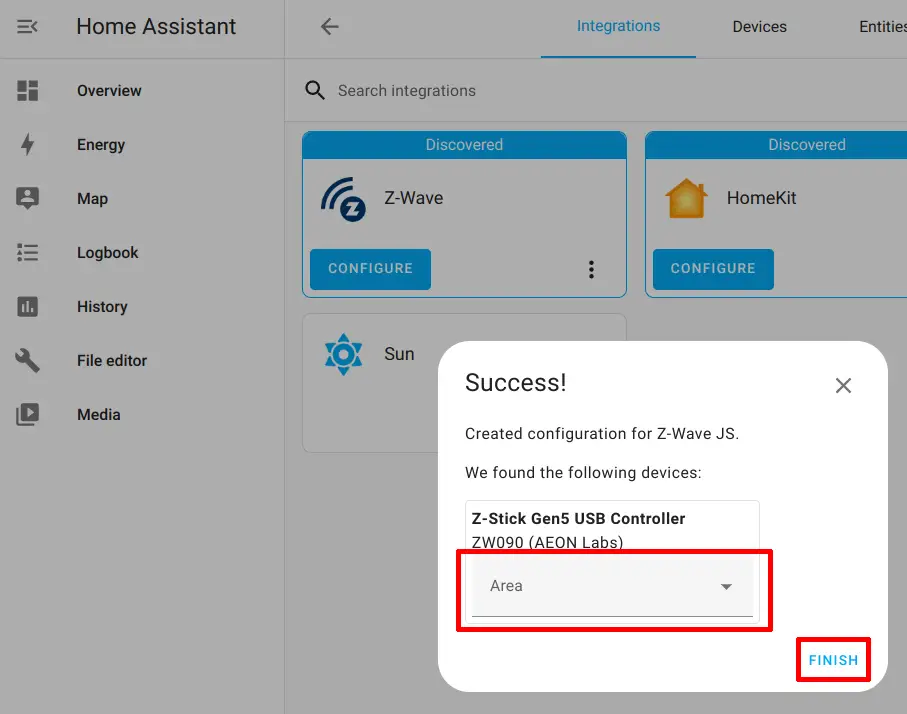
The only thing you need to configure is the “Area” where your USB Z-Wave device is located. You can create custom locations if none of the default locations match the actual location in your home. It is useful to create meaningful and descriptive areas because it helps group your devices on the default “Overview” dashboard. Click “Finish” to complete the configuration.
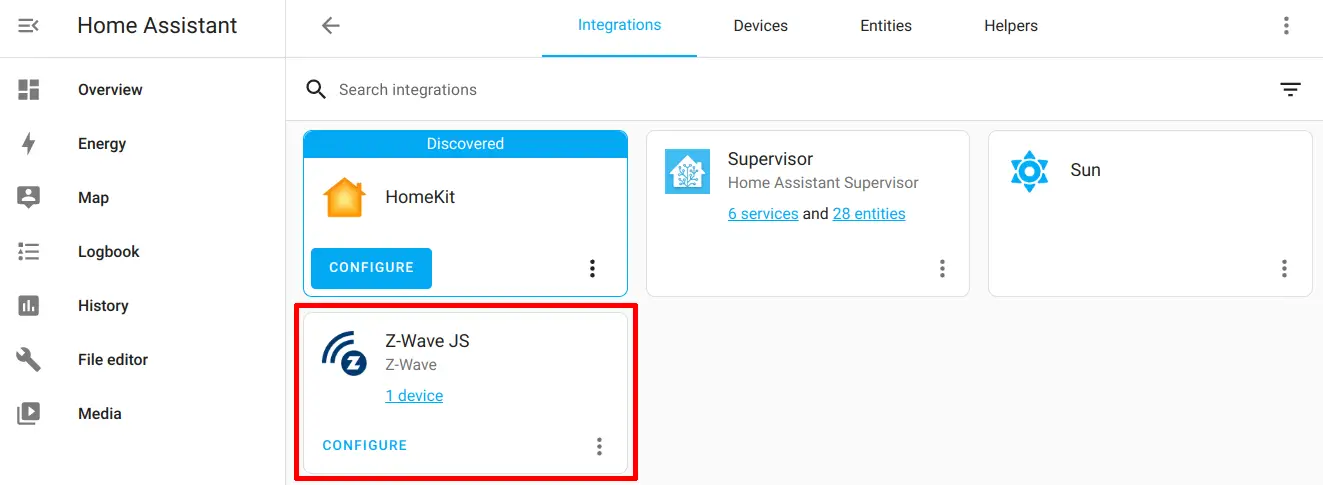
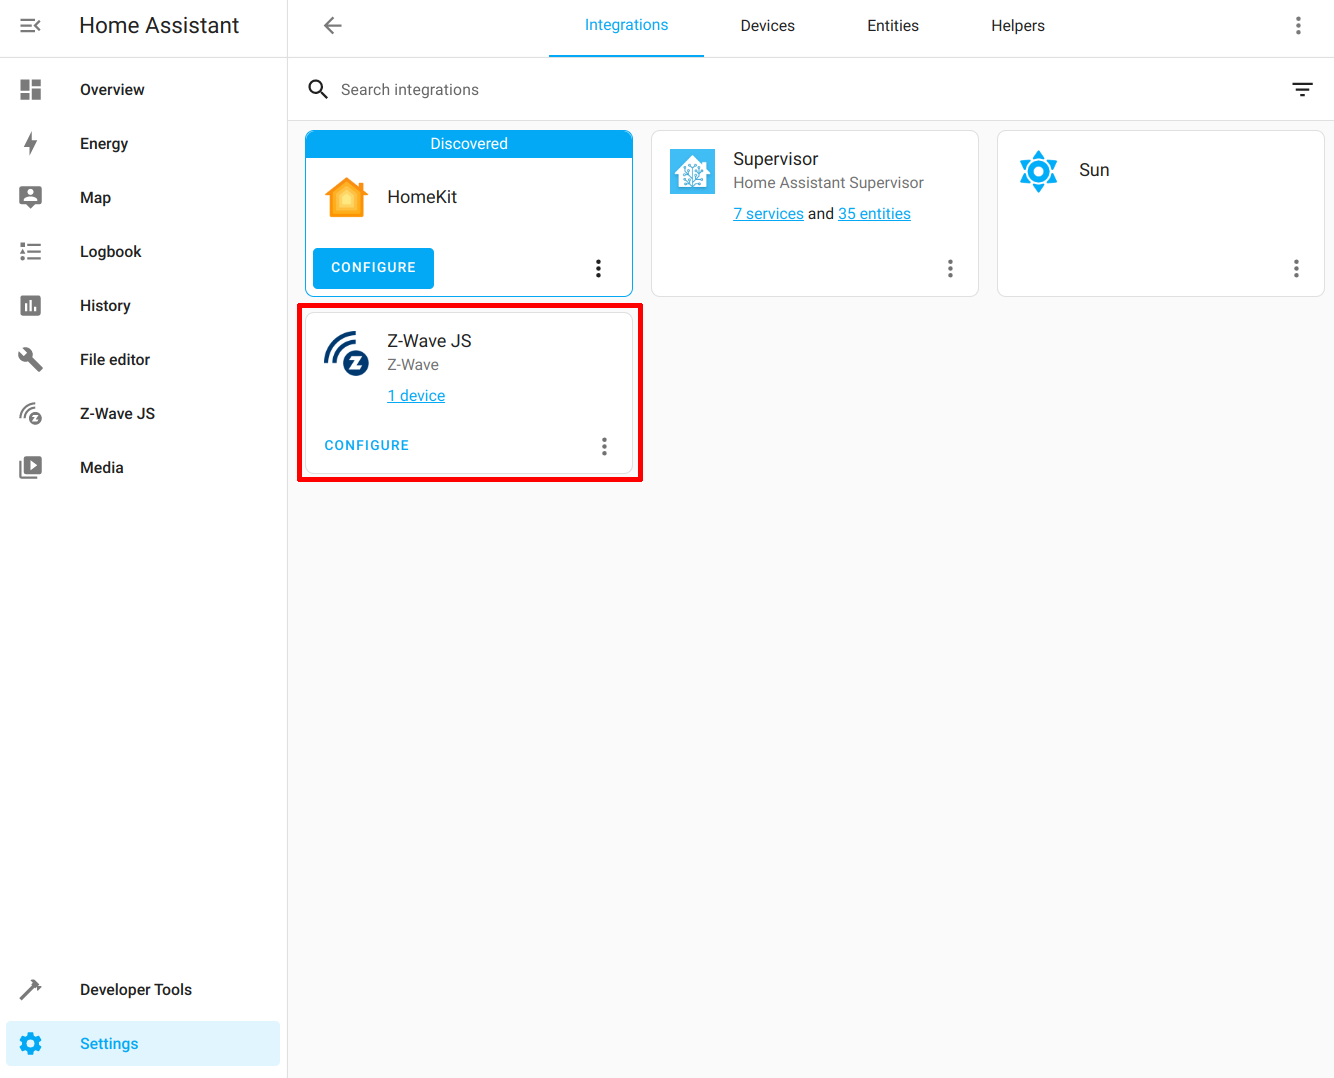
You will see that the integration no longer shows as “Discovered” and is installed along with any other integrations you may have installed.
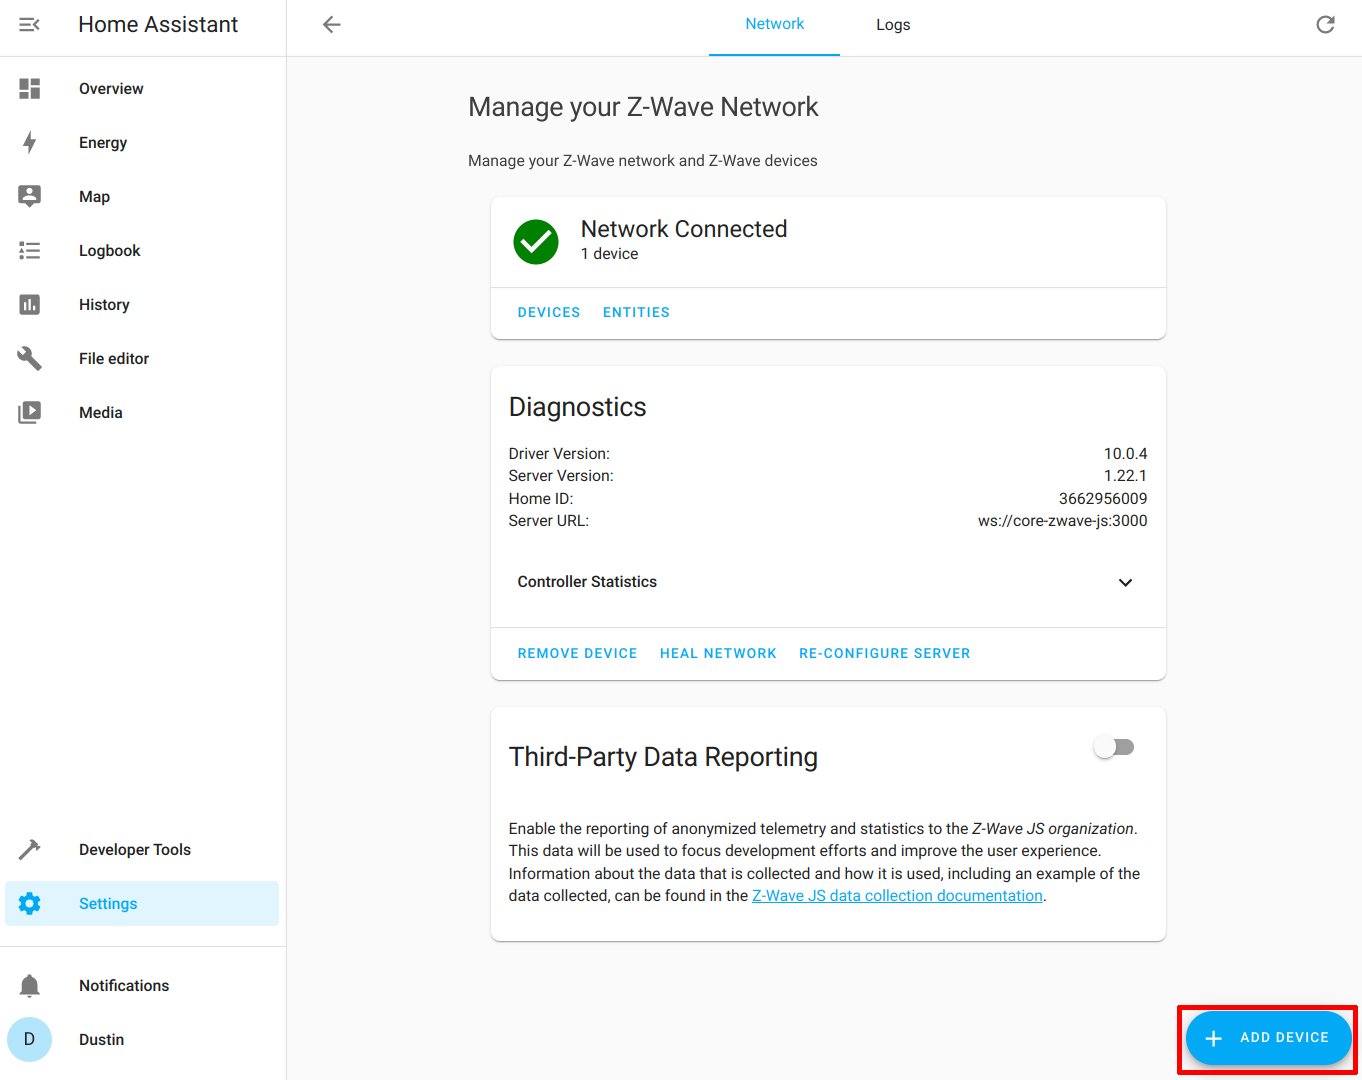
Include a New Z-Wave Device on Your Z-Wave Network
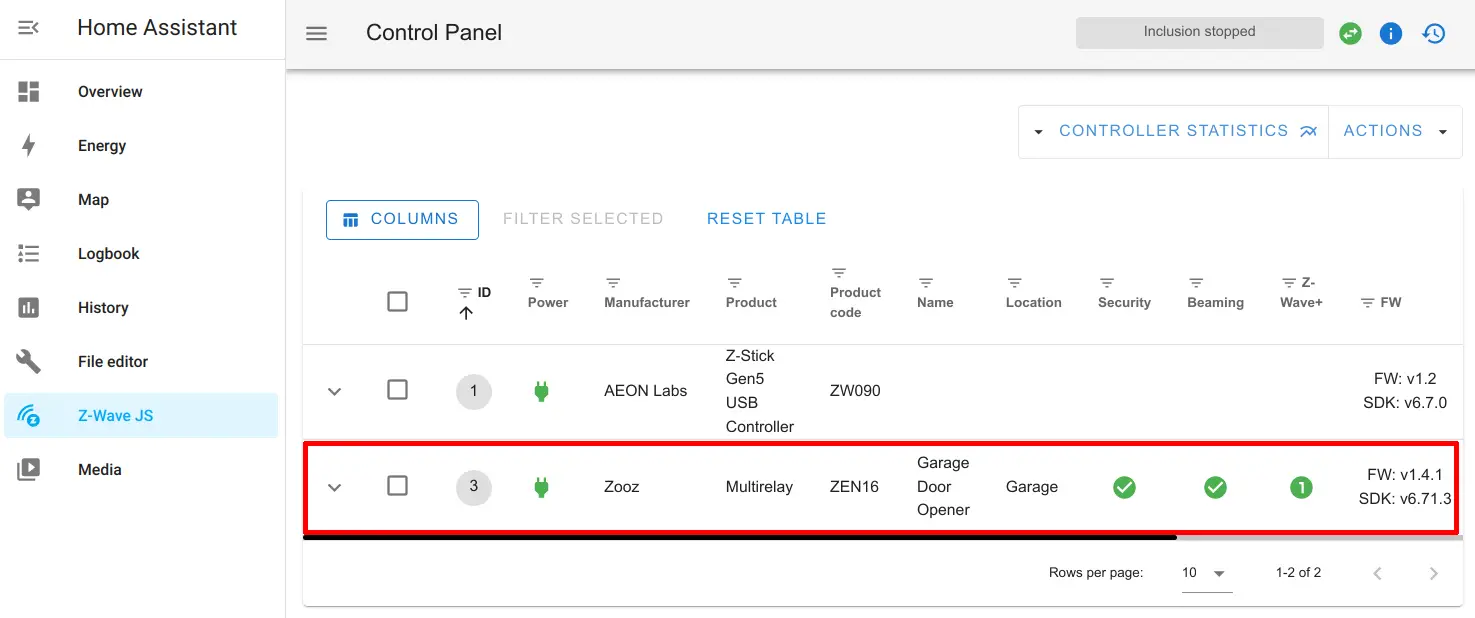
With the Z-Wave JS add-on and the Z-Wave integration set up, you can now finally add any Z-Wave device of your choice! For my example, I am going to include a Zooz ZEN16 multirelay switch.
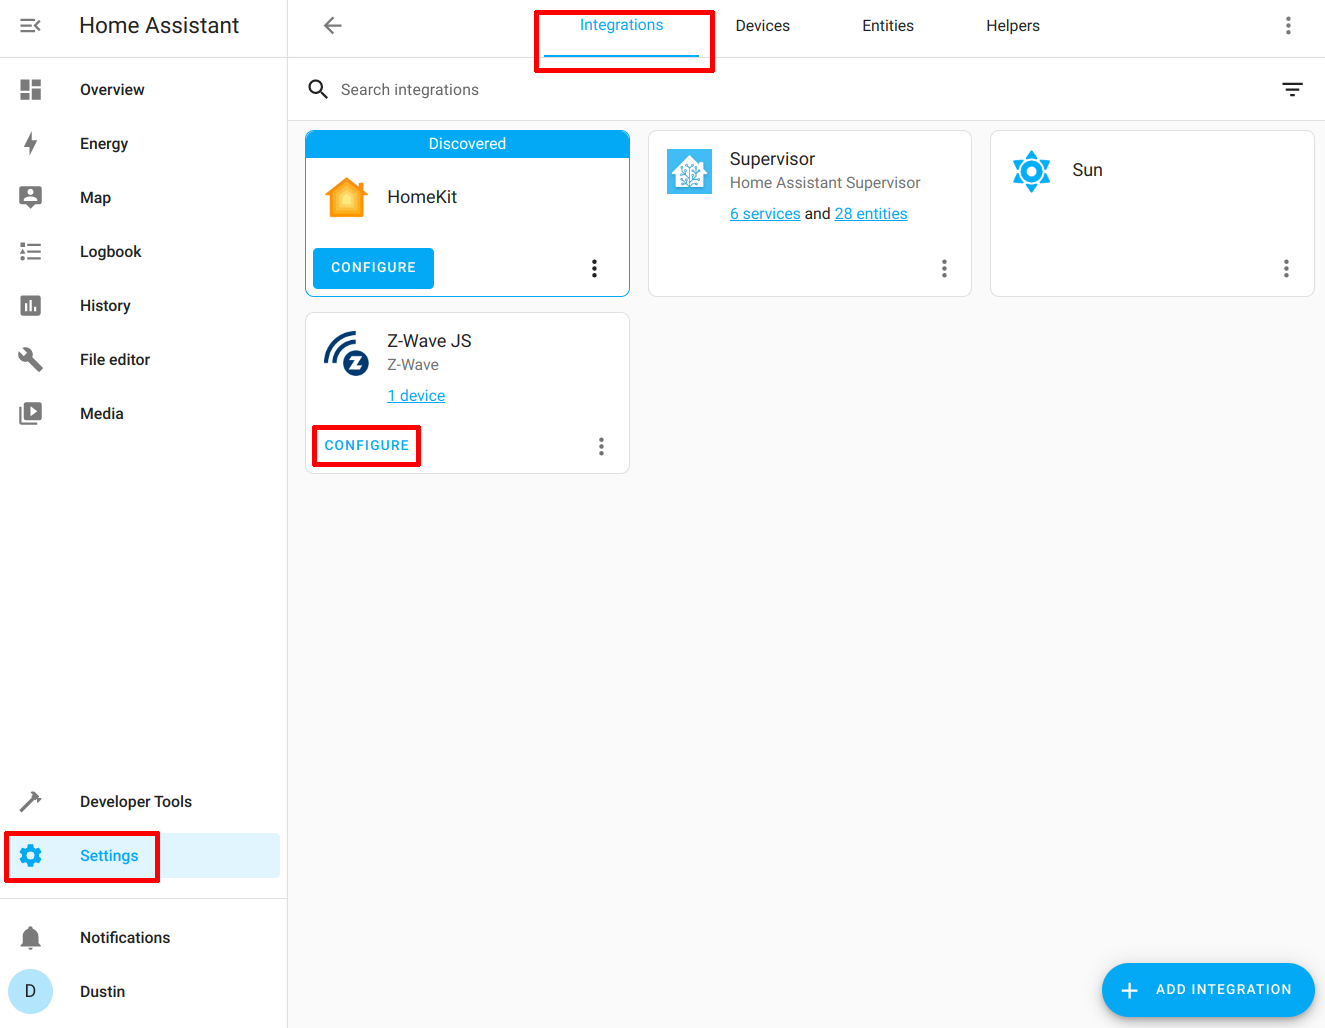
On the “Integrations” tab on the “Settings > Devices & Services” page, click on the “Configure” button for the Z-Wave JS integration.
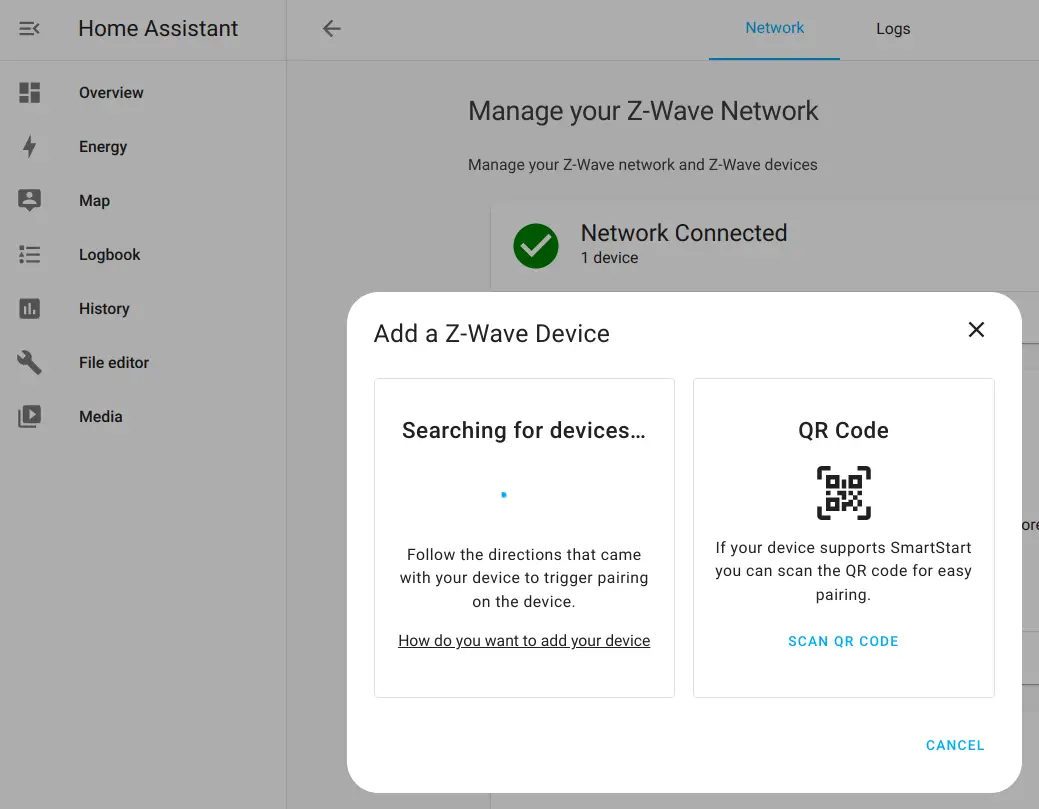
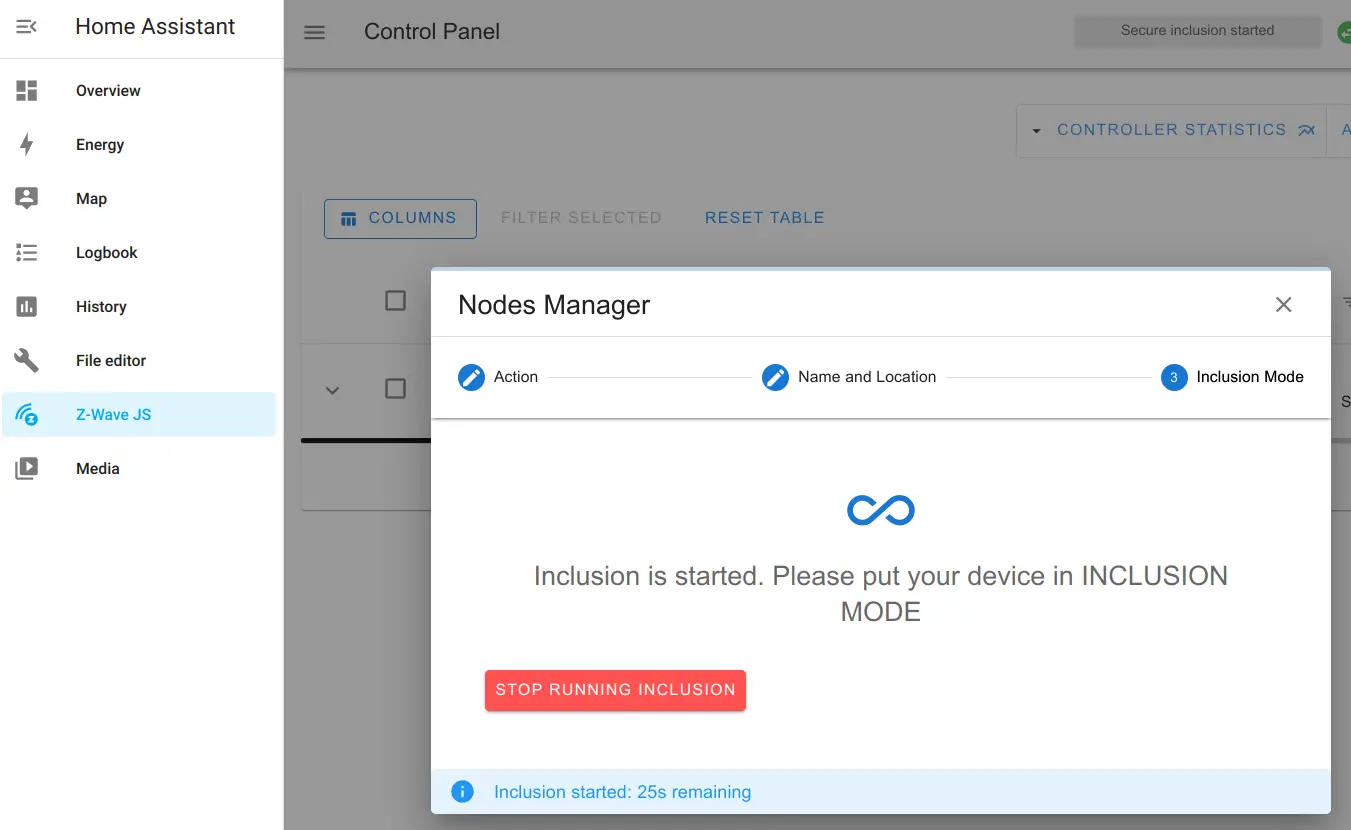
Next, click “Add Device” to start the process of adding a new Z-Wave device to your network.
While in “inclusion mode”, you need to push a button (often multiple times) to add the device to your network. This can vary between Z-Wave devices so you should consult the manual to know how to include your device. For the Zooz ZEN16, I have to push the Z-Wave button on the device 3 times quickly to add it to the network.
There is also an option to scan a QR code, which is convenient if you have the Home Assistant app installed on a device such as your phone. You will need to set up a secure connection to Home Assistant in order to use QR codes.
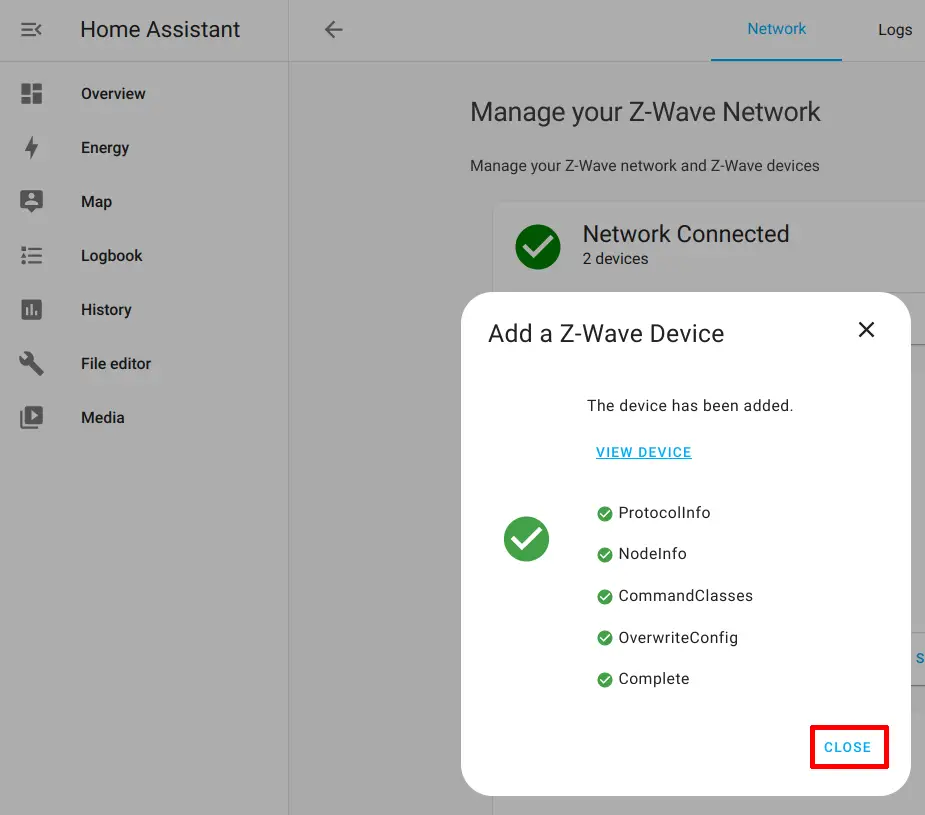
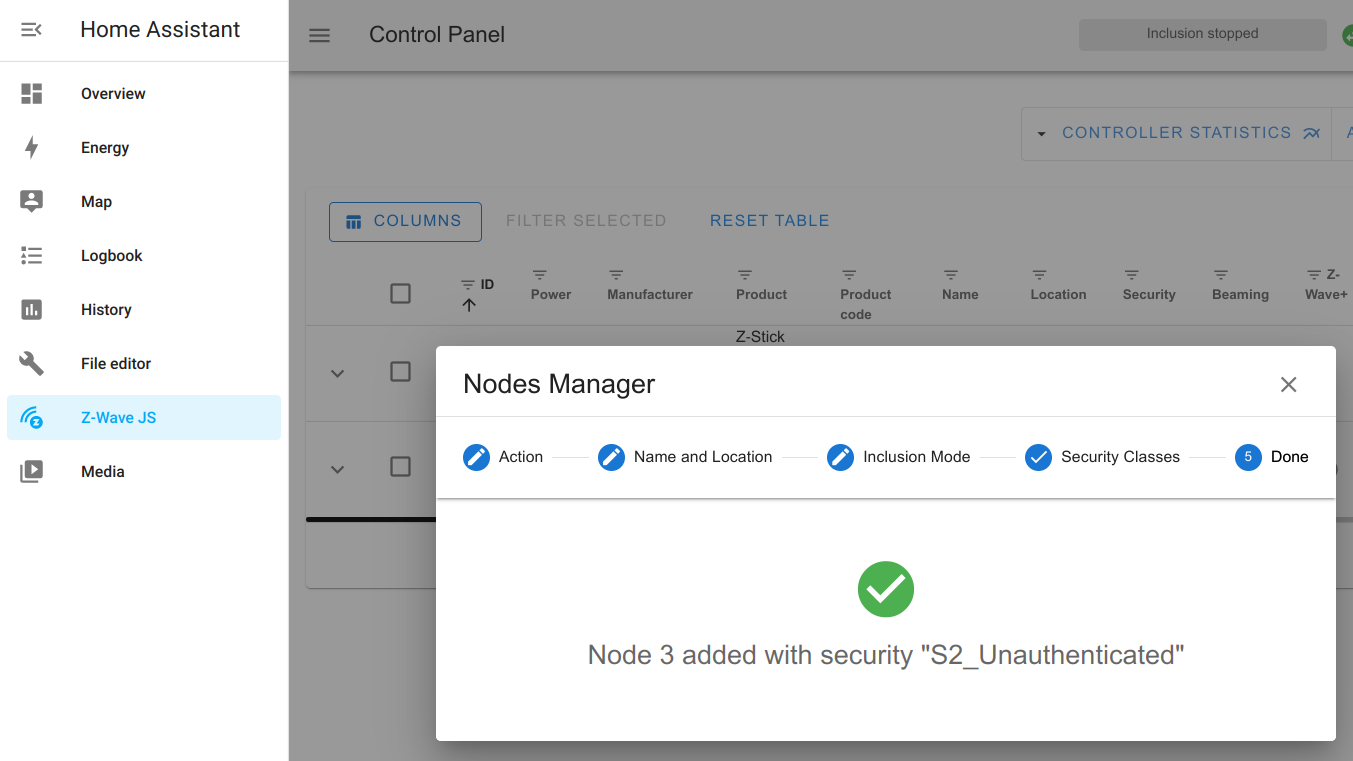
If all goes well, you should see the device successfully added to your network!
You may now skip the “Add-on #2” section below if you are not wanting to use Z-Wave JS to MQTT.
Add-on #2: Z-Wave JS to MQTT
If you choose to install the Z-Wave JS to MQTT add-on instead of Z-Wave JS, you will need to install the add-on from the “Community Add-ons” section of the “Add-on Store”.
Install Z-Wave JS to MQTT
Go to the “Settings > Add-ons” page.
Click on the “Add-on Store” button.

Find the Z-Wave JS to MQTT add-on in the “Community Add-ons” section and click on the plugin.
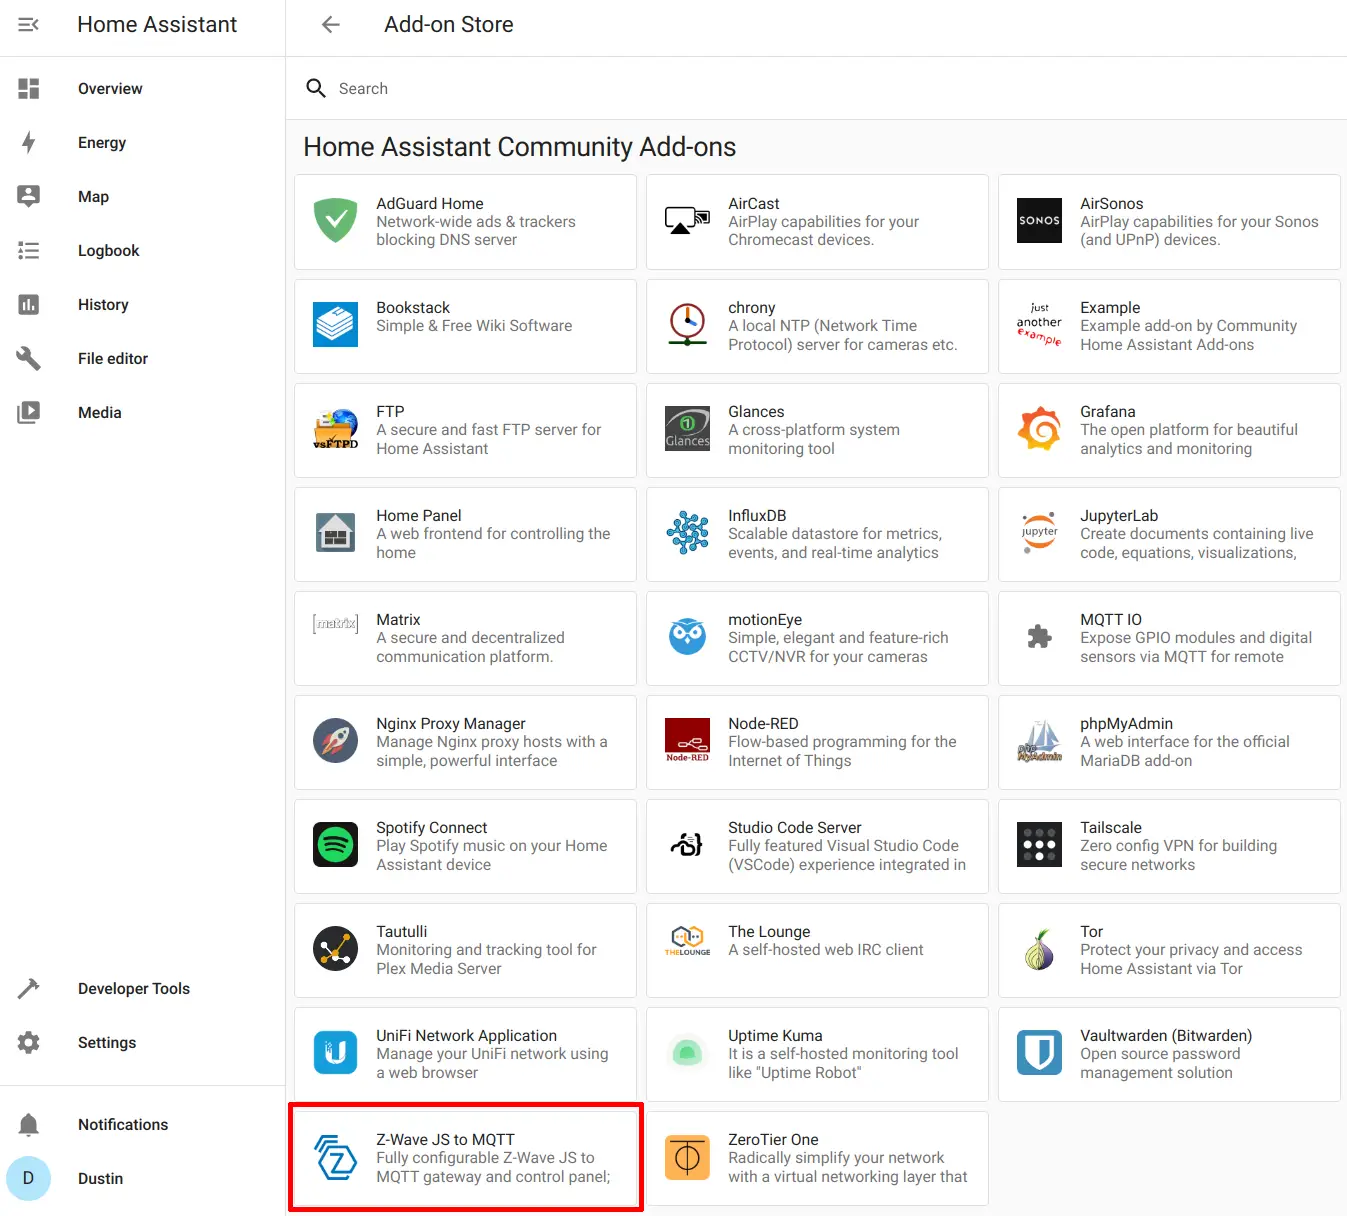
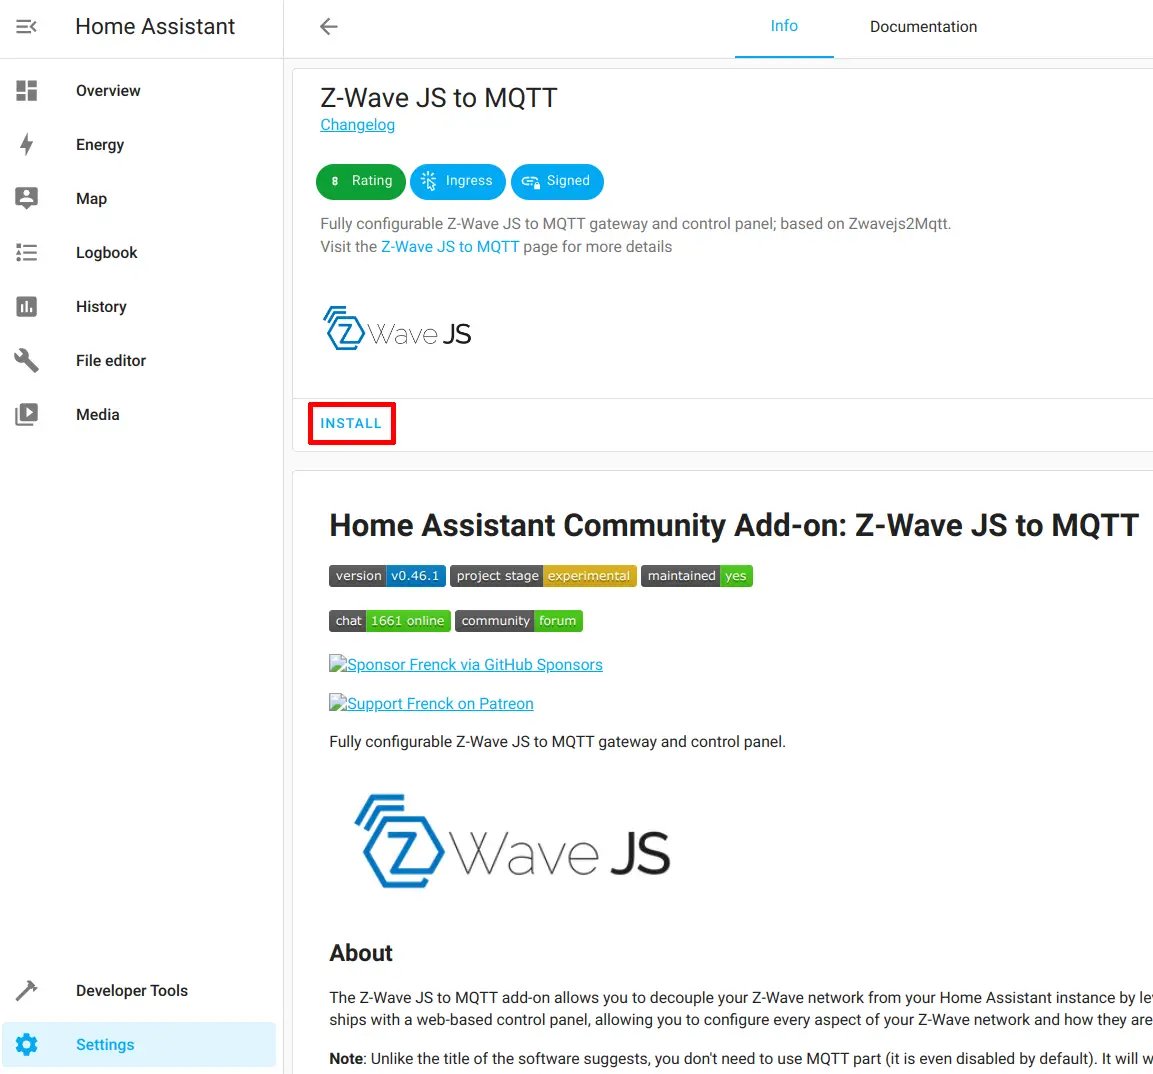
Click “Install” to get started.
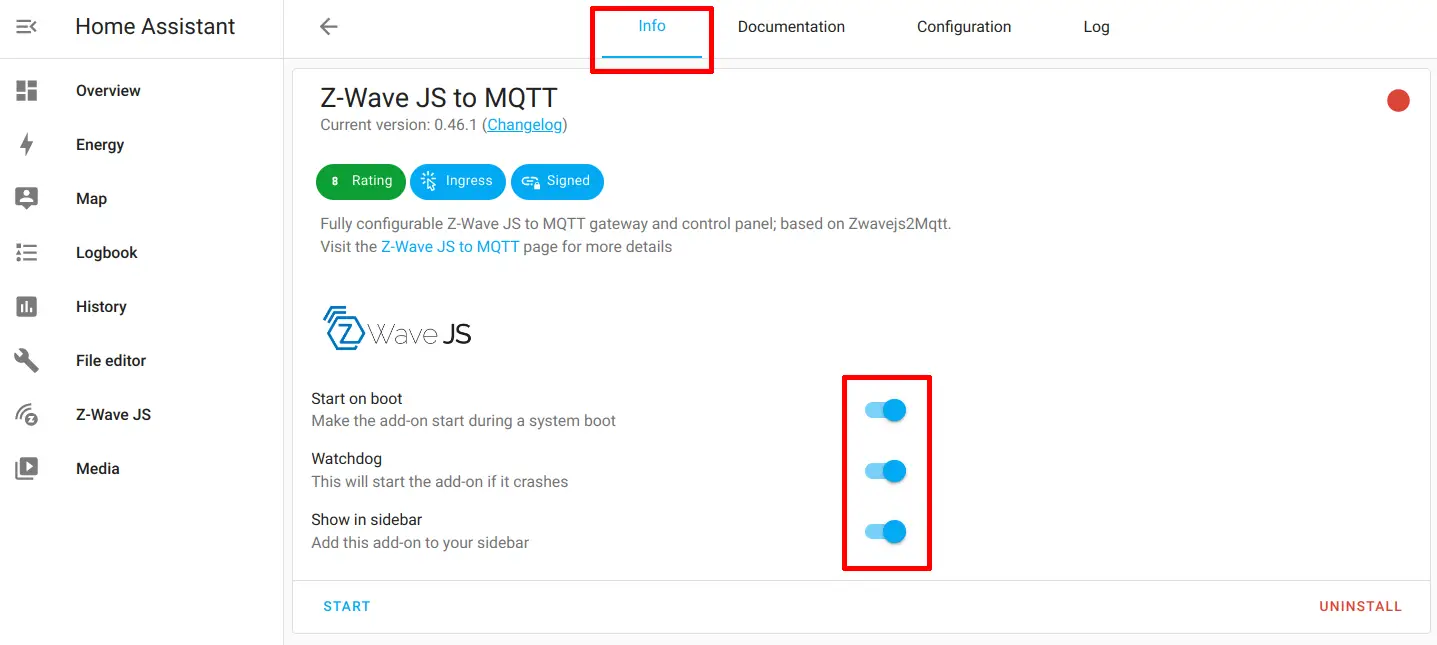
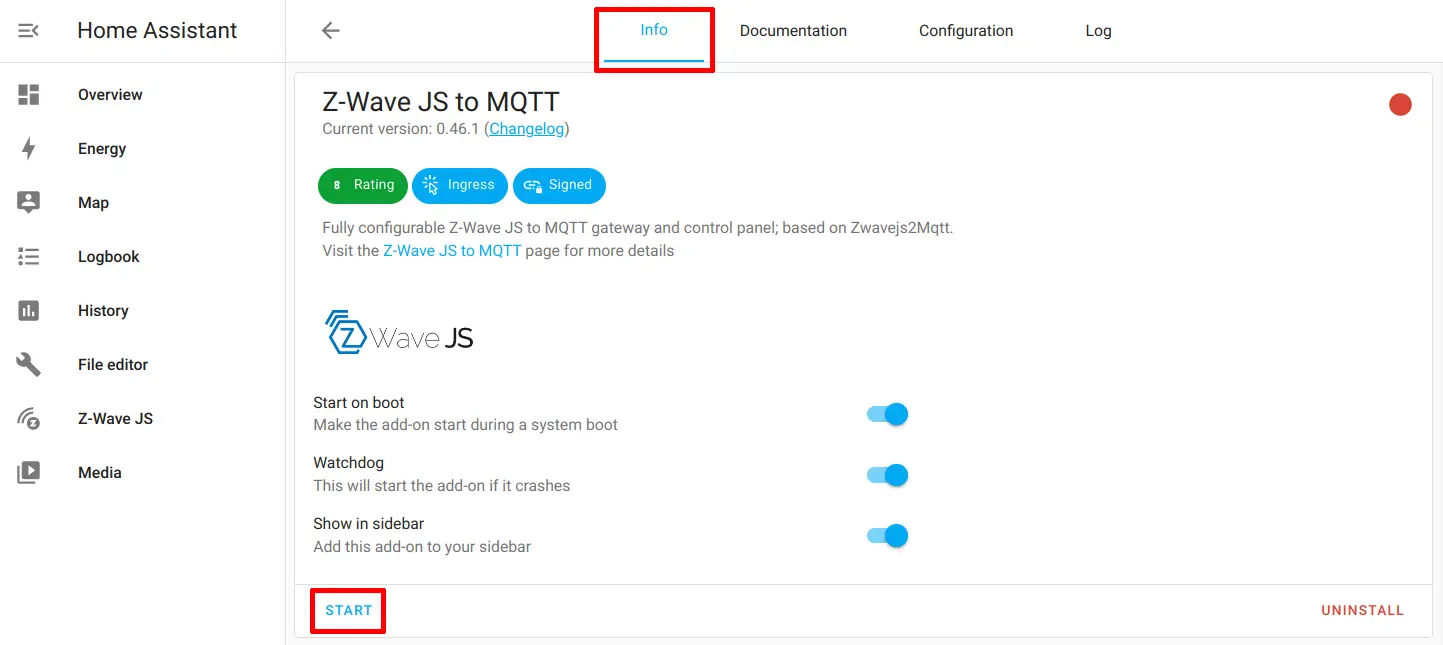
You will likely want to enable all the options for starting on boot, the watchdog, and show in sidebar to get the best experience. That way Z-Wave JS to MQTT is started automatically when you reboot, restarts when it crashes, and exposes the menu option for the feature rich control panel.
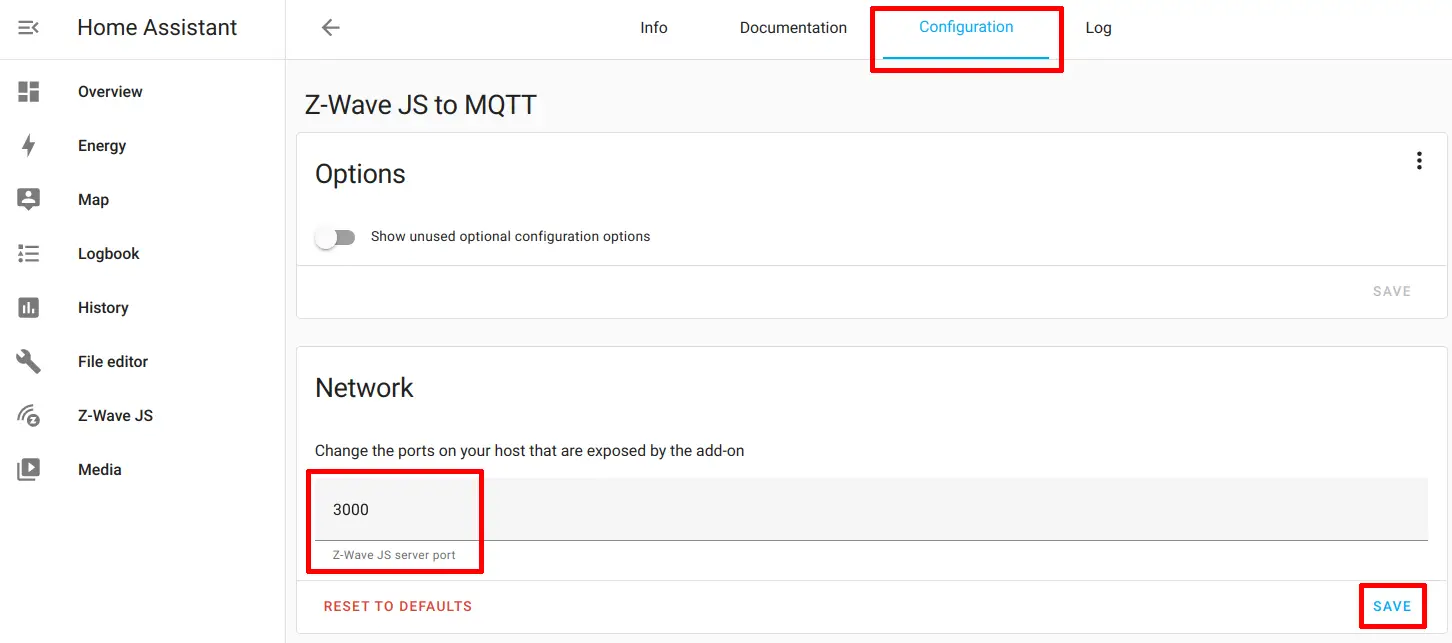
This step is very important. Before you click “Start”, you need to go to the “Configuration” tab for the add-on. Click on the toggle button in the “Network” section and enter the default port 3000 in the “Z-Wave JS server port” field as shown in the screenshot. Click the “Save” button to persist the change.
Go back to the “Info” tab and click the “Start” button to start Z-Wave JS to MQTT process.
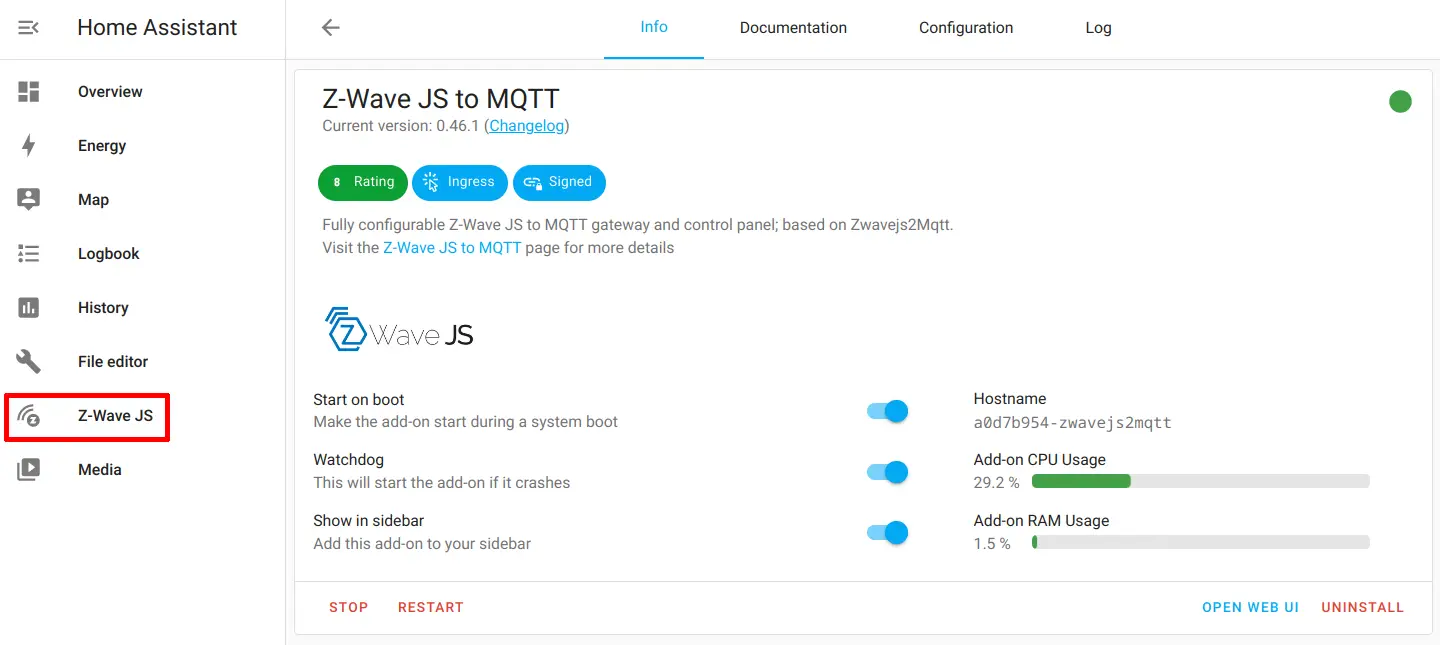
You should see that the Z-Wave JS to MQTT plugin is running. Now you need to go to the “Z-Wave JS” page by clicking the sidebar menu.
You can choose if you wish to submit statistics to help the Z-Wave JS project. If you enjoy helping out a development community, you may wish to enable this feature. It is designed to be secure and anonymous.
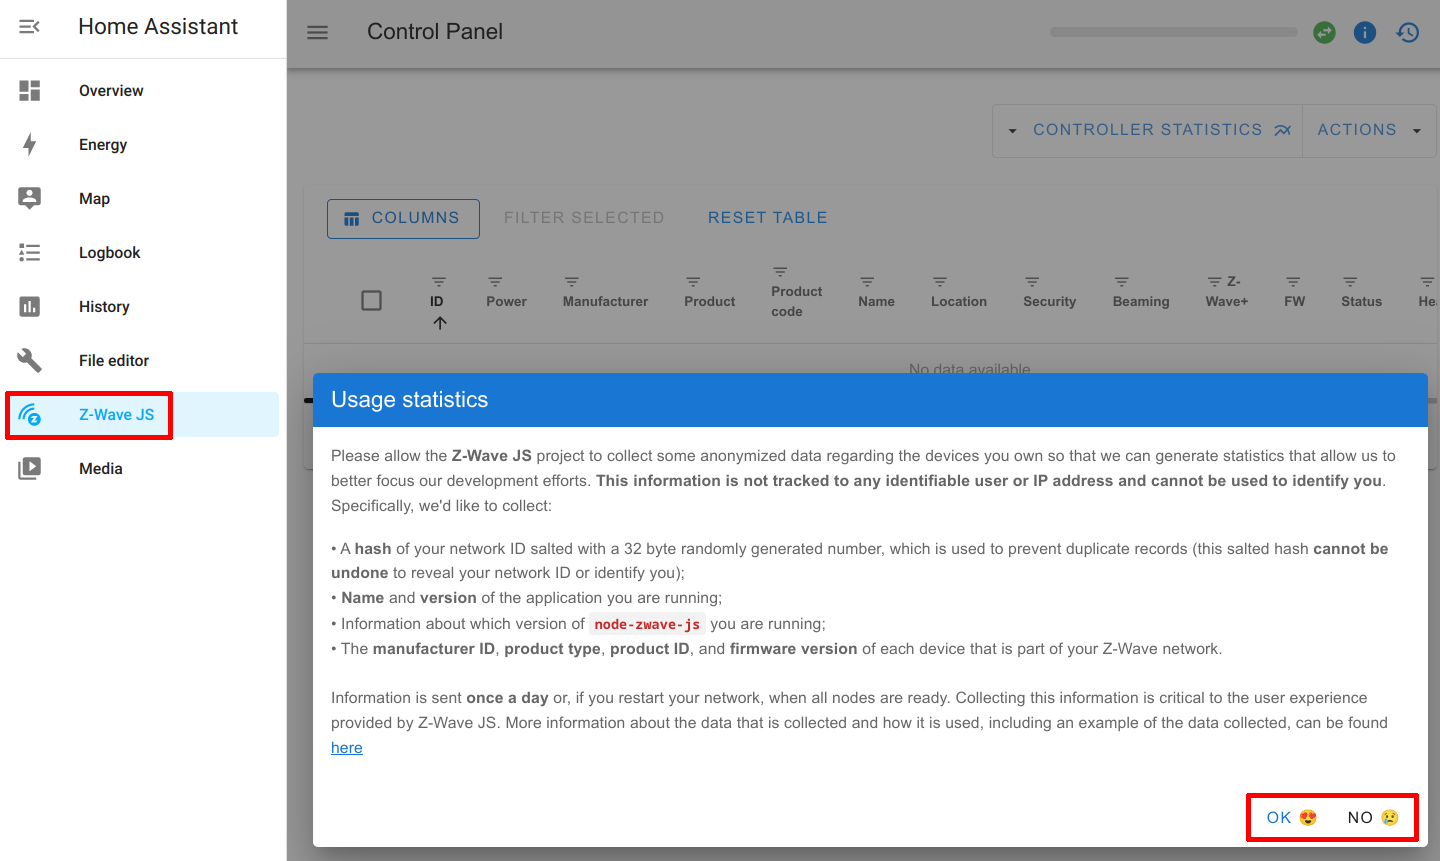
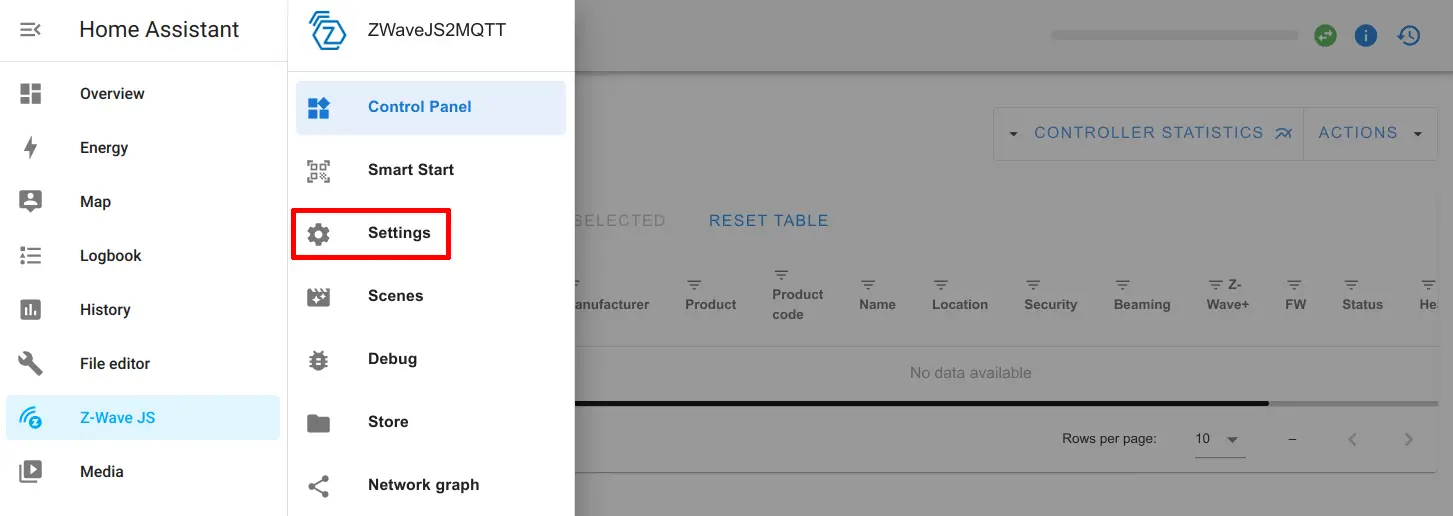
You have arrived at the default page of the Z-Wave JS to MQTT Control Panel. At the moment, there are no devices listed since you are not finished setting up the add-on. Click on the “Control Panel” menu icon. If you have a wide screen resolution, you may already see the full control panel side menu.
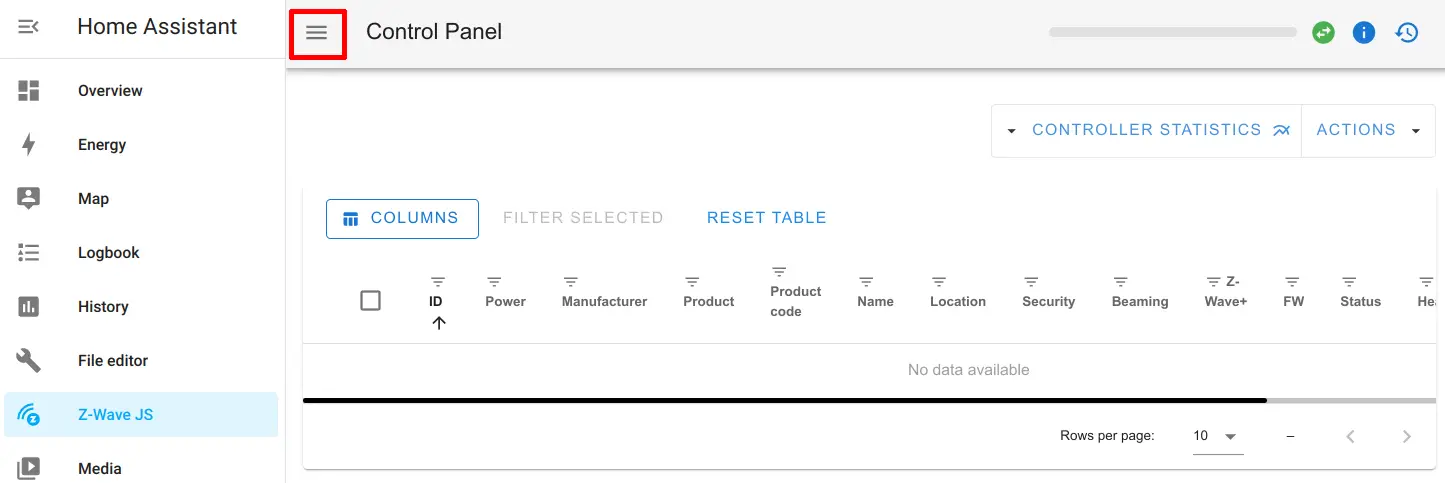
The menu will slide out to expose all the menu options. Click on the “Settings” menu option.
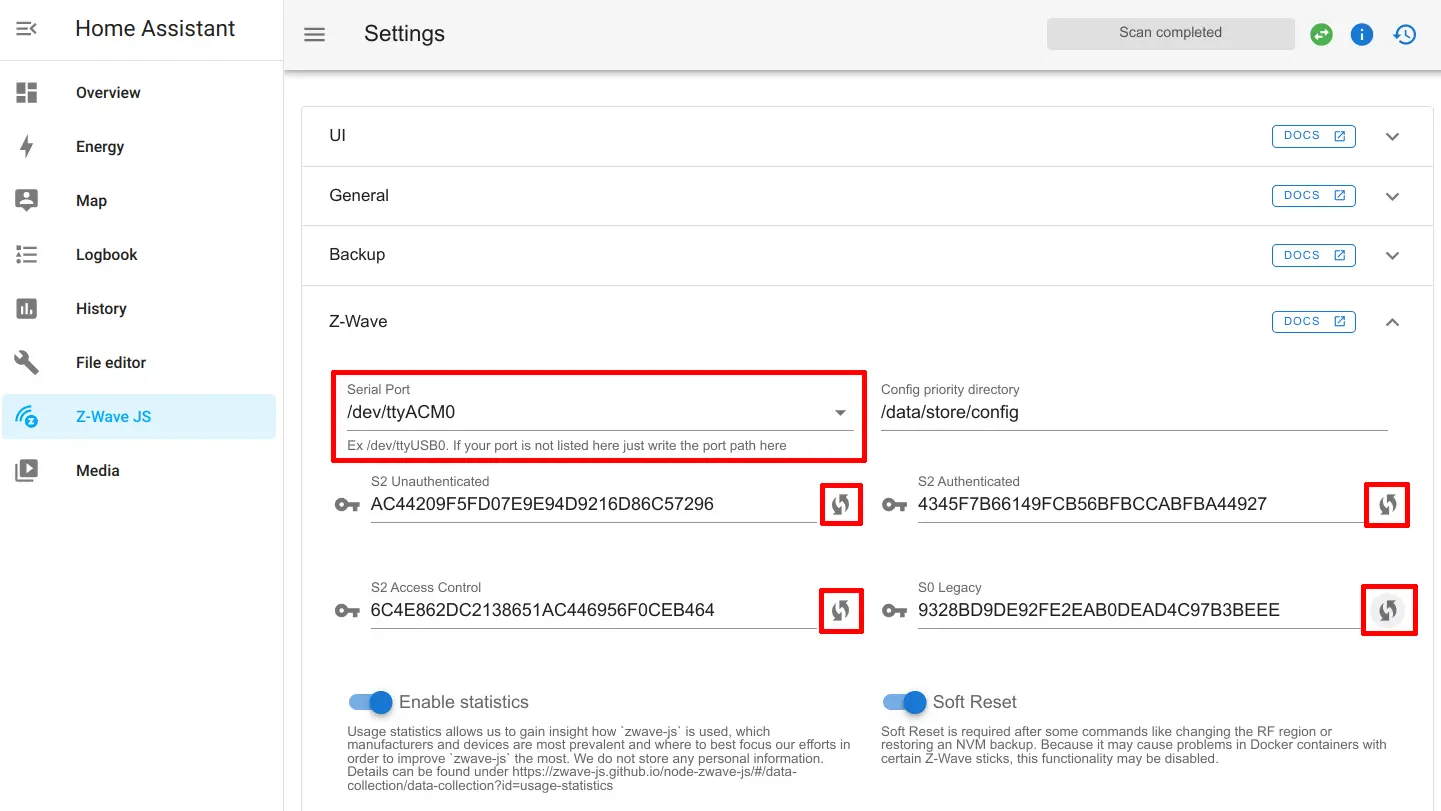
To select your Z-Wave controller, click the “Serial Port” dropdown menu. You will see an option for /dev/ttyACM0 or /dev/ttyUSB0, which should be your USB Z-Wave controller. It is often recommended to use the full hardware ID instead of the generic IDs of /dev/ttyACM0 or /dev/ttyUSB0 because in theory they could change. If you prefer to enter the hardware ID instead, you will need to go to the “Settings > System > Hardware” page and click on the upper right hand corner menu and select “All Hardware” in order to view the full hardware ID of your device.
After selecting the Z-Wave controller device, you will need to click on the double arrow icons shown in the screenshot below to generate the secure keys for all of the authentication modes. Do not worry, the keys below are not my actual keys – I generated them on a test machine.
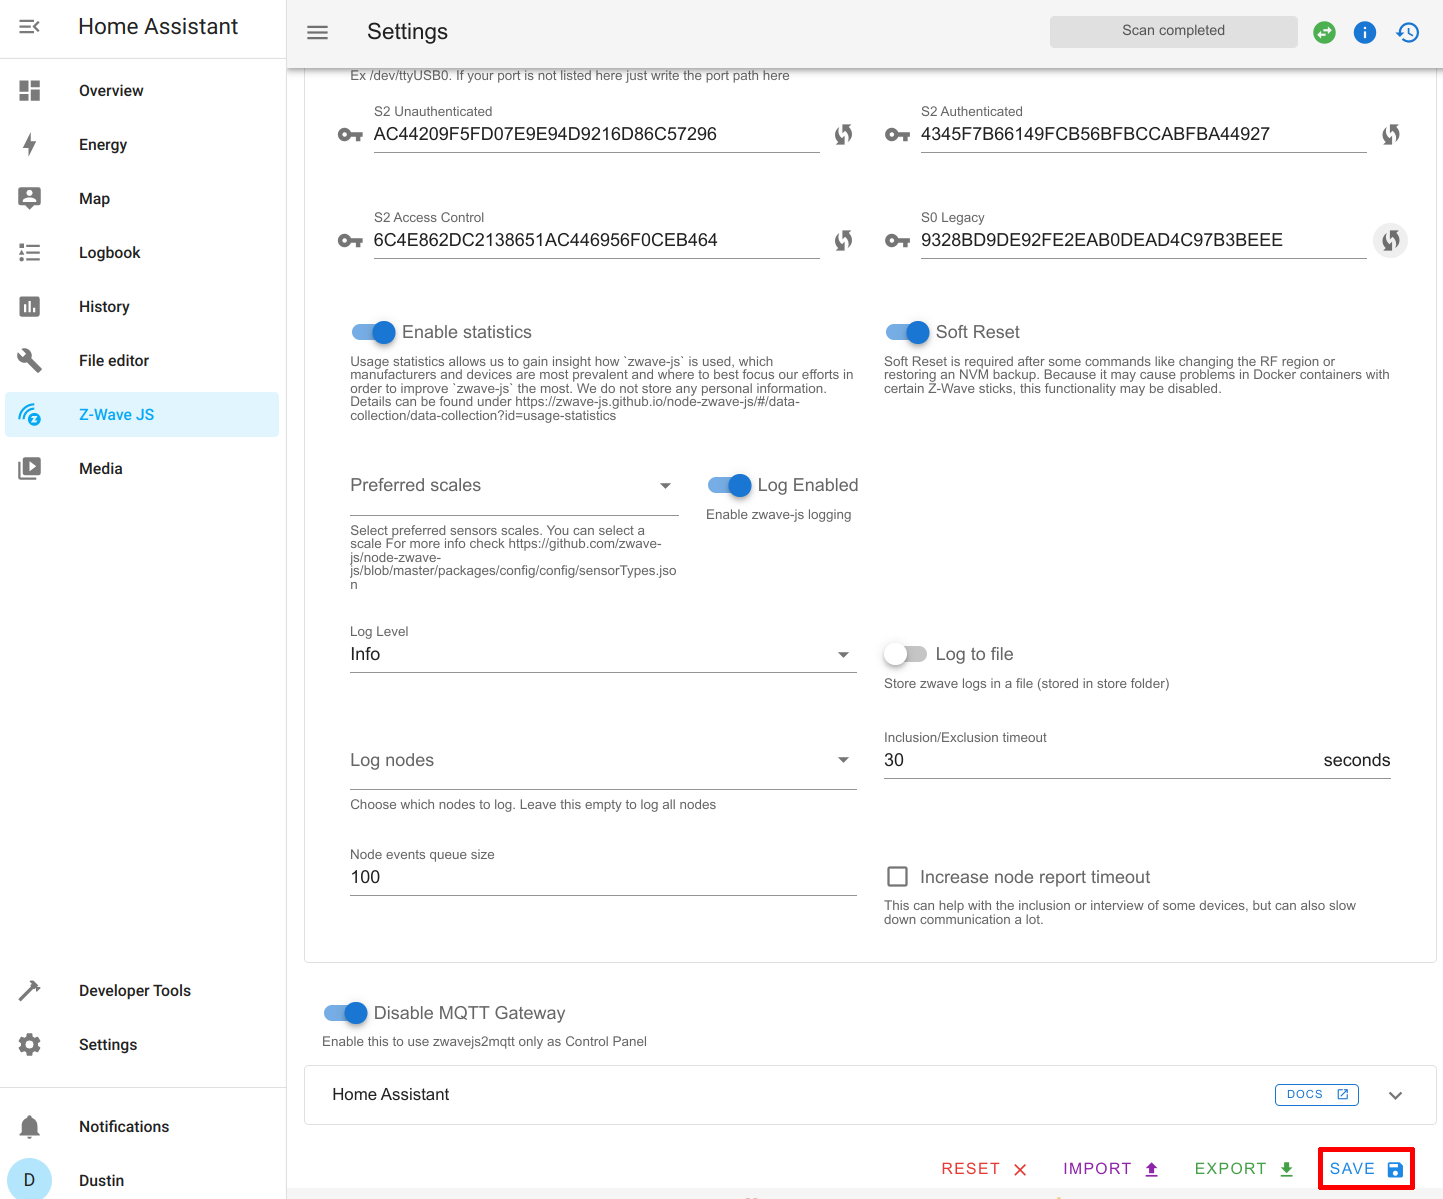
Scroll down the page and click “Save” to save the changes.
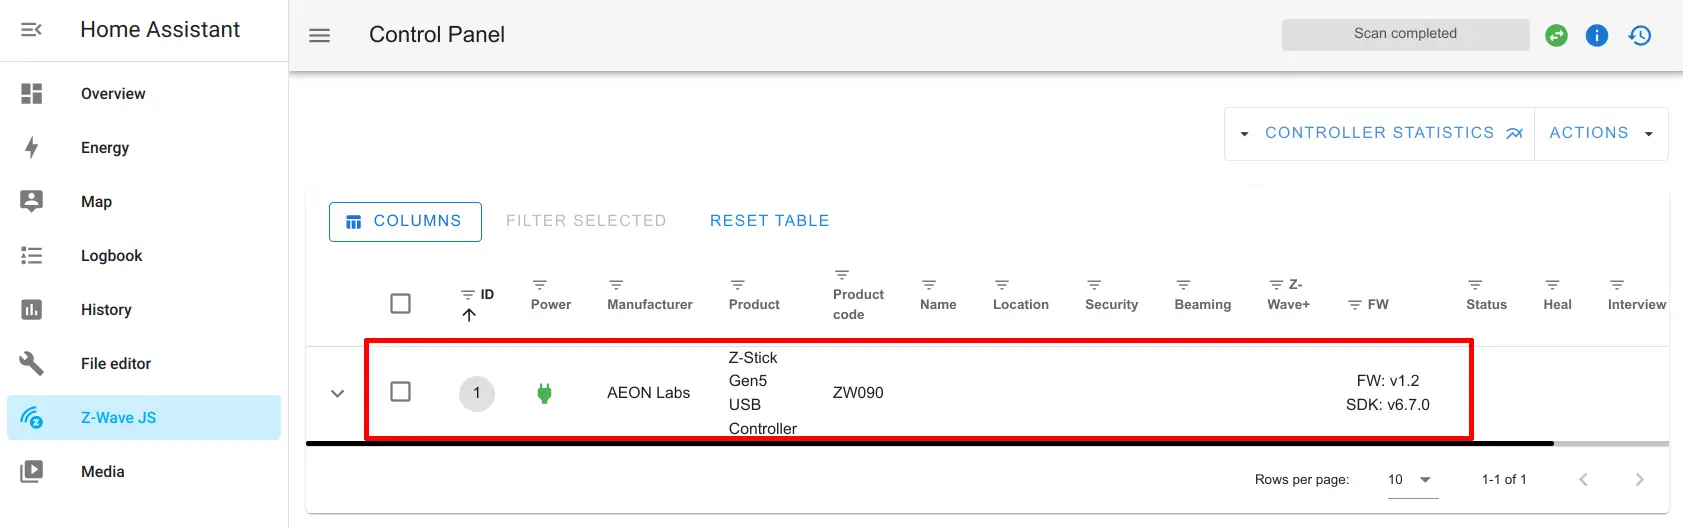
If you go back to the main Z-Wave JS page, you should see your Z-Wave controller listed as your only device.
Configure the Z-Wave JS Integration
Just like with the Z-Wave JS add-on, you will need to install the Z-Wave JS integration. Go to the “Settings > Devices & Services” page.

Once difference with the Z-Wave JS integration is that the Z-Wave backend will be controlled by the more feature rich Z-Wave JS to MQTT control panel. For this step, it is very important to click on the “Add Integration” button rather than using the “Discovered” integrations to ensure proper setup of the integration. The reason is that you are not prompted to set up another Z-Wave instance which is required to select the Z-Wave JS to MQTT backend.
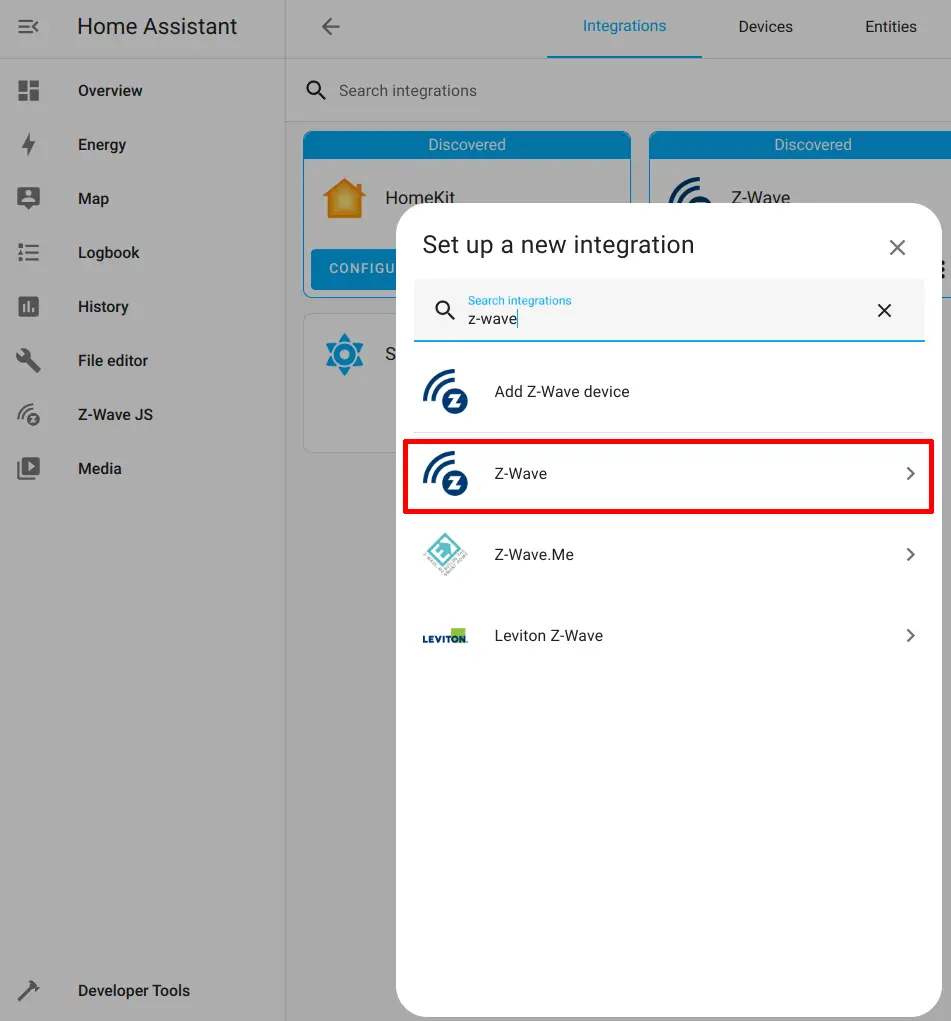
Search for “Z-Wave” to find the Z-Wave JS integration more quickly. Otherwise you have to scroll to the bottom of a long list of integrations. Click on “Z-Wave” to continue.
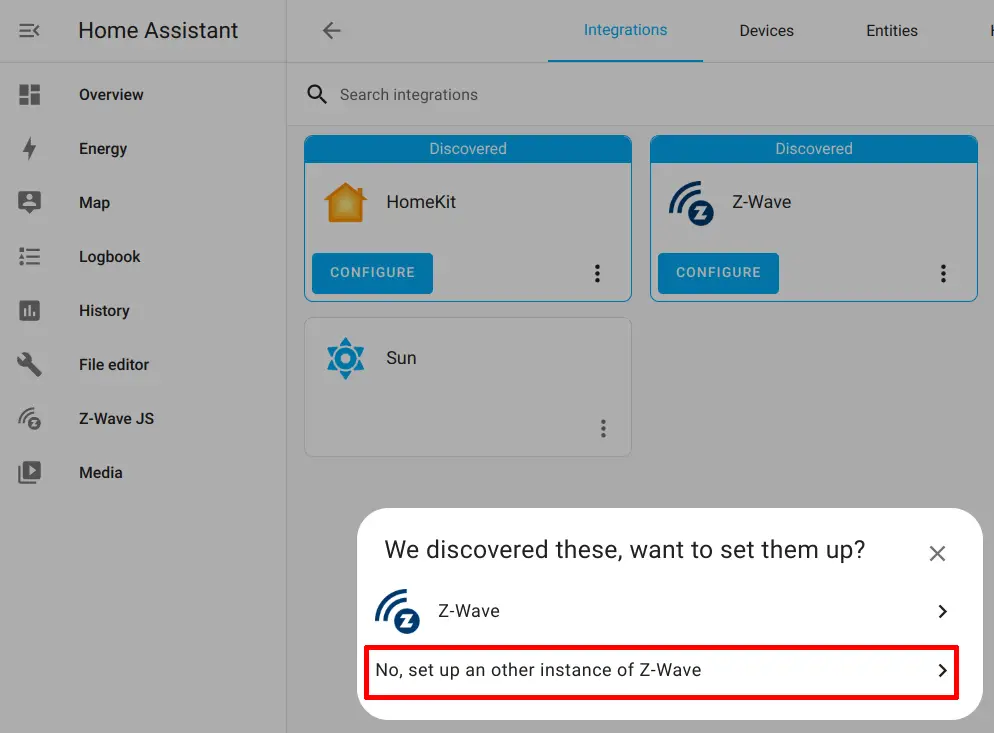
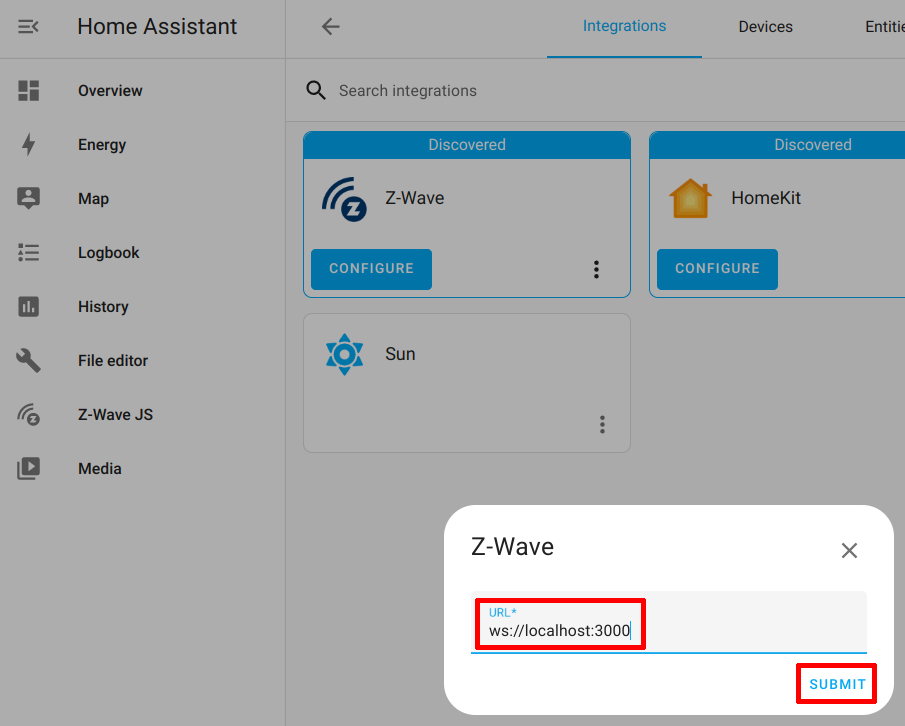
You will need to click on “No, set up another instance of Z-Wave JS” so you can connect to the Z-Wave JS to MQTT backend.
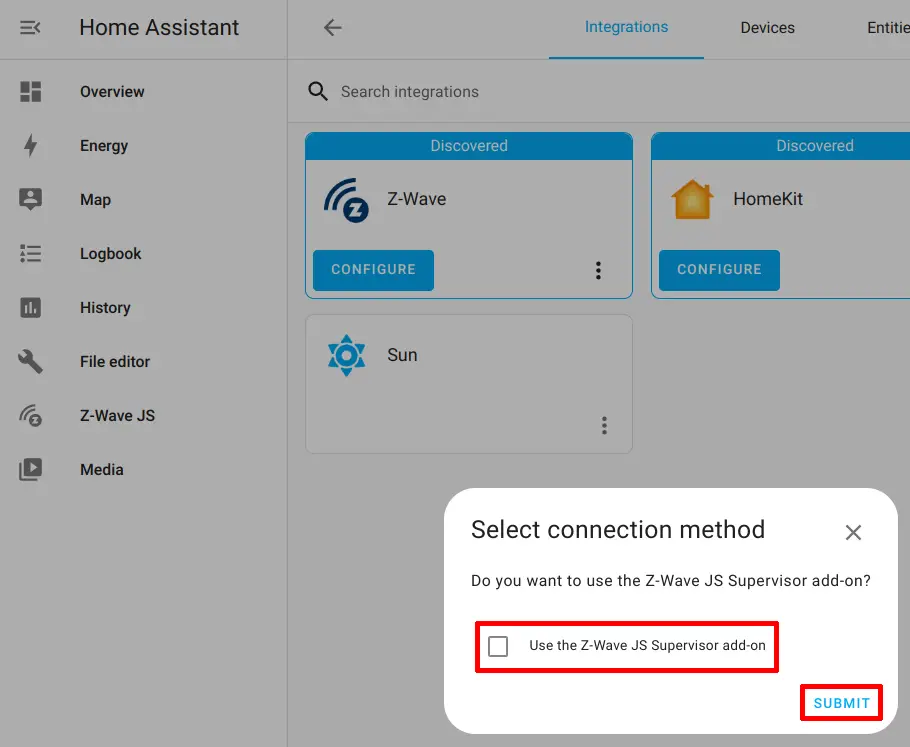
You must uncheck the box which prompts “Use the Z-Wave JS Supervisor add-on” because it will try to install the Z-Wave JS add-on which is not desirable when you want to use Z-Wave JS to MQTT. Click “Submit” to continue.
When installing the Z-Wave integration for the Z-Wave JS to MQTT add-on, you will be prompted for the websocket address of the Z-Wave JS to MQTT service. If you used the default port of 3000 when setting up the Z-Wave JS to MQTT add-on, you should be able to leave the default value of ws://localhost:3000 and click the “Submit” button.
If the integration can connect to your Z-Wave JS to MQTT backend, you will be shown your Z-Wave controller information along with the “Area” dropdown. Select the “Area” where your device is located. You do not necessarily have to do this, but it helps to group all of your smart home devices. Click “Finish” to complete the integration setup process.
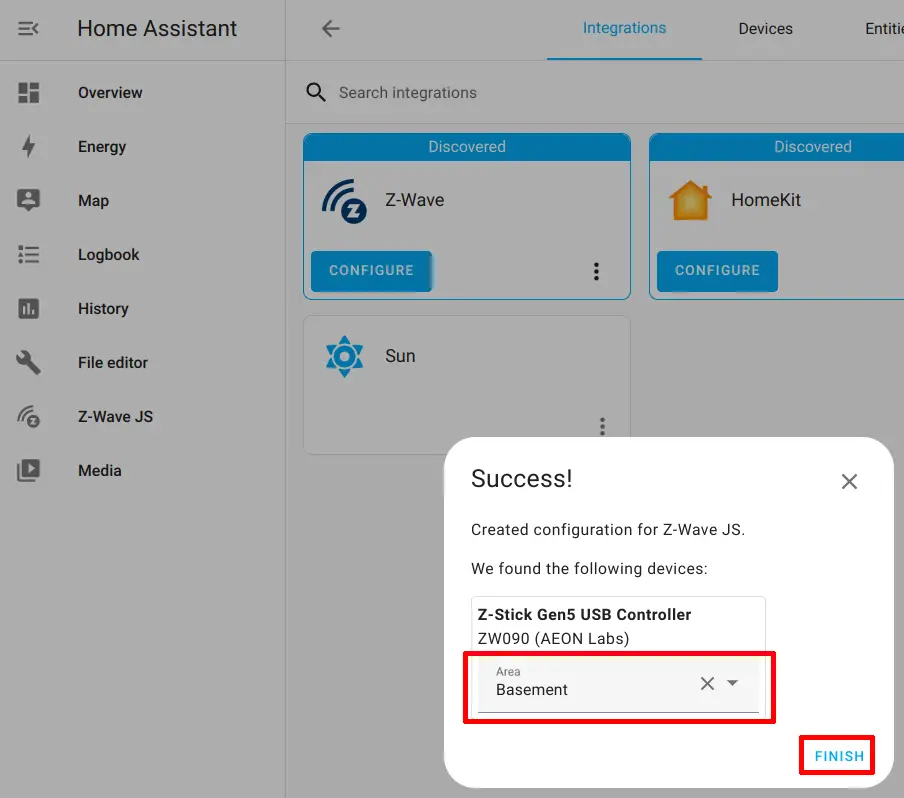
You should see the Z-Wave JS integration along with the other integrations after clicking the “Finish” button.
Include a New Z-Wave Device on Your Z-Wave Network
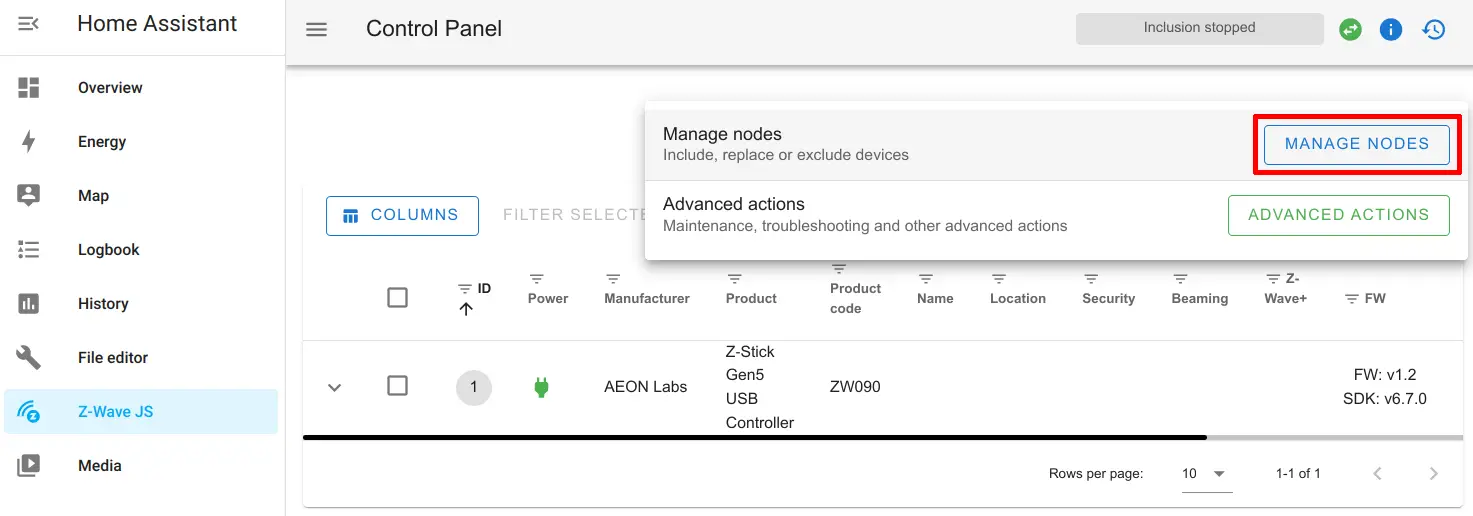
Including devices on your Z-Wave network is similar to the Z-Wave JS add-on but there are a few extra steps involved. You need to go to the “Z-Wave JS” page and click on the “Actions” menu.
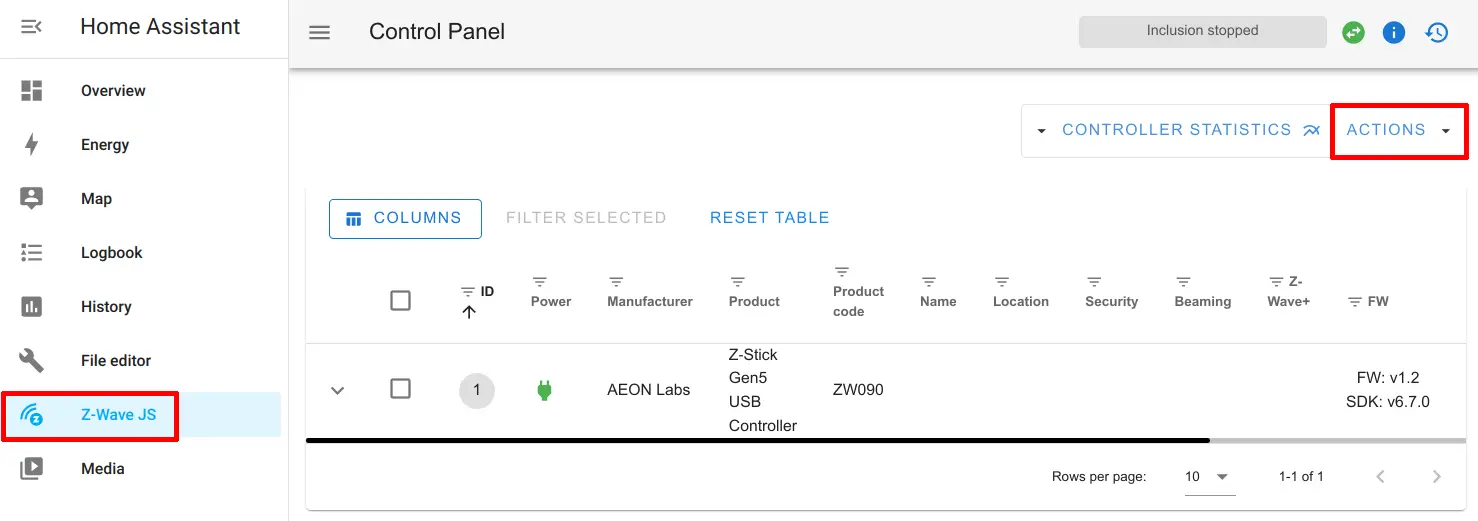
You will see the “Manage Nodes” and “Advanced Actions” buttons appear. Click on “Manage Nodes”.
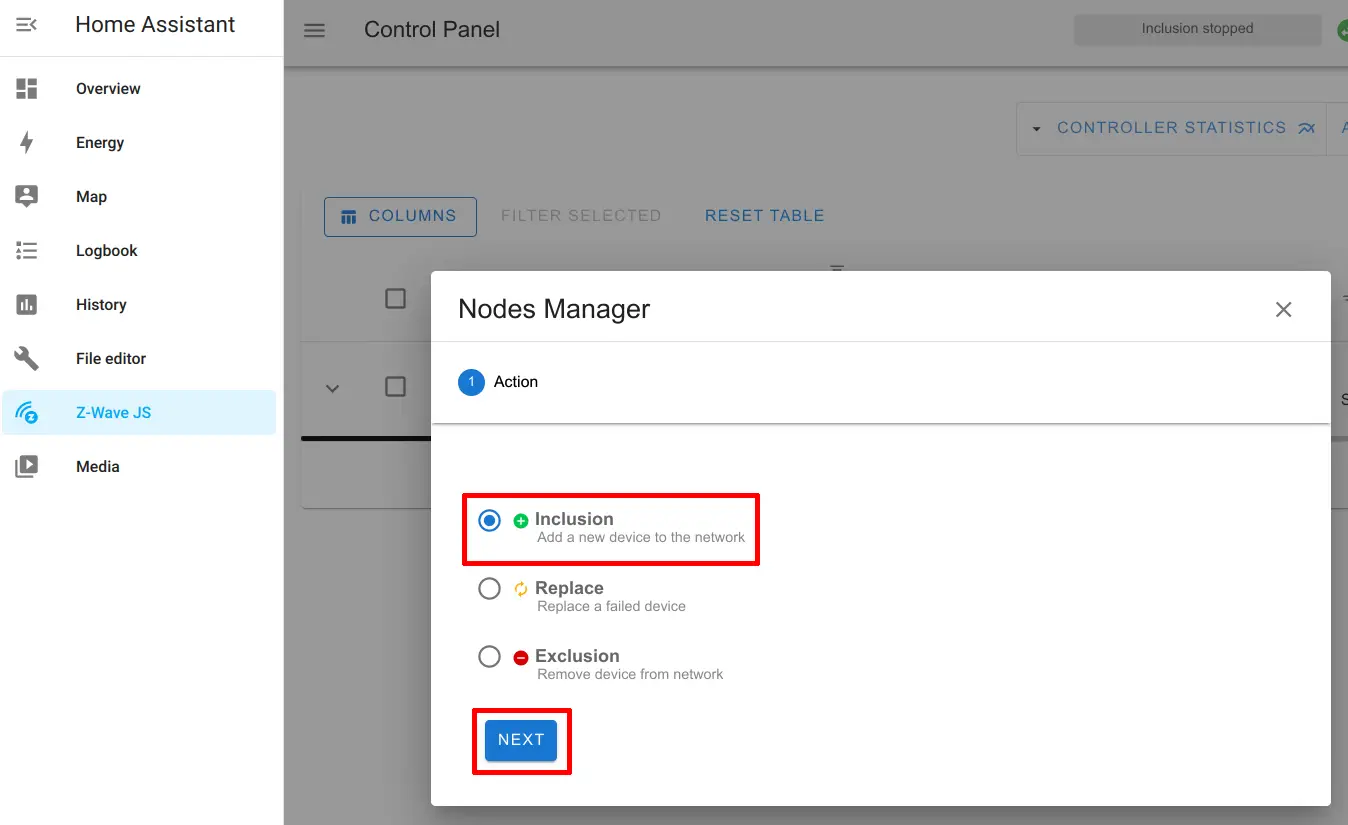
To include a device, you will need to start the “Inclusion” process. It should be the default option selected. Simply click “Next”.
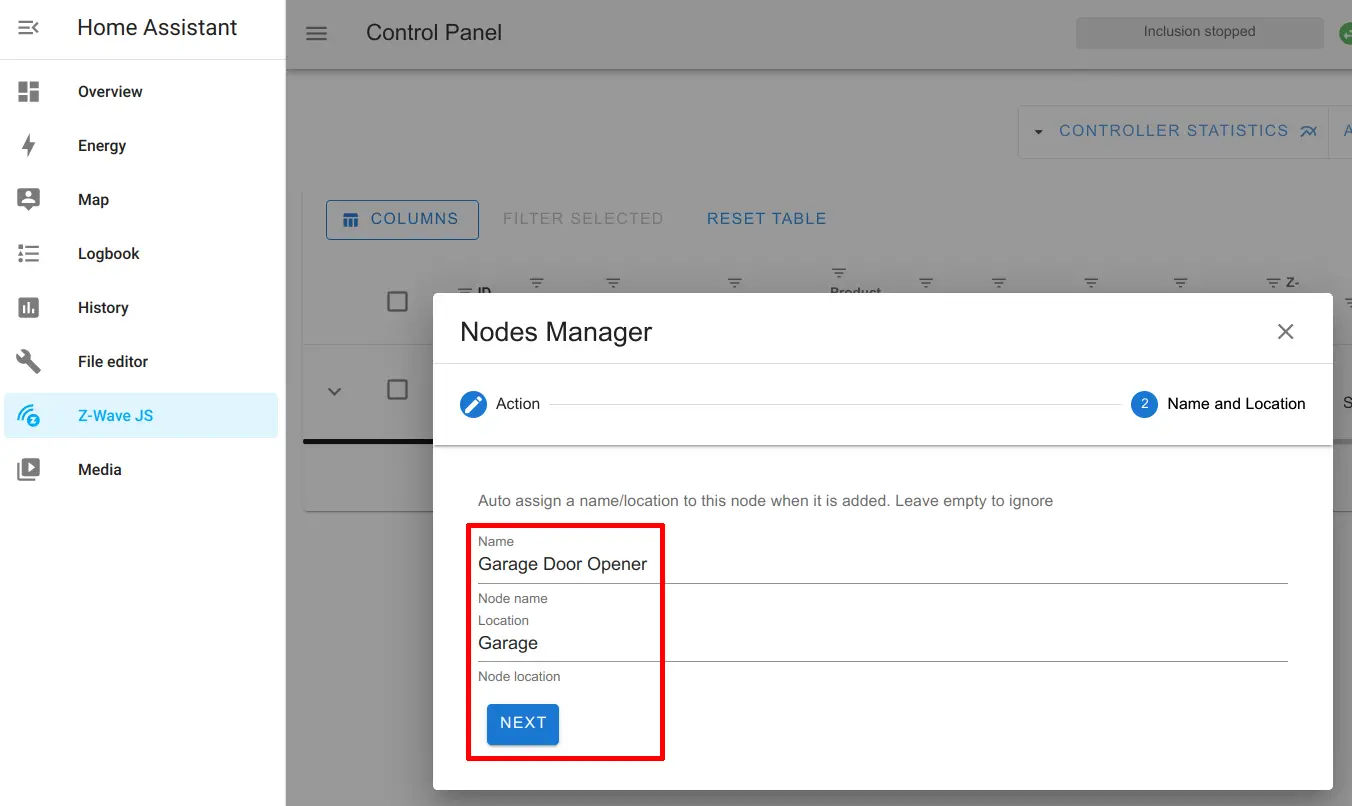
You may enter a “Name” and a “Location” for the device you are about to include. It is ok if you wish to leave them blank but it does help to identify your devices when you are using the Z-Wave JS web interface.
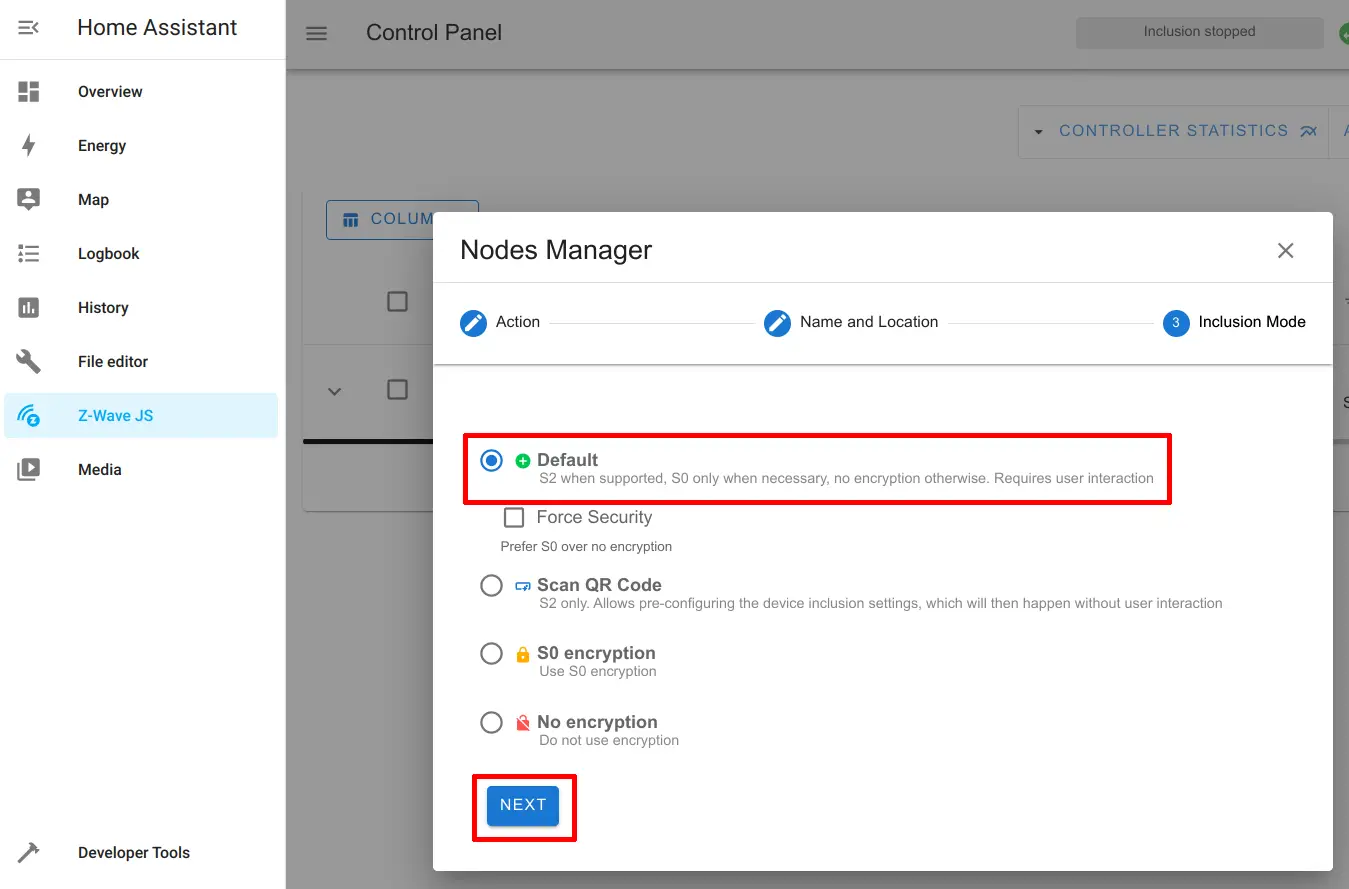
Z-Wave JS to MQTT provides you with several options during the inclusion process for encryption and for scanning QR codes. If you are on a desktop PC, using a QR code may not be easy to do unless perhaps you have a webcam. Also, you will need to set up secure connections for Home Assistant to use QR codes. Using the “Default” option in most cases may be fine for your needs unless you have reasons for using the others. Click “Next” to start the inclusion process.
There will be a 30 second timer that will start. You will need to push the proper sequence of button(s) on your device to have it included in the Z-Wave network.
You will be presented with several options on the security level you wish to use for the device. The method used will depend on the capabilities of your device, but you have the option to use less secure methods if security is not important (for sensors such as temperature/humidity you may not care about security as much as a door lock, for example). I have read that some users experience worse performance on their Z-Wave network if they use S2 encryption for every device on their network so they only choose to use the most secure methods for devices which require it such as door locks.

When the device has been added, you will see the success page.
You should now see the new device in the list of Z-Wave devices!
The Z-Wave JS to MQTT configuration is a bit more involved, but you gain a lot more features which may be valuable to you especially if you want to have maximum control over your Z-Wave network.
View the Device on the Default Dashboard
With the Z-Wave add-on of your choice installed, the Z-Wave integration configured, and your first device added, you will be able to see the entities created for the device when you go to the default “Overview” dashboard page. At this point you can turn on/off the device, view sensor values, etc. depending on the capabilities of your device.
If you do not specify an area for your device, you will see that the sensor and switch features are in separate cards as shown in the screenshot below, but if you specify an area for your device, they will be grouped under the same card.

To test if your Z-Wave add-on/integration is functioning properly with your Z-Wave device, you may click the toggle button(s) if your device has on/off toggles. There is nothing like toggling on/off your Z-Wave devices for the first time from your phone or your web browser and seeing a real-world action taking place.
Create Automations and Scenes
Home automation shines when you start creating various automations and scenes. To take full advantage of Home Assistant, you will want to create various automations and scenes. However, that is a topic on its own, which I will cover later. As you get more comfortable creating automations, you will find yourself digging deeper into powerful features to create more intricate automations.
Related Posts

How to Install Home Assistant on Proxmox
Home Assistant is a home automation software that is often installed on single board computers (SBCs) such as the Raspberry Pi because the system resources required by Home Assistant are low enough that a SBC will be sufficient for many users.
Read more
How to Set Up Ecosense RadonEye in Home Assistant using a Raspberry Pi as a Bluetooth Proxy
Radon is a dangerous radioactive gas that can be problematic in homes since the gas may concentrate to hazardous levels, which can increase the likelihood of lung cancer over an extended period of time of continual exposure.
Read more
Enable HTTPS using Let’s Encrypt in Home Assistant
In previous guides, I demonstrated how to set up encrypted connections for Home Assistant using either the Nginx Proxy Manager add-on or an existing Nginx Proxy Manager server on your network.
Read more