How to Set Up Ecosense RadonEye in Home Assistant using a Raspberry Pi as a Bluetooth Proxy
Radon is a dangerous radioactive gas that can be problematic in homes since the gas may concentrate to hazardous levels, which can increase the likelihood of lung cancer over an extended period of time of continual exposure. The gas is odorless so without a sensor, the gas is impossible to detect.
If you live in an area prone to high concentrations of radon, a radon detector is very important to consider for your smart home.
Many of the options for continuous radon monitoring consist of handheld devices with no wireless connectivity or devices which utilize Bluetooth and a mobile app. Some devices may connect to WiFi but require an account on the cloud to use the device. As someone who values having local access to all of my smart home devices and the data produced by those devices, I researched various solutions.
I narrowed down to the Airthings radon detectors (affiliate link) and the Ecosense RadonEye RD200 (affiliate link) . Airthings has both a cloud-based integration and a local BLE integration for certain models in Home Assistant. The Ecosense RadonEye, on the other hand, only has a Bluetooth proxy sensor integration via ESPHome.
I ended up choosing the RadonEye due to reviews attesting to the accuracy of the devices and general user experience, which seemed to slightly edge out the Airthings devices.
Why Use the Raspberry Pi instead of an ESP32?
When I first attempted to connect the RadonEye to Home Assistant, I tried using a Bluetooth proxy on an ESP32 with ESPHome. Unfortunately, the RadonEye sensor configuration in ESPHome may only support older versions of the RD200 based on forum posts and my personal experience.
From a Home Assistant forum post, I discovered a GitHub project that used a Python script to pull the values from the RadonEye and pushes the values to a MQTT instance. Home Assistant has a MQTT add-on that you may install that allows any device that can push MQTT data to integrate into Home Assistant.
I happened to have a Raspberry Pi Zero 2 W that I was decommissioning so I thought a Bluetooth proxy would be a perfect use case for such a tiny, energy efficient device.
The Pi Zero is a great alternative to using an ESP32 device as a Bluetooth proxy since you can install an OS and run whatever ARM-based software you like since it is a single board computer (SBC) rather than a microcontroller. The power consumption of the Pi Zero is higher than the ESP32, but it is still very low (less than 1 Watt).
Note that you may use other larger Raspberry Pi models, but I think it is a waste of resources to run it on more powerful Raspberry Pi models unless you are using it for multiple purposes.
Install Raspberry Pi OS Lite
You may use the Raspberry Pi Imager software to install Raspberry Pi OS Lite. The latest version of the OS should work fine (at least at the time this guide was written).
To install the Lite version, click on “Raspberry Pi OS (Other)”.
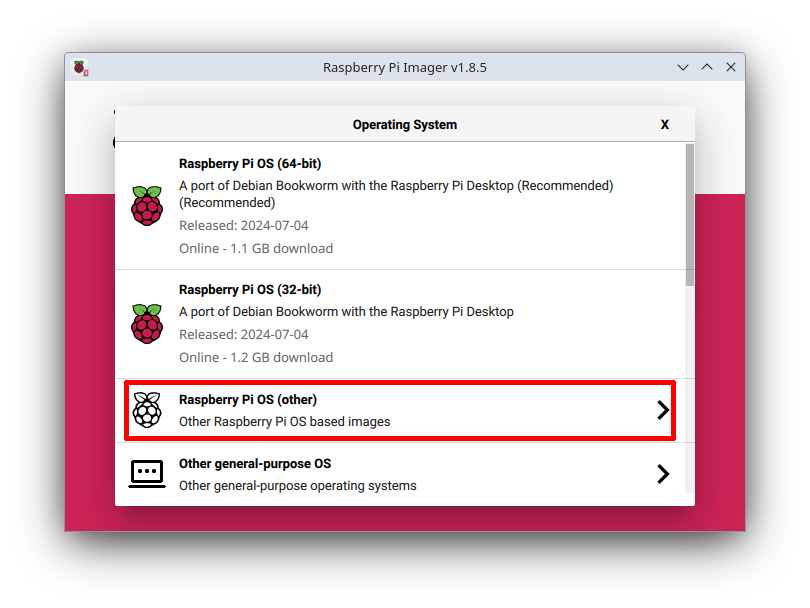
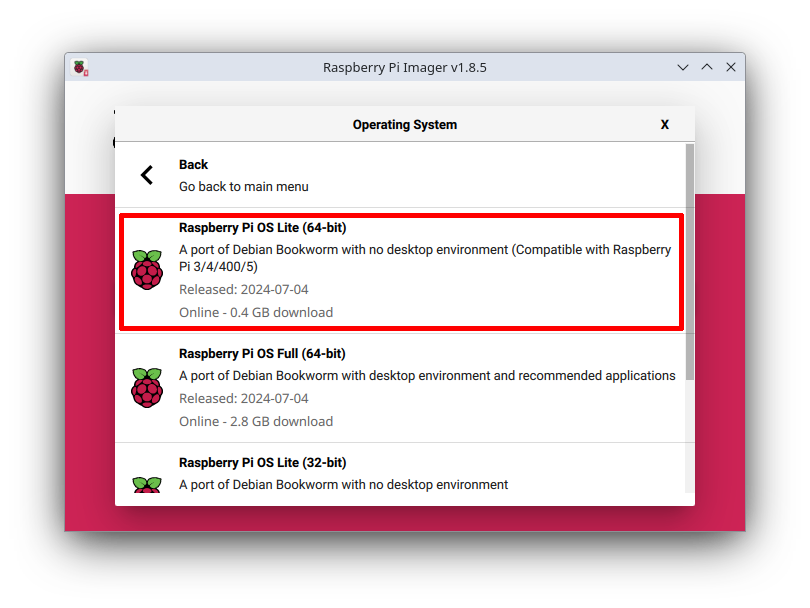
Then you will have options for the Lite versions which is great when you want to run Raspberry Pi’s headless to use less system resources.
A great feature of the Raspberry Pi Imager is that is allows you to set up the WiFi and other settings before you flash the microSD card. This is especially useful for headless setups because you will be able to log in right away to your Raspberry Pi without needing to connect a screen and a keyboard.
Once you have Raspberry Pi OS installed, it is always best to get it up to date.
sudo apt update
sudo apt dist-upgrade
Install Required Dependencies
Now you will need to install some necessary dependencies. For instance, git is needed to download (clone) the GitHub project to your Raspberry Pi. While Python3 is included in the Raspberry Pi OS installation, pip3 is not which is why the python3-pip package is necessary.
sudo apt install git python3-pip libglib2.0-dev
Next you will need some Bluetooth packages for Python. In newer OS’s with newer Python versions, you will see a warning about breaking system packages when you attempt to install the Python packages. Technically, you are supposed to create a virtual environment to install packages in a safe manner.
Since I am using the Raspberry Pi Zero 2 W for a sole purpose, I ran the following commands with the --break-system-packages flag to allow the packages to be installed. Just be forewarned that this could cause problems with packages installed on the system. I do not know how likely you will have a problem, but I did not encounter any issues doing so for this single purpose.
pip3 install --break-system-packages bluepy
pip3 install --break-system-packages paho-mqtt
Run the Python version command below to determine the version of Python you are running. This is important for the next step for setting up the bluepy-helper package.
You should see a version number such as 3.11.2.
python3 --version // Use 3.11 not 3.11.2, for example
Run the following commands with the version number minus the last minor revision number: use 3.11 instead of 3.11.2. You will likely receive an error if the version number is entered incorrectly because the path to the bluepy-helper will not be valid.
Note that I am assuming you are using the default username of pi but if you customized your Raspberry Pi OS installation to use a different username, you will need to use that username instead.
sudo setcap cap_net_raw+e /home/pi/.local/lib/python3.11/site-packages/bluepy/bluepy-helper // use the user id of default user (pi by default unless it was changed)
sudo setcap cap_net_admin+eip /home/pi/.local/lib/python3.11/site-packages/bluepy/bluepy-helper
Download Radon Reader Code
While in your home folder, you may clone the GitHub repository using the following command:
git clone https://github.com/EtoTen/radonreader.git
The paho-mqtt library used by the Python script is a different version than what is expected by the script. Therefore, there is one minor tweak that needs to be made in order for the Python script to function properly.
Open the radon_reader.py file using the nano command:
nano ~/radonreader/radon_reader.py
Search for the line below:
clientMQTT = mqtt.Client("RadonEye_%s" % randint(1000,9999))
Change the line to:
clientMQTT = mqtt.Client(mqtt.CallbackAPIVersion.VERSION1, "RadonEye_%s" % randint(1000,9999))
Press “Ctrl + O” and then “Enter” to save the file. Then press “Ctrl + X” to exit nano.
Scan for Bluetooth Low Energy (BLE) Devices
One part of this process I found to be a bit tricky was determining the MAC address of the Bluetooth controller on the RadonEye RD200. The script has an option to auto scan for the RD200 but it is possible it is only searching for older models.
Then I searched for how to scan for Bluetooth devices and came across the hcitool command. At first I tried hcitool scan, but the RD200 did not show up. I realized that I needed to do a BLE (Bluetooth Low Energy) scan which is a separate command, which is shown below.
You will need to look for a device name which starts with FR: followed by the serial number of the RD200 (found on the bottom of the device). It will be Press “Ctrl + C” to quit scanning.
sudo hcitool lescan
The MAC address will be listed to the left of the device name. Copy the MAC address which will look something like 08:66:98:91:FA:C0.
Test Obtaining Radon Level
With the MAC address known, you may test pulling the radon level from the RD200. Include the MAC address beside the -a flag and also use -t 1 if you are using the RD200 model newer than 2022.
python3 ~/radonreader/radon_reader.py -a 08:66:98:91:FA:C0 -t 1
You should see something like:
2024-07-22 [11:46:42] - 08:66:98:91:FA:C0 - Radon Value: 1.78 pCi/L
Set up MQTT on Home Assistant
In Home Assistant, you will need to install MQTT if you have not done so prior to this guide.
Go to the “Settings > Add-ons > Add-on Store” page. Then click on the “Mosquitto broker” under the “Official Add-ons” section.
After the plugin is installed, visit the MQTT add-on plugin and click on the “Configuration” tab. You will need to add a username/password to be used by the Python script to push data to MQTT.
Add the following user with a password of your choice:
- username: radoneye
  password: yourpassword
Start or restart the plugin.
In order for the radon sensor value to show up on the Home Assistant dashboard, add the MQTT sensor to configuration.yaml file. I like to use the “File Editor” add-on to browse to the configuration.yaml file.
mqtt:
  sensor:
    - state_topic: "environment/RADONEYE/#"
      name: 'Radon Level'
      unique_id: 'radon_level'
      unit_of_measurement: 'pCi/L'
      value_template: "{{ value_json.radonvalue }}"
Restart Home Assistant for the MQTT sensor to be available. You can simply restart Home Assistant without needing to reboot the entire system.
You should be able to see the radon sensor on the “Overview” page.
Test Publishing to MQTT on Home Assistant
Similar to testing reading a value from the radon sensor, you may also test pushing a single value to Home Assistant in order to determine everything is working correctly. You may use the IP address such as 192.168.1.50 of Home Assistant or a hostname such as homeassistant.local. Also include your username and password.
python3 ~/radonreader/radon_reader.py -a 08:66:98:91:FA:C0 -t 1 -ms 192.168.1.50 -mu radoneye -mw yourpassword -ma -m
You should see the sensor value updated in Home Assistant.
Create Cron Job
Once you verify the sensor value has been updated successfully, you should create a cron job to repeat this process as frequently as you like. The RadonEye updates every 10 minutes so you could create the cron job to check every 5 minutes as shown below to ensure you do not miss the 10 minute window and have to wait another 10 minutes for an updated value.
However, if you set the job to be every 10 minutes, you will still have good long term statistics in Home Assistant. To open the cron job editor, enter the following command:
crontab -e
At the bottom of the file, past the following to run the job every 5 minutes. Replace the values below with your RD200 MAC address, IP/hostname of Home Assistant, and the MQTT credentials.
*/5 * * * * /usr/bin/python3 /home/pi/radonreader/radon_reader.py -a 08:66:98:91:FA:C0 -t 1 -ms 192.168.1.50 -mu radoneye -mw yourpassword -ma -m
Set up Notifications
The best thing about adding devices to Home Assistant is that you can create automations. Rather than simply have a single location to monitor sensors and other entities, you can have Home Assistant take action when something important occurs.
For the radon detector, you will likely want to set up notifications so you can be alerted that radon levels are too high.
Go to the “Settings > Automations” page and then click “Create Automation”.
When you click the “Add Trigger” button, you will need to select “Entity” instead of “Device” since the sensor data is coming from MQTT rather than from a device which is directly integrated into Home Assistant (such as Zigbee/Z-Wave/other WiFi devices).
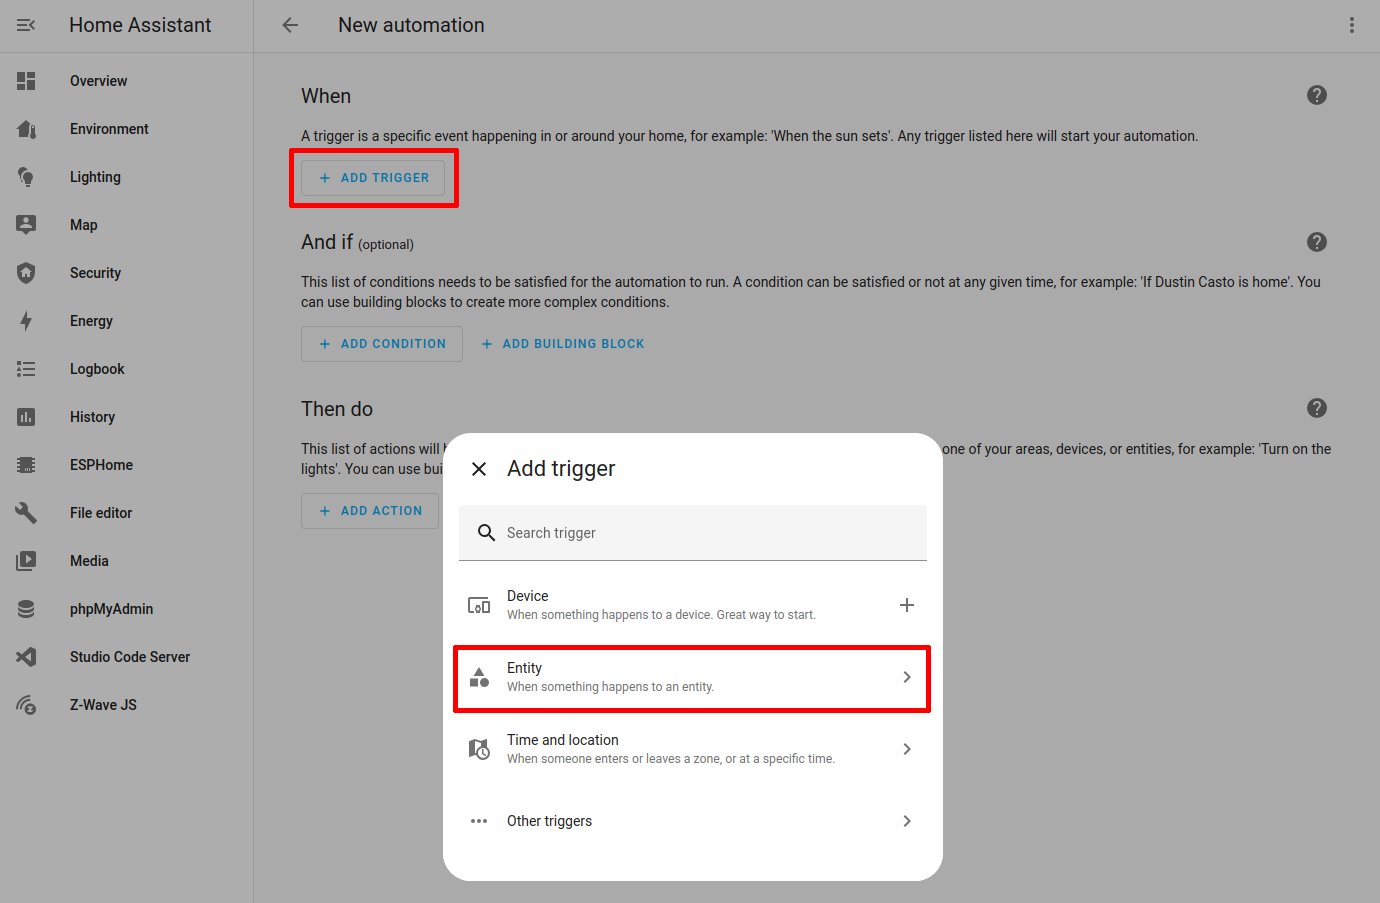
Then choose “Numeric state” since the notification will be based on numeric value changes.

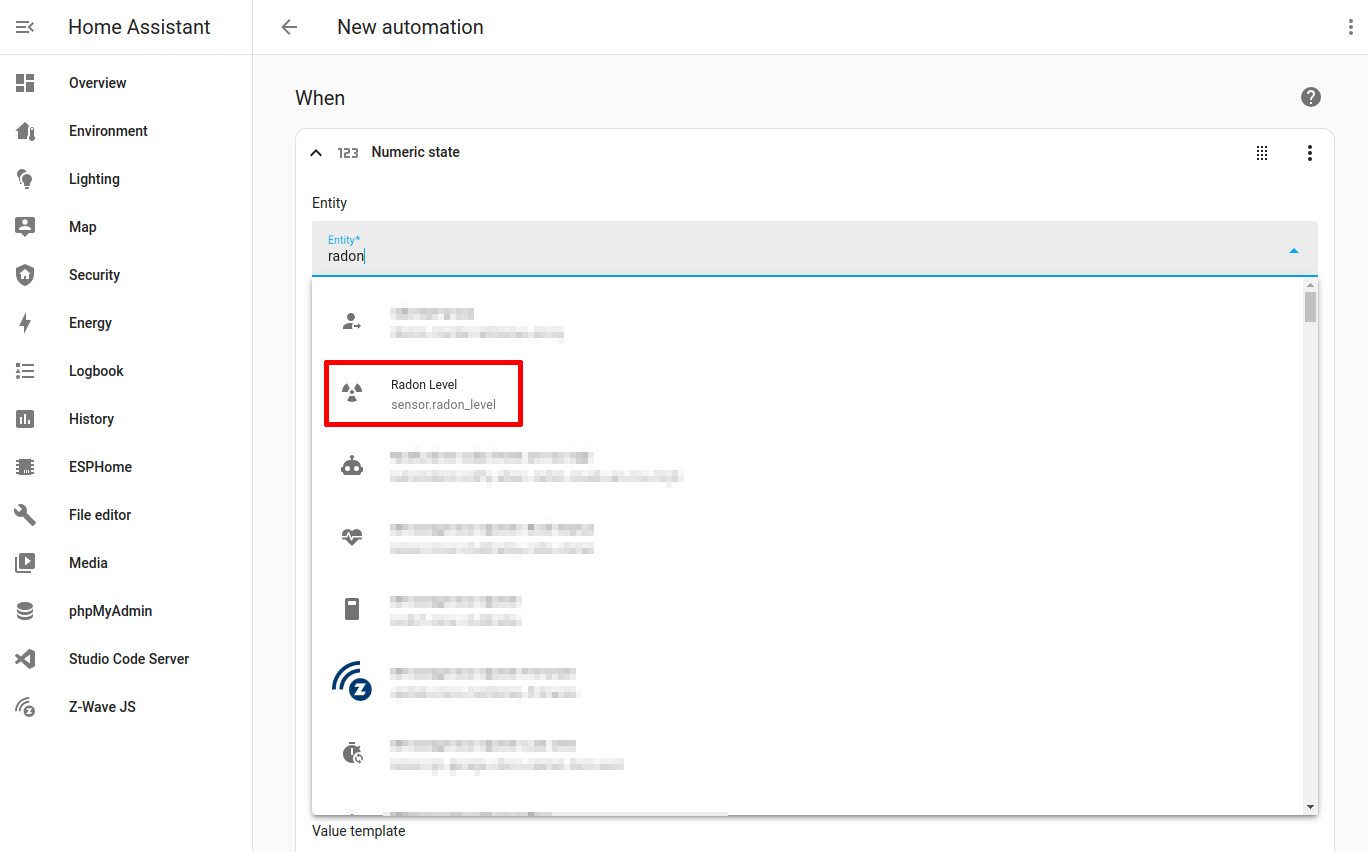
Search for the “Entity” named “Radon Level” (this is the name specified in the configuration.yaml file).
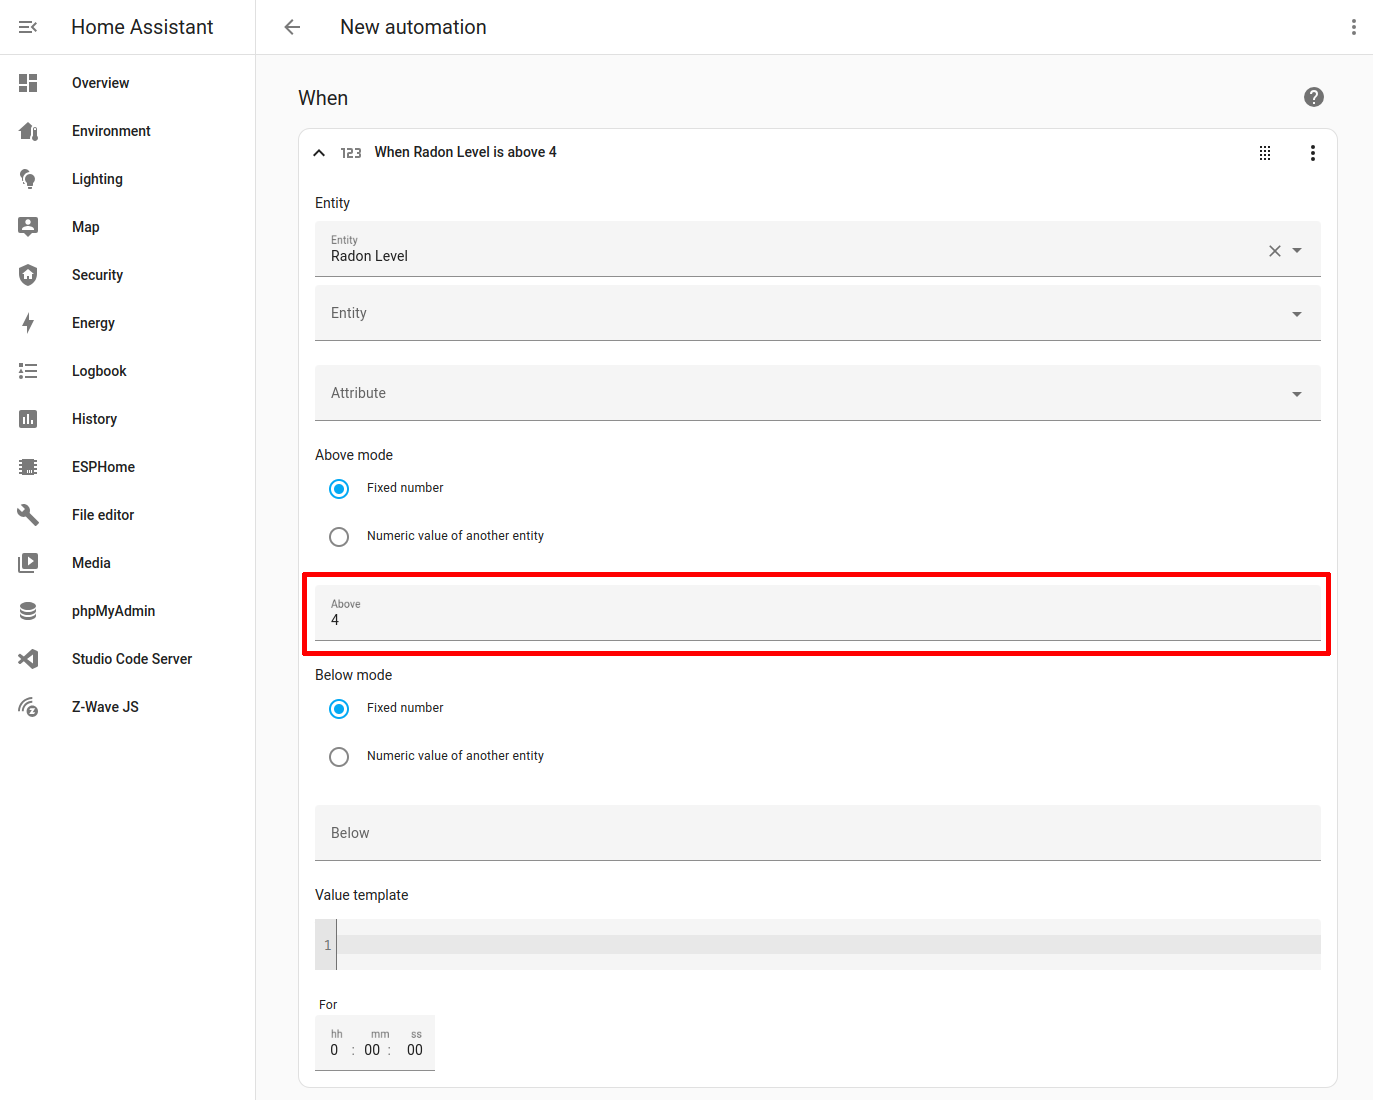
In the “Above mode” section, enter 4 as the value since that is the dangerous level of radon.
Note: You may want to set this value lower while you are testing the notification to ensure that it fires properly. Keep in mind that the current value must be below the level you are testing and then must go above that value in order for the notification to fire. For example, if the value is currently 2 but you set the level to test to 1, the radon levels must go below 1 and then later go above 1 for the notification to fire.
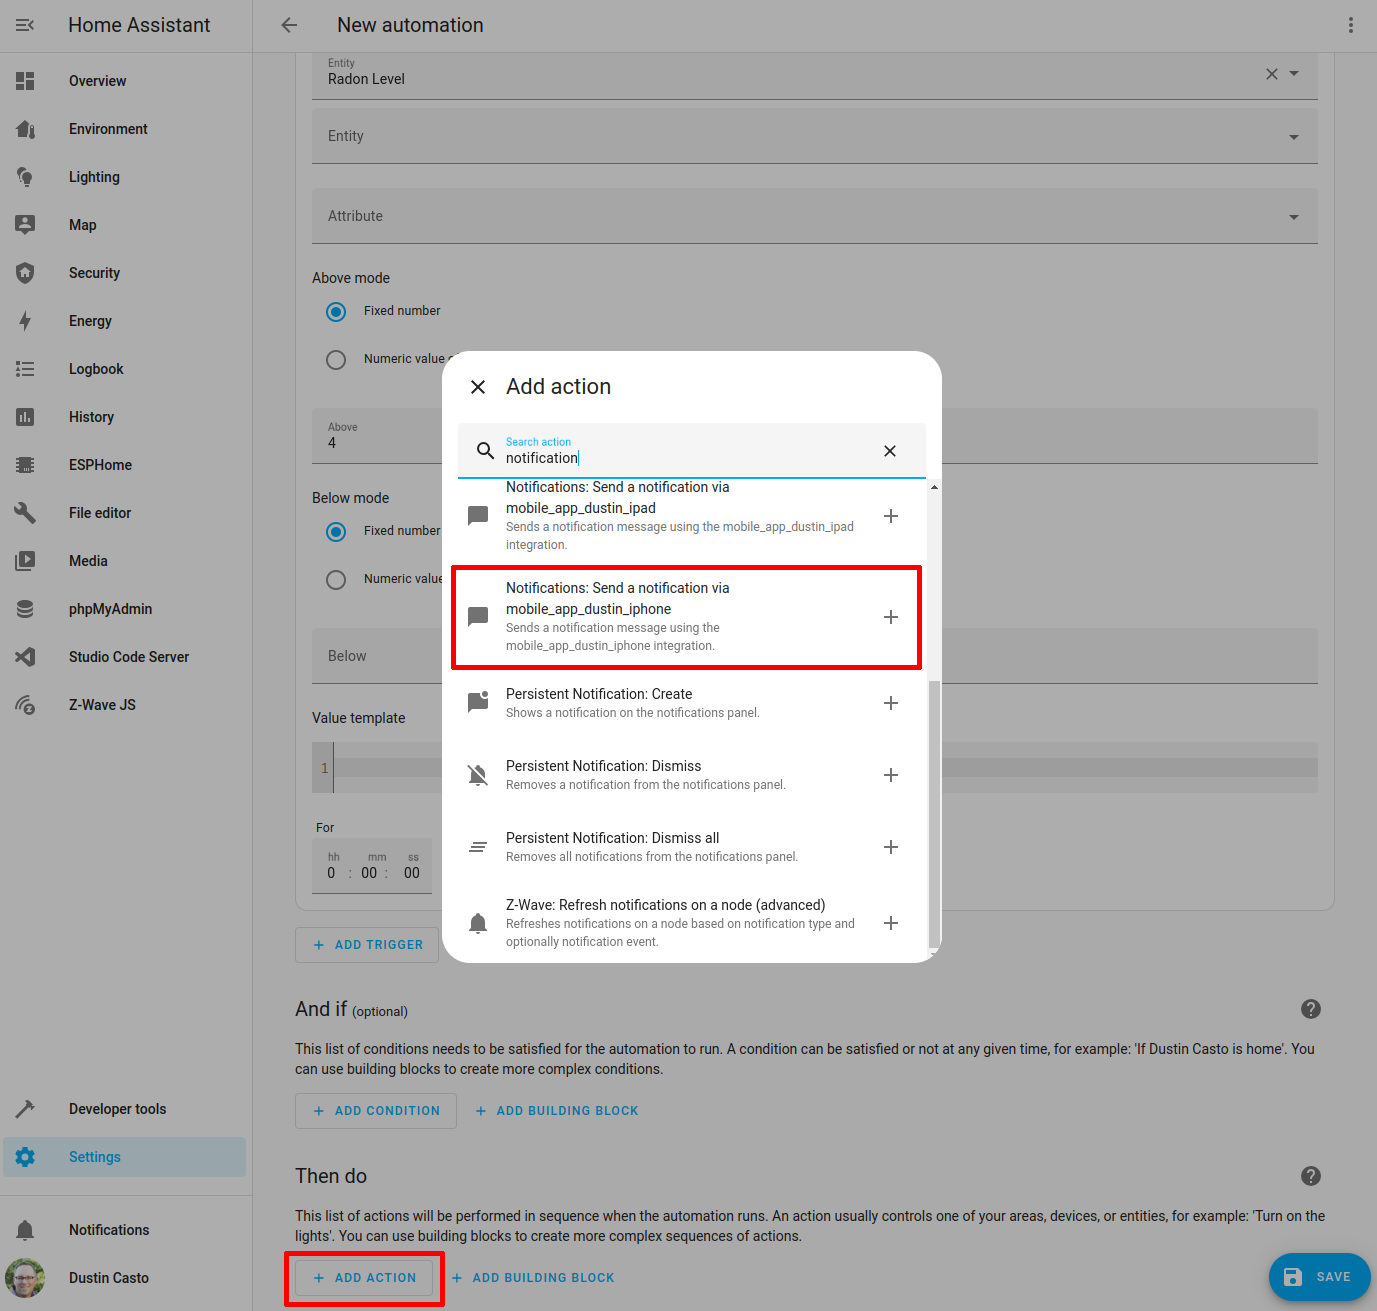
Finally, you can send a notification to one of your phones, for example, by clicking “Add Action” under the “Then do” section. Then search for “notifications” to find the option for the device you wish to send push notifications.
To send push notifications to your phone, you must have the Home Assistant app installed on your phone prior to setting up the notification.
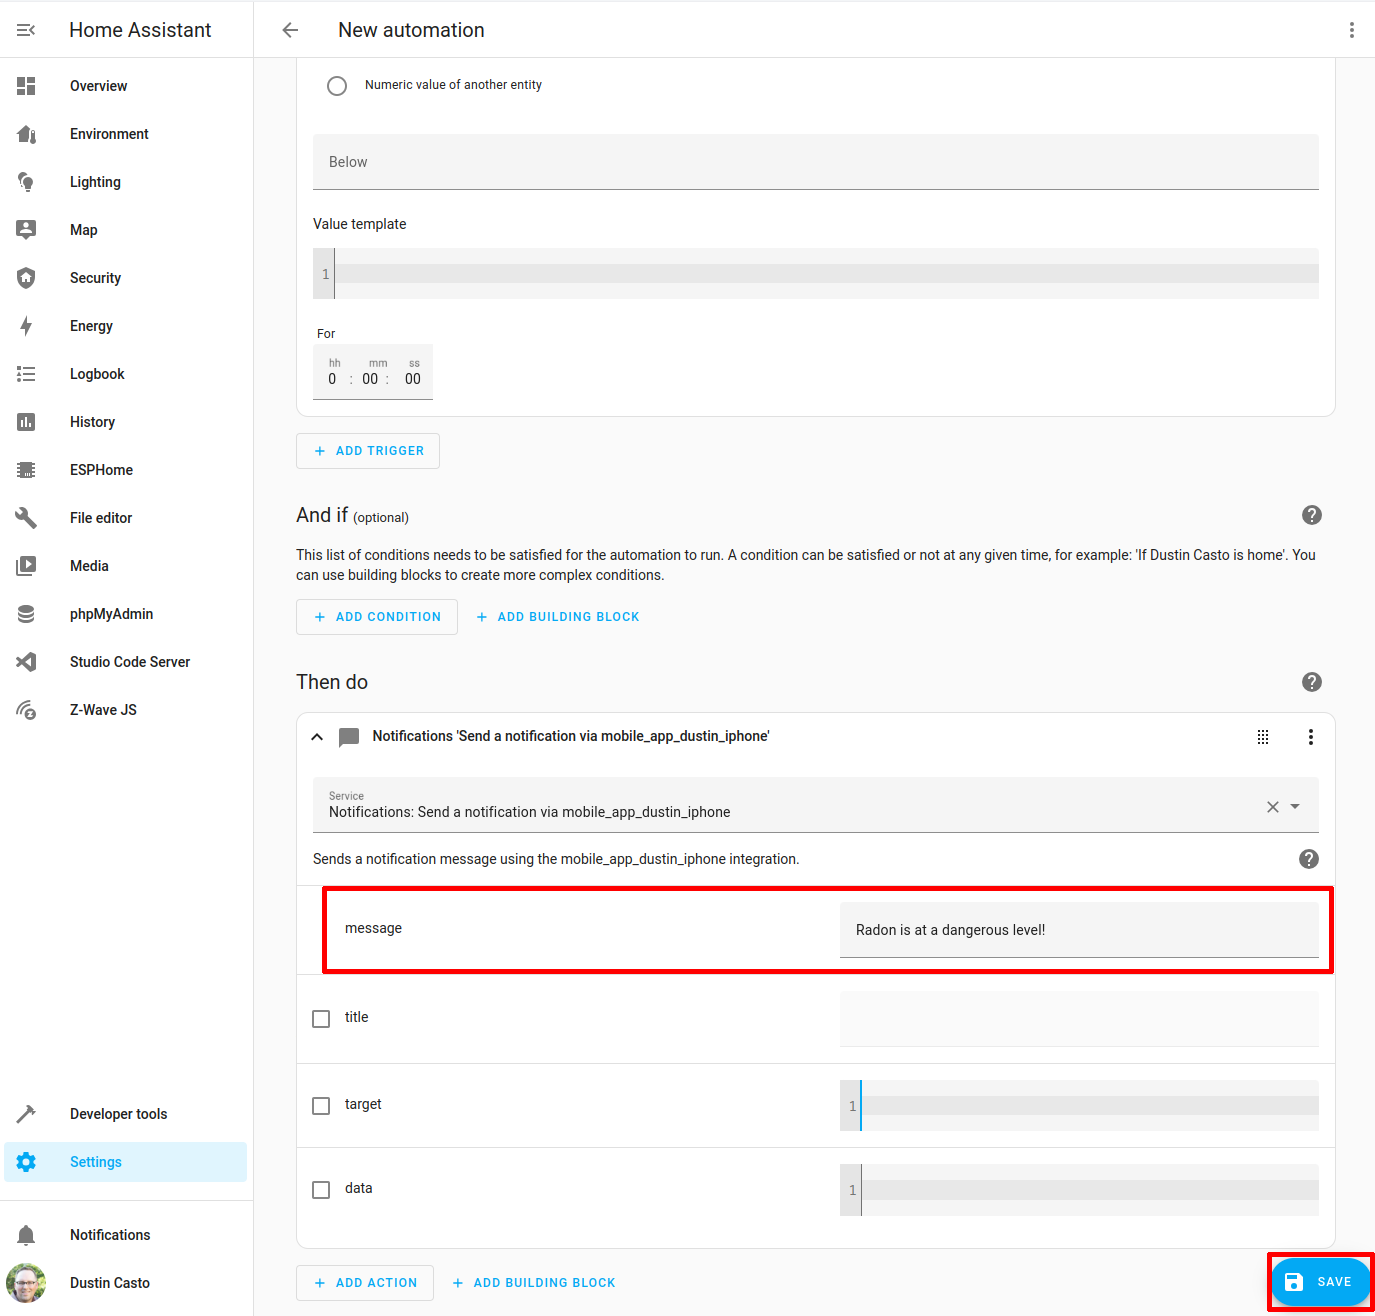
You may enter a descriptive message to send for the push notification such as “Radon is at a dangerous level!”.
Optionally, you may wish to add a notification if levels are between 2.7 and 4 since that is considered moderate levels according to the RadonEye sensor. You may combine this into a single automation by using trigger IDs and taking different actions based on the trigger ID.
Enjoy Monitoring Your Radon Levels
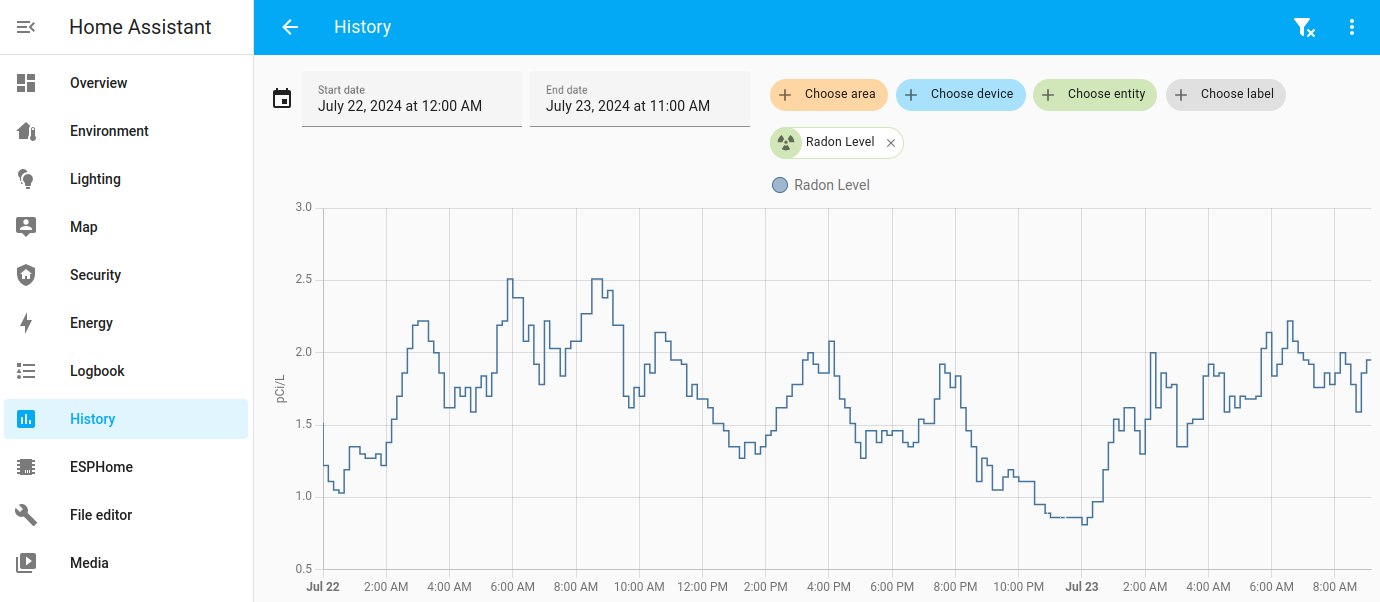
With everything set up, you should have a nice historical graph you may view from your Home Assistant dashboard! This should help give you some peace of mind knowing the radon levels are in a safe range.
Related Posts
Enable HTTPS using Let’s Encrypt in Home Assistant
In previous guides, I demonstrated how to set up encrypted connections for Home Assistant using either the Nginx Proxy Manager add-on or an existing Nginx Proxy Manager server on your network.
Read moreChamberlain myQ Alternative
On October 25th, Chamberlain released a statement about revoking 3rd party access to their myQ products. The called the access “unauthorized” but in reality the access was from customers who wish to use their purchased smart home product on their platform of choice such as Home Assistant.
Read more