
Create a Home Assistant Automation to Notify When the Laundry is Finished
If you have your washing machine plugged into a heavy duty appliance smart plug or you have energy monitors connected to your breaker panel, you may wish to receive notifications when your laundry is finished. The notification is helpful if your laundry machines are located on a different floor in your house or you happen to not be near them to hear when the laundry finishes.
Personally, I appreciate receiving the washing machine notification when I am working in my basement office since my laundry machine is located upstairs with the bedrooms two floors above me. This helps prompt me to switch the laundry over. If you have several children and have a need to do laundry more frequently, you will understand why it is important to change over the laundry in a timely manner.
I will demonstrate how to create an automation in Home Assistant to notify you when the washing machine is finished. For this guide, I am going to assume you have the Home Assistant phone app installed and logged into Home Assistant so that you will be able to receive push notifications on your phone. Home Assistant will create an entity for your mobile phone which can be used for push notifications and other purposes.
Note: You will need to fine tune this automation to meet your needs since the laundry cycles can vary between models.
Create Automation
To create a new automation, click on “Settings > Automations & Scenes > Create Automation”. Then choose “Create new automation” to start a new empty automation.
An automation requires a trigger. A trigger is what will cause the automation to begin. Once you create the trigger, you will need to add the action to perform once the automation is triggered.
Trigger: Power/Electric Consumption
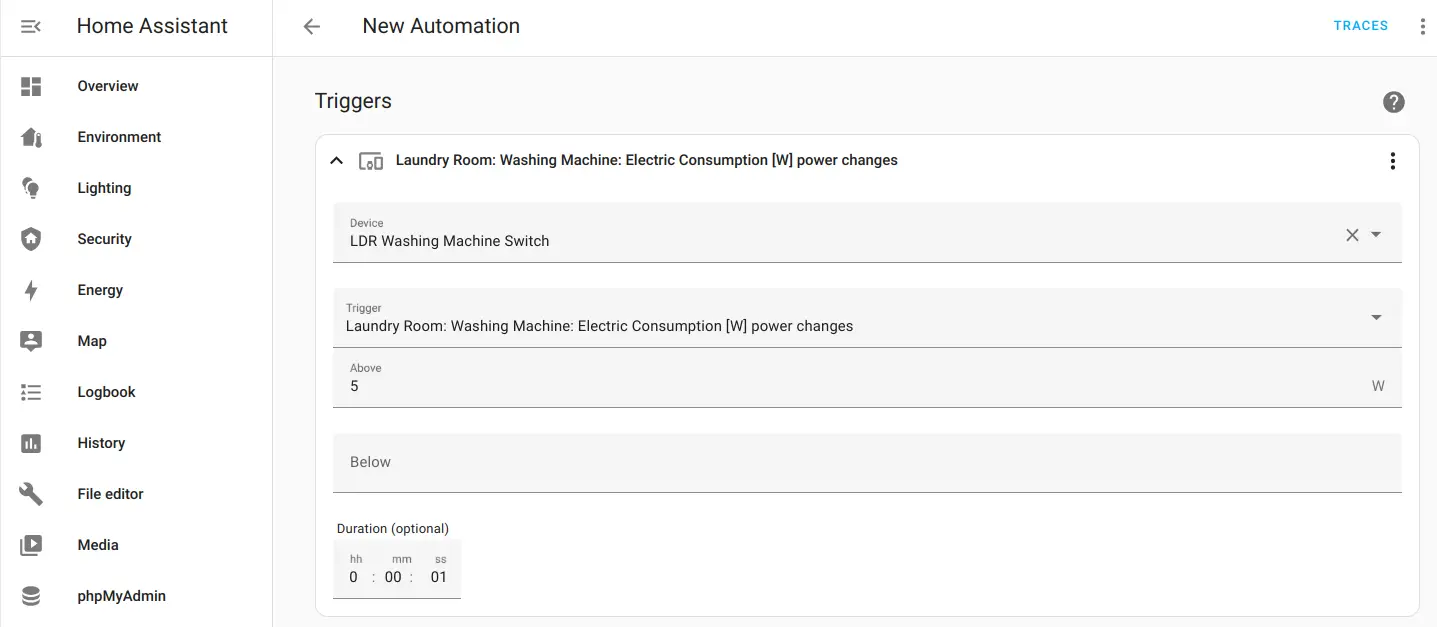
Click on “Add Trigger” to create a new trigger. Choose “Device” and then select the energy monitoring power switch from the “Device” dropdown box.
For the “Trigger” option, select something similar to “electric consumption [W] power changes”. The name of that trigger may vary based on your device.
Enter 5 in the “Above” box to indicate 5 Watts or higher will trigger the automation. You may need to tweak this if your device idles at a higher Wattage but hopefully your device is closer to 0 Watts when not being used.
For the “Duration”, you may want to set it to 1 second if you experience any power surges. On rare occasions, I have seen a random spike of power which will cause the automation to begin so adding the 1 second duration should be enough to prevent power spikes from triggering the automation.
Action: Wait for Power/Electric Consumption to Change
For this automation, you want to wait until the power goes below a threshold for a certain amount of time.
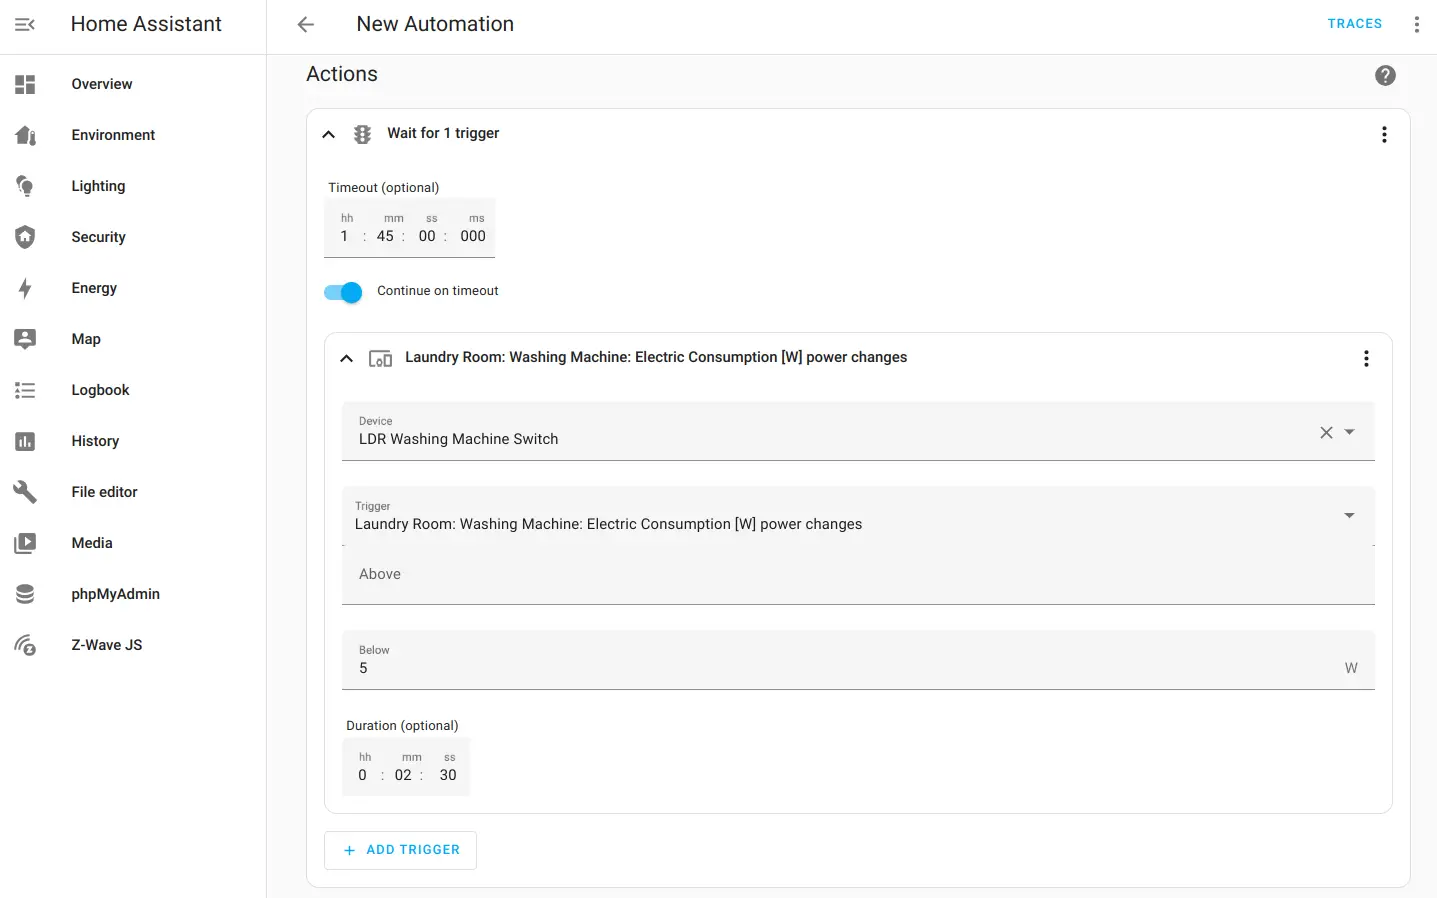
To define the action that should occur after the automation is triggered, click on “Add Action” and choose “Wait for a trigger” from the dropdown box. You should enter a “Timeout” that is as long as the maximum time it takes to run a load of laundry in case the smart switch stops responding or goes offline for some reason and it never reports a drop in power. This timeout is helpful to prevent the automation from longing for a very long or never stopping. Ensure that you have “Continue on timeout” enabled so the automation will still send the notification. I set the timeout to 1 hour 45 minutes in my example.
Click on “Add Trigger” and then “Device”. Select the power switch and choose the trigger “electric consumption [W] power changes”. Enter 5 in the “Below” box so that it will be triggered when the power drops below 5 Watts (you may or may not need to tweak this threshold).
For the “Duration”, enter a value slightly above the maximum amount of time between cycles on the washing machine. To know what this value should be, you can look at the power usage history when the washing machine is changing cycles. I thought 2 minutes was long enough, but I had one cycle take about 2 minutes 15 seconds. Keep in mind you want this value to be as close to the maximum value as possible because this will also be the soonest you will be notified that the laundry has finished. You will not be able to notified immediately when it is finished due to the fact that the power drops to near 0 Watts between cycles. However, 2.5 minutes after the laundry is finished is not that big of a deal in the grand scheme of things. Reliable and accurate notifications are more important.
You may have noticed that this trigger in the “Actions” portion of the automation is similar to the trigger that starts the automation but this time the trigger will be used to determine when to send the notification.
Action: Notification
After the first action of waiting for the power consumption to drop below 5 Watts for 2.5 minutes, the notification will be sent.
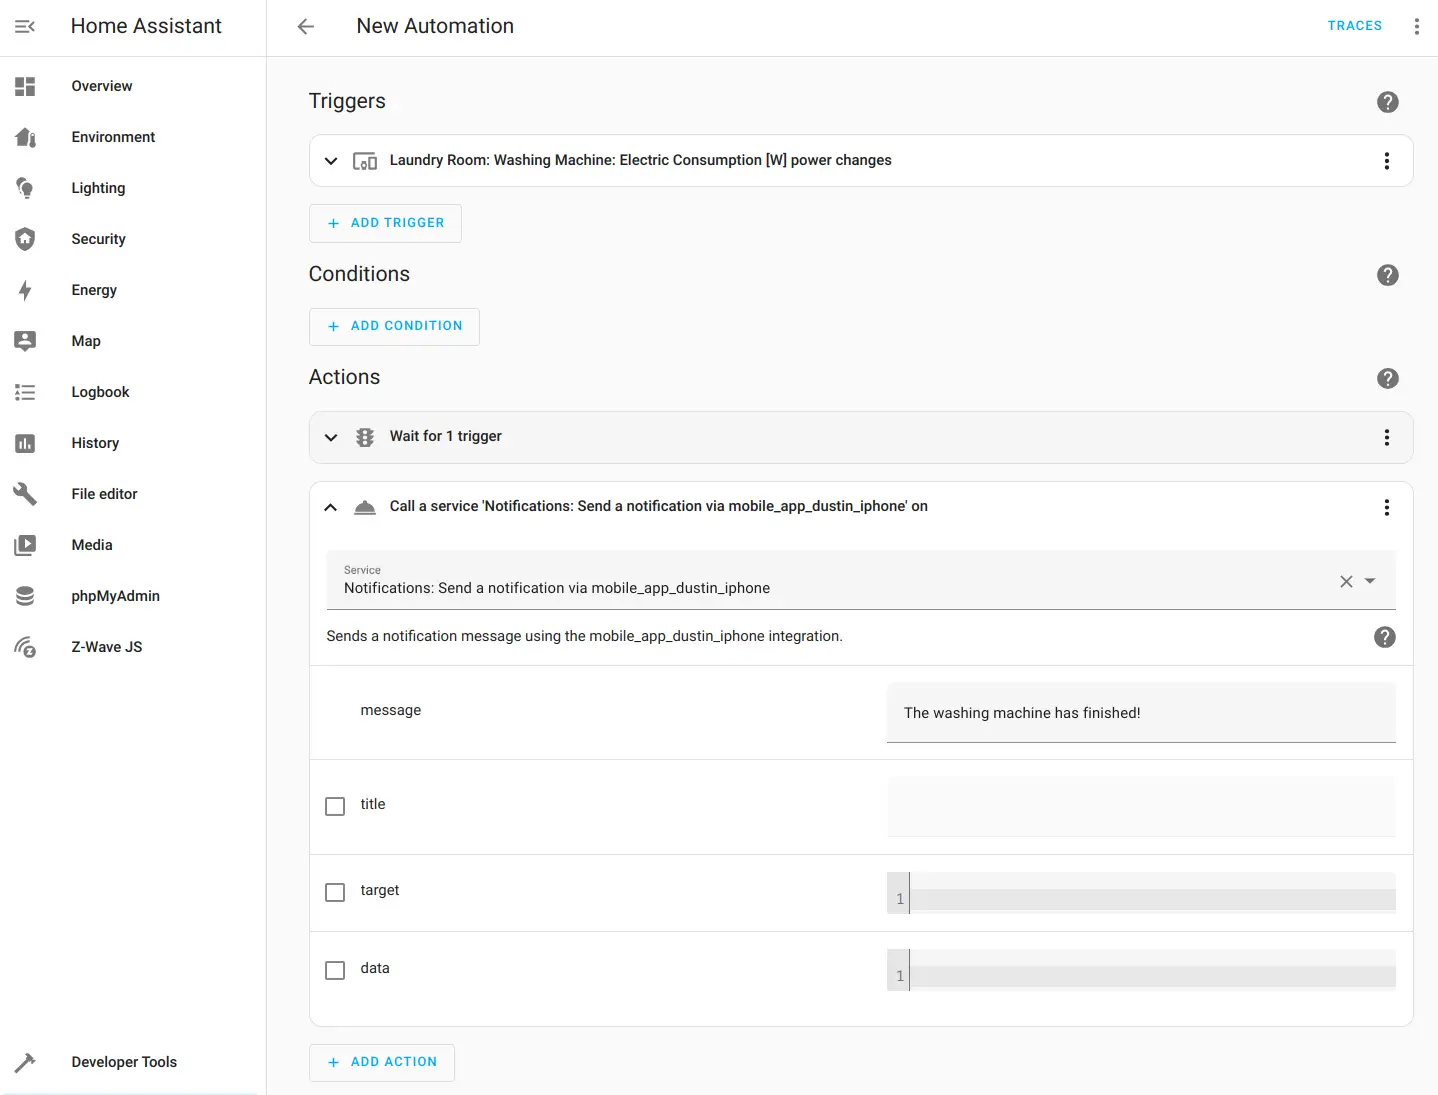
Add another action to send the notification. Click on “Add Action” at the bottom of the page to add a second action. Select “Call service” and select “Notification: Send a notification via mobile_app”. You may start typing “notification” to jump to this service call more quickly. Note that you will only see your phone in the dropdown list if you have set up the mobile app. Home Assistant will create a phone entity which you can use in automations.
Enter the “message” you want to receive such as The washing machine has finished!. You may also include a “title” as well.
Automation Mode
Typically, the default automation mode of single is fine for most automations since it only allows the automation to run one at a time (if a new automation is triggered during the automation, it will not start again until the first execution has finished).
However, when fine tuning my washing machine notification, I noticed that the automation would trigger multiple times while the washing machine was running because the power consumption would drop to near 0 Watts when switching to a new cycle and then go above 5 Watts again. All of those triggered automations would not start because of the mode being single and the original triggered automation was still running (since the duration would keep the original automation running between each cycle), which was ok.
However, what was not ok is that it was more difficult to troubleshoot issues when viewing the “Traces” page for the automation because it would display all of the automations that were triggered but canceled because the original automation was running. So to find the original trace, I would have to go back 5-6 traces.
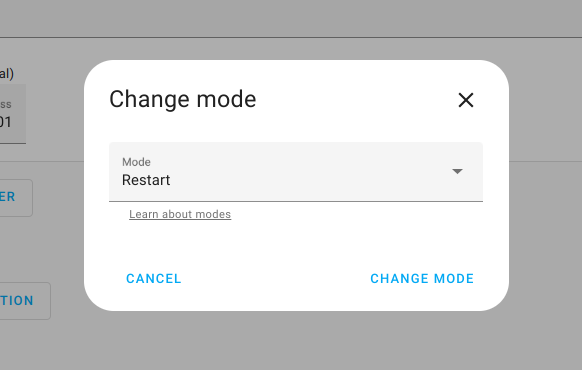
I decided to change the mode to restart because that means the latest trace will be the one which sends the notification because all previous executions of the automation were canceled since it essentially was restarted at the beginning of each washing machine cycle.
If you want to change the mode, click on the 3 dot menu at the top right corner of the “Edit Automation” page and click “Change mode”.
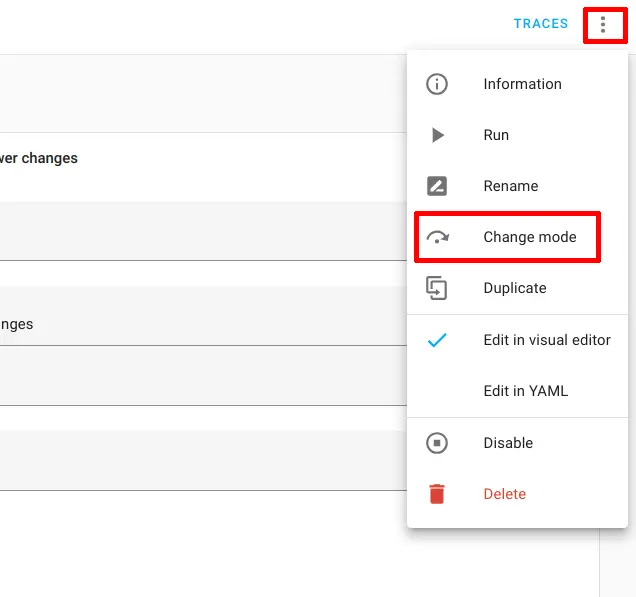
Then select the Restart mode. Click the “Change Mode” button.
Save the Automation
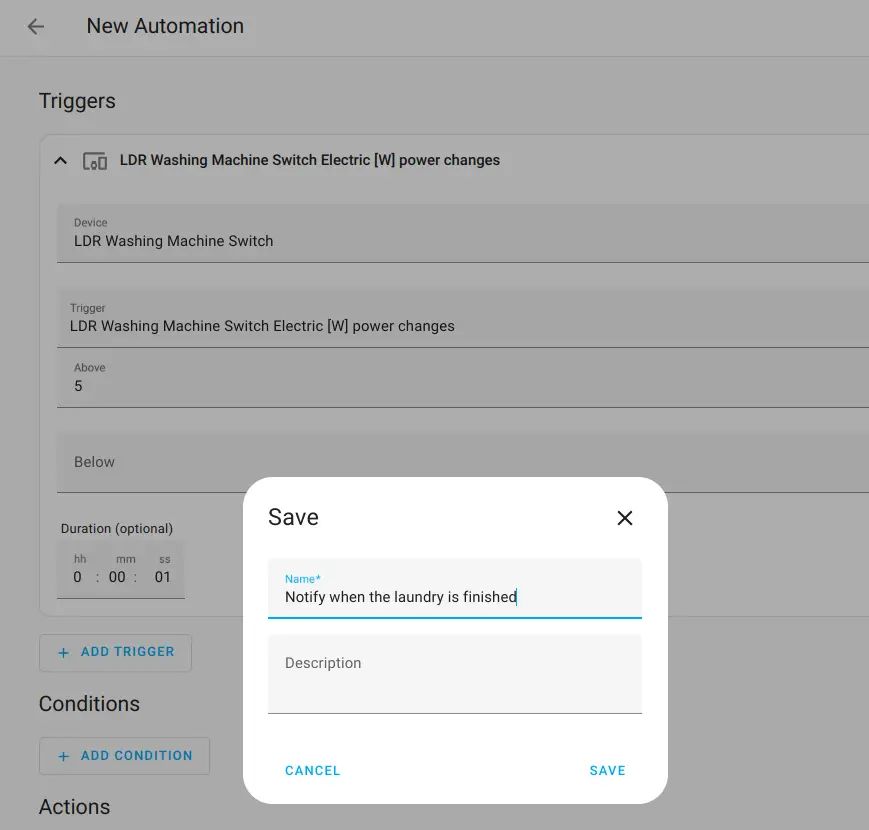
Finally, click the “Save” button at the bottom of the page. Enter a “Name” and an optional “Description” and click “Save” to save the automation.
Test Automation
Test the automation by starting a new load of laundry in your washing machine. You may watch if the automation is triggered by going to the “Settings > Automations” page and viewing the “Last triggered” date and time.
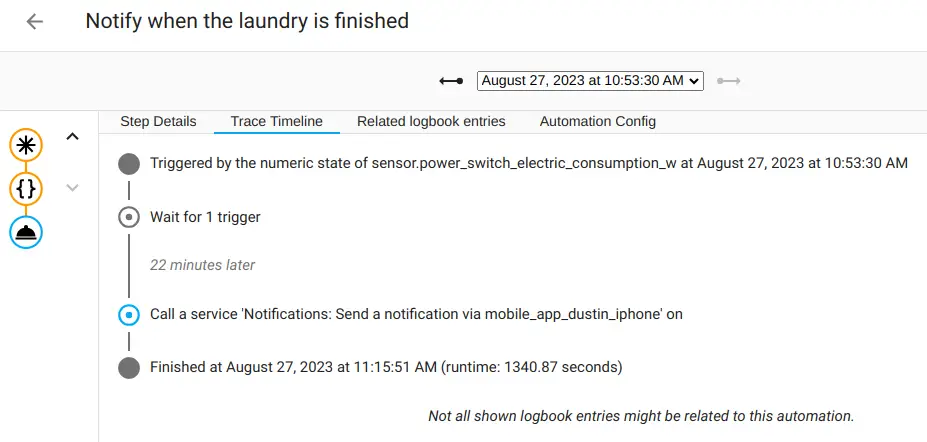
If you are encountering issues with your automation or you want to dig into what is happening during the automation in more detail, click on the 3 dot menu on the right side of the page for the laundry notification automation. Click on “Traces”. You will be able to see the step details when you click on each step. The trace timeline is also very helpful since it provides a describes of what is happening without all of the technical information, which is great for beginners but I also find it helpful because of the nice summary of what occurred during the automation.
With an automation such as this, you may find yourself tweaking it several times until you get it fine tuned to avoid any potential false notifications. Since washers/dryers have different types of cycles, you need to ensure you do not have the notification occur in between a cycle. The example I provided you may work well for you but you may need to tweak it to work better for your particular model of washer/dryer. I had to spend some time fine tuning to ensure the notification was accurate and reliable.
Once you get the automation fine tuned, you will love the convenience of your smart home devices notifying you when an event has occurred.
YAML Code
If you prefer YAML when creating automations, below is the YAML code generated by the web interface. You will, of course, have to use your own device and entity IDs:
alias: Notify when the laundry is finished
description: ""
trigger:
  - type: power
    platform: device
    device_id: b1e1486bac6287b383184cf92dad63af
    entity_id: sensor.power_switch_electric_consumption_w
    domain: sensor
    above: 5
    for:
      hours: 0
      minutes: 0
      seconds: 1
condition: []
action:
  - wait_for_trigger:
      - type: power
        platform: device
        device_id: b1e1486bac6287b383184cf92dad63af
        entity_id: sensor.power_switch_electric_consumption_w
        domain: sensor
        below: 5
        for:
          hours: 0
          minutes: 2
          seconds: 30
    timeout:
      hours: 1
      minutes: 45
      seconds: 0
      milliseconds: 0
  - service: notify.mobile_app_dustin_iphone
    data:
      message: The washing machine has finished!
mode: restart
Related Posts

Create a Home Assistant Automation to Control a Bathroom Fan When Humidity is High and Auto-Shutoff Timer
Automating a bathroom fan based on humidity levels is a common task you may want to do with your smart home devices.
Read more
Use MariaDB instead of SQLite Database in Home Assistant
By default, Home Assistant uses a SQLite database to store all its historical data. However, you can use other databases such as MariaDB which perform better for larger datasets even though MariaDB is is heavier on hardware resources than SQLite.
Read more
How to Set Up Nginx Proxy Manager in Home Assistant
If you wish to have secure connections to Home Assistant, a reverse proxy may be used. The proxy can reside on the same system (as demonstrated in this guide) or on another system as I have demonstrated in a previous guide.
Read more