How to Put Home Assistant behind Existing Nginx Proxy Manager
A reverse proxy allows you to conveniently have a single entry point by which you may host multiple apps/services on one or more systems. Reverse proxies offer several benefits which you may wish to read about if you are unfamiliar. In your home network, you may already be running a reverse proxy such as Nginx Proxy Manager (NPM) on a different system, virtual machine, or container than your Home Assistant installation. Therefore, you may find it more convenient to add Home Assistant behind your existing NPM to secure communication to the web interface.
Many tutorials demonstrate the process on the same system using the Nginx Home Assistant Proxy SSL add-on and a Let’s Encrypt certificate or the community add-on for Nginx Proxy Manager. However, if you already use NPM for other services on your network, you can leverage the one you already have deployed so you can manage the Let’s Encrypt certificates from a single location. In my network, I use a single NPM instance to serve both local and external facing services. I am able to restrict local apps such as Home Assistant to only being accessible internally in NPM using access lists.
In this guide, Home Assistant will be using the default installation which only includes HTTP (unencrypted) access. Users will connect to the reverse proxy which will provide the secure HTTPS connection. To have better security you can use HTTPS on the backend servers as well but to keep things simple, you can leave the backend services as HTTP. You will want to ensure your HTTP service(s) such as Home Assistant are on a trusted network (intruders could still get into the network and cause problems). If you have more advanced networking knowledge, you could put your services on their own isolated network and force all connections through the reverse proxy. That could help improve security and may help contain any malicious activity to a small portion of your network.
Set up the Proxy Host in Nginx Proxy Manager
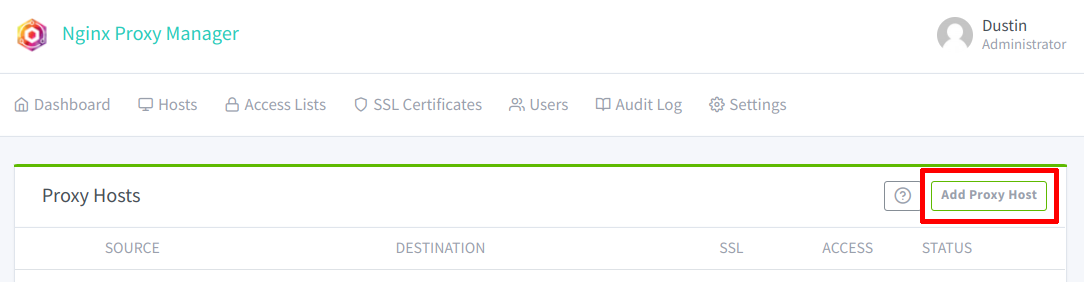
On the “Dashboard” of NPM, click on the “Proxy Hosts” section to open the “Proxy Hosts” page.

Then click on the “Add Proxy Host” button in order to add a new host.
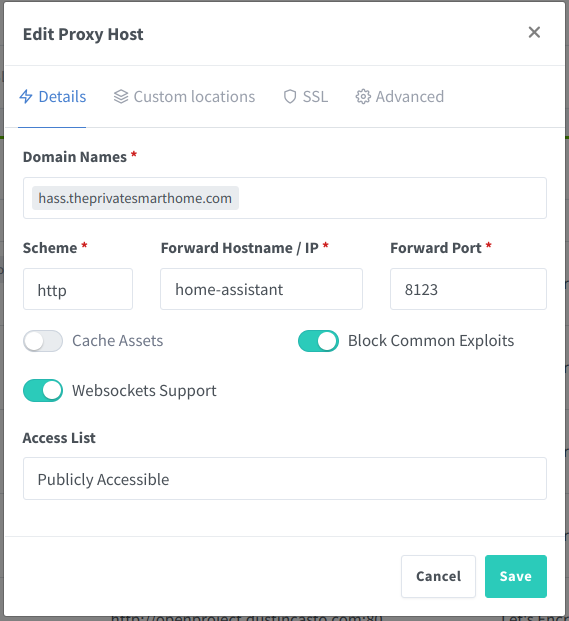
Enter the host/domain name(s) that you are using to access Home Assistant on your network in the “Domain Names” box. This host/domain name needs to be different than the hostname of your Home Assistant server (if you wish to access both by the hostname). You will need to configure a DNS record on your router for the new hostname used to access Home Assistant via HTTPS. Ror a router running OPNsense, for instance, you could add a Unbound DNS override for the hostname using the IP address of the reverse proxy. The DNS record should use the IP address of the reverse proxy so that all clients on your local network can access Home Assistant through the reverse proxy. In the example below, I am using hass.theprivatesmarthome.com so I would create a DNS override for the hass hostname and theprivatesmarthome.com domain name that would use the IP address of the reverse proxy.
If you are only accessing Home Assistant on your internal network (which I recommend for security concerns), you can simply use the hostname such as hass instead of a fully qualified domain name (FQDN) such as hass.theprivatesmarthome.com. If you plan to access Home Assistant without a VPN (please understand the security implications of this), you will have to use a FQDN for the “Domain Names” and have your external IP address configured with your DNS registrar (possibly using a dynamic DNS client if you have a dynamic IP address assigned by your ISP).
For the “Scheme”, “Forward Hostname / IP”, and “Forward Port”, you just need to enter the standard HTTP URL used to access Home Assistant once it is installed. You can enable “Block Common Exploits” and “Websockets Support”. While I do not normally enable “Cache Assets” on my reverse proxy, you could try it out if you believe it could help with performance. I tend to not worry about it since I do not have a lot of traffic hitting my services, and I am afraid that caching could interfere with pages not refreshing properly due to loading older cached assets (I have not tested this theory, but I am basing it on experience with caching in general).
For the “Access List”, it will default to “Publicly Accessible”. If you have your reverse proxy exposed externally on your network, you may want to consider creating a “Local Access” list if you wish to prevent certain services from being accessed from outside your home. Otherwise, if the proxy is not exposed externally, leaving it as “Publicly Accessible” is fine because it is not actually accessible outside your network since you have not opened access.
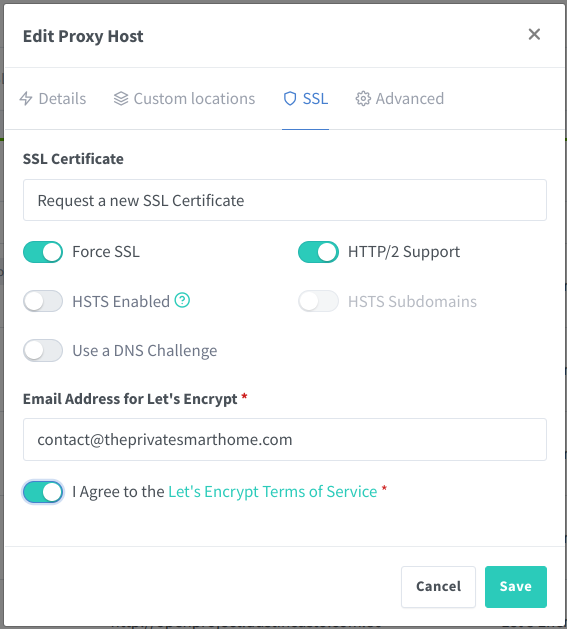
You will need to configure the SSL settings on the “SSL” tab so that you can have encrypted communication to the reverse proxy that is available on your network. If you do not have a certificate for the Home Assistant host/domain name yet, you can select “Request a new SSL Certificate”. The default HTTP challenge for requesting a certificate is the most simple, but it requires you to open port 80 to your reverse proxy. To avoid doing that, you should select “Use a DNS Challenge” and select your DNS provider along with other information such as the API key.
Using a DNS challenge also has the added benefit of being able to issue wildcard certificates. I make use of that so that I do not have to create a certificate for each subdomain I use for each hosted service on my network. Whenever I add a new service, I can simply select the wildcard certificate and I am good to go!
Select “Force SSL” to ensure clients always use the encrypted connection. “HTTP/2 Support” can help make web requests more efficient and faster. If you want the maximum level of security, you can enable HSTS, but you should be careful with that option if you plan to host multiple services under your domain name. I had issues in the past where it would lock me out of certain services because I was trying to host or access them differently. I had to manually clear out the HSTS cached settings in the web browser in order for me to access the webpage again.
Once you have created the proxy host, you will need to make a small configuration change to Home Assistant to allow the proxy to function properly.
Edit the Home Assistant Configuration.yaml File
Now that the proxy host has been set up in NPM, you need to configure Home Assistant to trust connections coming from the reverse proxy. If you are new to Home Assistant or prefer to configure as many things as possible from the user interface, you should install the “File Editor” add-on from the official add-on store since it will allow you to easily browse and edit the Home Assistant configuration files.
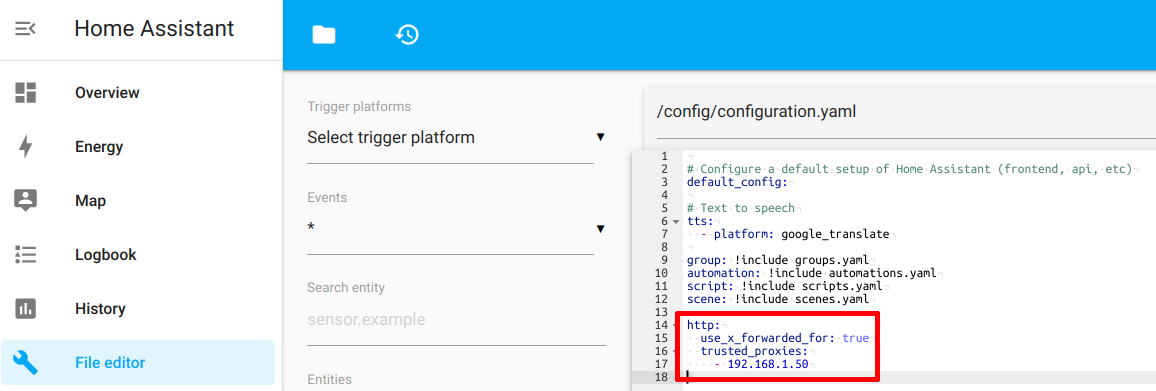
You will need to edit the configuration.yaml file to add the following configuration. Substitute the IP address for the IP address used by your reverse proxy (your proxy should have a static IP address configured):
http:
  use_x_forwarded_for: true
  trusted_proxies:
    - 192.168.1.50
If you use the “File Editor”, you can see what it looks like in the screenshot below:
Once you have saved the changes to the configuration file, you need to reboot your Home Assistant.
Access Home Assistant with Your New HTTPS URL
If all goes well, you should be able to access your Home Assistant via HTTPS using the hostname you entered in Nginx Proxy Manager. In my example, the URL will be: https://hass.theprivatesmarthome.com. Note that you no longer need to use port 8123 and your connection is now encrypted. One of the nice features of reverse proxies is the fact you can use the standard port 80 and 443 for HTTP and HTTPS connections regardless of the default port number used by your service. If you were hosting multiple services on the same system without a reverse proxy, you would have to use a different port number for each service so they do not conflict with one another.
Related Posts

Add the Community Add-on Repository in Home Assistant if it is not Installed
When I was updating the Home Assistant Core, I encountered an interesting issue. It broke my Z-Wave JS to MQTT add-on.
Read more
Create a Basic Automation in Home Assistant
When you have Home Assistant running with at least one smart device configured, you are ready to start creating automations! Automating tasks in your home is one reason to create a smart home.
Read more
Set up Z-Wave in Home Assistant
Once you have a fresh Home Assistant installation up and running, you will likely want to dive into configuring your smart home devices.
Read more